
Example: SAML Based Authentication with Microsoft Active Directory (AD)
The following example describes how to enable SAML based authentication in Axonius with Microsoft Active Directory AD. The step-by-step example below uses Windows Server 2016, but the same logic can be applied to other versions of Microsoft Active Directory (AD) as well.
Note
Microsoft updates their UI from time to time. The location of fields on their pages may be different than described here.
To download the metadata file from the Axonius SAML instance:
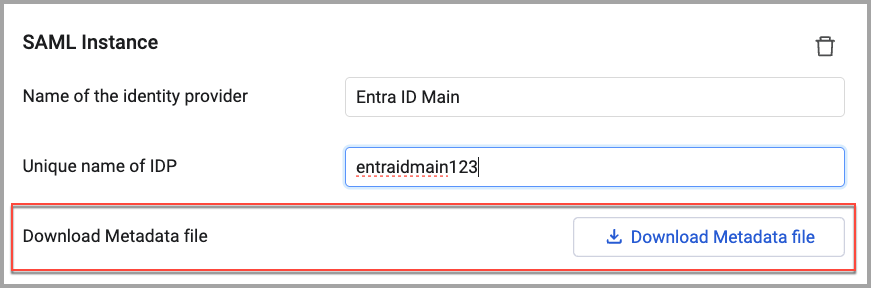
- Configure the following settings for each SAML instance. Learn about Using Multiple SAML Providers.
- Name of the identity provider (required) - If your identity provider supports metadata URL parsing, you can use the link to automatically fill in some details. If it doesn't, fill them manually in the Name of the identity provider field. Note that the name of the identity provider can be any string you like; It is used only to identify the identity provider within Axonius.
- Unique name of IDP (required) - A unique name for the identity provider that cannot be changed after it is saved. This name must be added to the SSO provider when creating the connection. The IDP name:
- Cannot contain spaces, hyphens, or a long word.
- Can be up to 10 characters and may contain numbers.
- Examples: AxSSO00001, AxLogin001, AxAzure001
IDP Note
After configuring this option and saving, the IDP field will become inactive and cannot be changed. The option will appear in the list of available identity providers for the user. The IDP must be added to paths.
- Click Save at the bottom of the page to save the instance.
- Click Download Metadata file. The file is downloaded to your local Downloads folder.
In Microsoft AD:
- Log in to an Active Directory server as an administrator, and open the Active Directory Federation Services (AD FS) management tool. Click "Relying Party Trusts" and then "Add Relying Party Trust".
.png)
- Select "Claims Aware" and click "Start"
.png)
- Select "Import data about the relying party from a file" and select the metadata file. Then click "Next".
.png)
- Specify a display name for the application and click "Next".
.png)
- Choose an access control policy and click "Next".
.png)
- Click "Next" and Close.
.png)
- From the list of Relying Party Trusts, select the relying party trust we just created. Make sure that it is enabled, and then right click it and select "Edit Claim Issuance Policy".
.png)
- Click "Add Rule" and select the "Send LDAP Attributes as Claims" template, then click "Next".
.png)
- Fill in the details to send Axonius the id, first name and last name of any user that will sign in. Then, click "Finish" and "OK".
.png)
- Log in to Axonius as an administrator, navigate to System Setting Categories/Subcategories pane->GUI->Login, and Enable SAML based logins. Use the metadata URL for your domain:
https://[[ADFS server name]]/FederationMetadata/2007-06/FederationMetadata.xml
Updated 9 months ago
Did this page help you?