
Creating a Case Set
The following sections describe how to access the Create a Case Set wizard and create a Case Set. For general information about Case Sets, see Case Sets.
Accessing the Case Set Wizard
You can initiate the Create a Case Set wizard (opens on Select Assets tab) from various locations within Axonius:
-
From the Case Sets page, navigate to Case Management
>Case Sets and click Create Case Set. -
From the Create Case drawer, click Advanced Options.
Accessing from Enforcement Actions
- From Enforcement Actions:
- For a Create Incident or Ticket (category) enforcement action, in the Select Action tab, click Link with a Case.
- For a Create new case enforcement action, in the Select Action tab, click Link with a Ticket.
Accessing from Monitoring
- From Monitoring:
- Run the Create Case action on a selected rule in the Rules table. See Creating a Case from the Findings Center.
Accessing from Workflow Actions
- From Workflow Actions:
- For a Create new case Workflow action, in the Action Setup pane, click Link with a Ticket.
- For a Create Incident or Ticket Workflow action, in the Action Setup pane, click Link with a Case.
Creating a Case Set
The Create a Case Set wizard guides you through the following steps:
- Step 1 - Select Assets - Choose the assets for the Case Set and optionally assign a unique name and description.
- Step 2 - Configure Case - Create and configure an Axonius Case to handle the ticket(s) created in the Configure Tickets step.
- Step 3 - Configure Tickets (optional) - Select and configure a Create Incident/Ticket Enforcement action to open tickets with the desired third-party vendor.
- Step 4 - Add Actions (optional) - Select and set up follow-up actions to occur after the Case and ticket creation.
- Step 5 - Schedule Plan (optional) - Schedule a one-time or recurring run of the Case Set based on your desired schedule plan.
- Step 6 - Additional Conditions (optional) - Set any additional conditions for triggering the Case Set.
Note
Axonius auto-fills fields with default values where possible. Required fields are marked with an asterisk (*).
Step 1 - Select Assets
In this step, Select Assets, you define which assets the Case Set applies to, similar to how you select assets for an Enforcement Set. This is where you define the scope of the Case Set, determining which assets the automation will monitor and act upon.
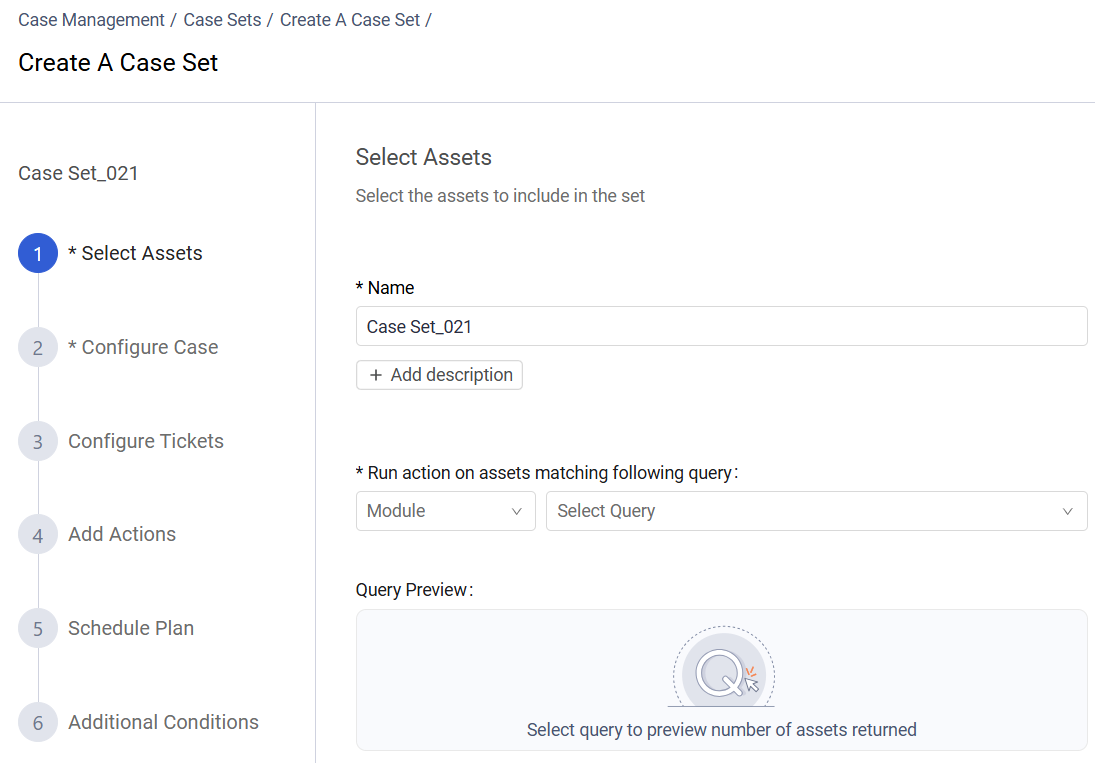
Required Configuration
You must select the asset type (for example: Devices, Users, Software) and the specific query that identifies the assets needing remediation or action.
Optional Configuration
When defining the assets, you can also set identifying details for the Case Set itself.
- Assign a unique, custom Name to your Case Set for better identification, replacing the default name (for example:
_Case Set_nnn_). - Provide a description for your new Case Set by clicking + Add description and in the box that opens, typing a Description.
Note
Once the Case Set is saved, you cannot modify its name or change the asset type (e.g., Devices, Users, Software) that the query runs on.
After you select the asset type and query, the Query Preview automatically displays:
The Query Count - the number of assets that meet the query criteria.
The ratio of matching assets Out of Total number of assets.
If the configured query currently yields zero results, the Case Set can be saved. However, no Case Set will be created until assets matching that query appear in the system.
Step 2 - Configure Case
In this step, Configure Case, you create and configure a Case to handle the ticket(s) created in the Configure Tickets step of the Case Set.
The Required Fields and Additional Fields for Cases in Binging Sets are similar to those for standard Cases. In Case Sets, these fields are organized into tabs, whereas the Create Case drawer presents these fields on one screen. Learn how to fill in these Case fields.

Step 3 - Configure Tickets
In this step - Configure Tickets, select the third-party vendor where tickets will be created and configure its fields. You can optionally link tickets to the Case. To do so, enable Link ticket to the case.
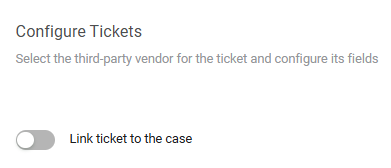
After this option is enabled, select an existing Create Incident or Create Ticket enforcement action. Then, configure its Required Fields and optionally, its Additional Fields. Any new tickets generated by the selected third-party Enforcement Action will be automatically associated with the Axonius Case.
Note
For Enforcement Actions that create a ticket per asset, multiple tickets may be created per Case. For others, a single ticket is created per Case.
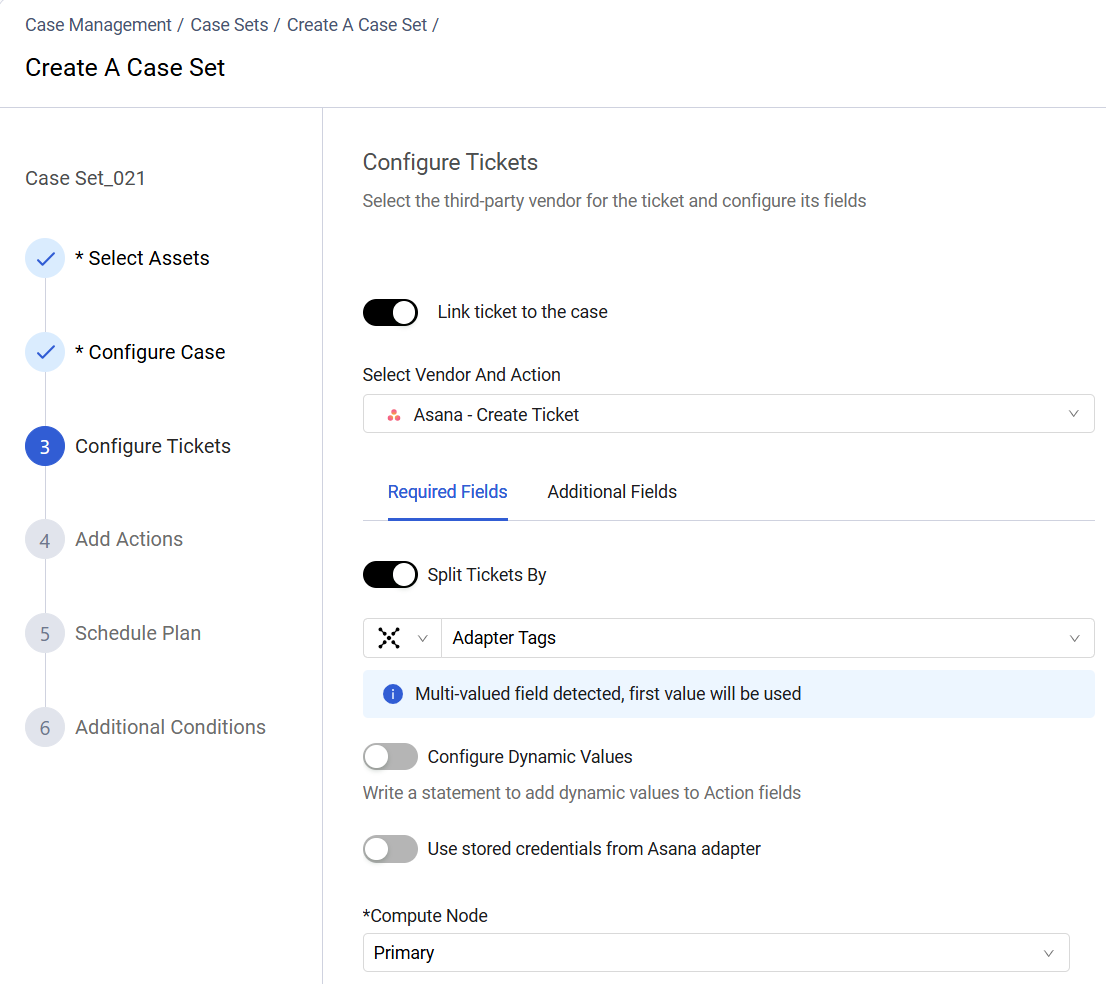
To configure a third-party vendor for the ticket and configure its fields:
-
From the Select Vendor and Action dropdown, select an enforcement action that opens tickets at your desired third-party vendor.
-
The Required Fields tab appears, and one or more tabs appear next to it for additional optional fields per category. If there is only one category, the next tab is labeled Additional Fields. The fields displayed depend on which ticket vendor is selected.
-
In the Required Fields tab, the fields displayed depend on the selected ticket vendor. You can set the following:
-
Split Tickets By (default: disabled) - Enable this option to create separate tickets based on the value of a specific asset field. First, click the adapter icon to select an adapter (or Aggregated) from the drop-down list. Then, click the Select Adapter Field box to choose the field used for the split. This can be used in conjunction with Configure Dynamic Values.
Note
- The Split Tickets By option appears only in ticket creation actions, and does not appear for ticket-per-asset creation or ticket update actions.
- For assets containing multiple values, the system uses only the first value to perform the split.
-
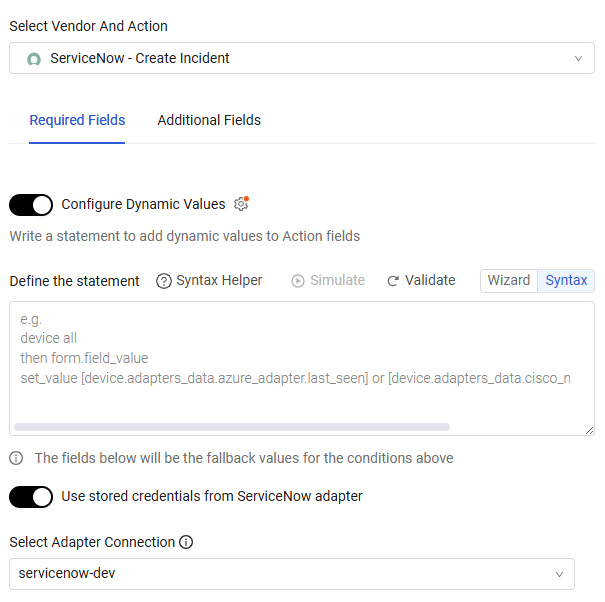
If you want to configure dynamic values for this action, enable Configure Dynamic Values and Define the statement using the Dynamic Value Statement Wizard or the Syntax Helper with Autocomplete feature(the default; see screen below). For more details on statement syntax, refer to Creating Enforcement Action Dynamic Value Statements.
-
If you want to use stored credentials from the adapter associated with the Enforcement Action, toggle on Use stored credentials from adapter-name adapter.
-
-
Fill in the remaining Required Fields for the Main Action. To learn more about each Enforcement Action and its required fields, see About the Enforcement Action Library.
-
Click each additional tab and provide values for the optional fields that you want to use under that tab. For details on each field of every Enforcement Action and its required fields, see About the Enforcement Action Library.
Step 4 - Add Actions
Select a follow-up action to occur after the Case Set creation. For information about configuring follow-up actions, see Adding Follow-Up Actions and Workflows.
Note
- When a Case Set is run, any future actions or event occurrences defined in the set are attached to the resulting case as planned activities. These planned actions remain associated with the case even if the parent Case Set is later modified or deleted.
- When you define follow-up actions in a Case Set, these actions are attached to every case created by that set, and remain independent. If you later delete the Case Set, any cases already created will still attempt to perform their scheduled follow-up actions unless they are manually terminated in the Run History (see Viewing Case Set Run History).
Step 5 - Schedule Plan
Axonius supports scheduling a Case Set to run at specified times and under certain conditions. Scheduling criteria are available in step 5 of the wizard, Schedule Plan.
The scheduling criteria for Case Sets are similar to those for Enforcement Sets. Learn more on how to configure each schedule plan.
Step 6 - Additional Conditions
In this step, Additional Conditions, you can set further conditions for triggering the Case Set. You can add as many conditions as required.
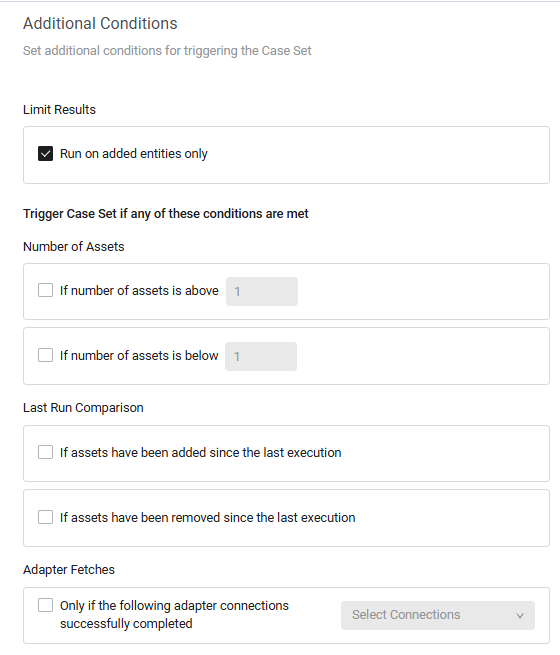
The additional run conditions for Case Sets are similar to those for Enforcement Sets. Learn more about how to configure additional run conditions.
Updated 10 days ago