
Creating Enforcement Sets
The Action Center allows you to actively control your asset environment. Use it to build and apply policies and create triage and remediation actions. Enforcements may be automated or run manually. The following procedure describes how to create a new Enforcement Set using the Create Enforcement Set button.
Note
You can also create a new Enforcement Set by:
- Duplicating an existing Shared Enforcement Set, and then modifying it, as required.
- Saving a Predefined Enforcement Set as a New Enforcement Set, and then modifying it.
To create an Enforcement Set
-
In the Enforcements page, click Create Enforcement Set. The Create Enforcement Set drawer opens with the Select Assets tab open. The Enforcement Set configuration is divided into four tabs: Select Assets, Select Action, Select Schedule, and Enforcement Set Name.

Note
Axonius auto-fills fields with default values where possible. Required fields are marked with a * next to the field name.
- Select the assets that the Enforcement Set should run on.
- Select the Enforcement Set action. The selected Action is added to the Enforcement Set as the Main Action.
- Optionally,schedule the Enforcement Set runs.
- Name the Enforcement Set.
- Optionally configure Success Actions, Failure Actions, or Post Actions by clicking Advanced Options. This is clickable only after selecting the main action. See Configuring Success, Failure and Post Enforcement Actions below.
- Do one of the following:
- Save the Enforcement Set once an Enforcement Action is selected, even if not all required fields are filled in, by clicking Save. The Drafts folder on the Enforcements page is displayed.
- Test the outcome of the Enforcement Set on one asset by clicking Test Run. Learn more on how to test run an Enforcement Set.
- Save the Enforcement Set and run it on all matching assets by clicking Save and Run.
You can view the results of all Enforcement Set runs on the Run History page.
Selecting the Assets
This section describes how to select the assets that the Enforcement Set will run on.
Note
Use system asset types, such as Activity Log, Adapter Fetch History, Asset Investigation, and Findings, only in relevant Enforcement Set actions. Learn about which Enforcement Actions use these asset types.
To select the assets
-
Under Run action on assets matching following query, from the Module list, select the module/asset type you want to query. Then, from the Select Query list, do one of the following:
-
Select a saved query from the list.

-
Click + Add Query to create a new query using the query wizard. To learn more about creating a new query, see Creating a New Query.
-
-
To see a preview of the results of the selected query, in Query Preview, click Load Preview. The following are displayed:
- Query Count - The number of assets returned by the query.
- Out of Total - The percentage of assets returned from all assets of the selected asset type.

Creating a New Query
You can create a new query instead of using an existing saved query. This new query will be saved in the folder selected and can be accessed from the Folders pane of the Queries page.
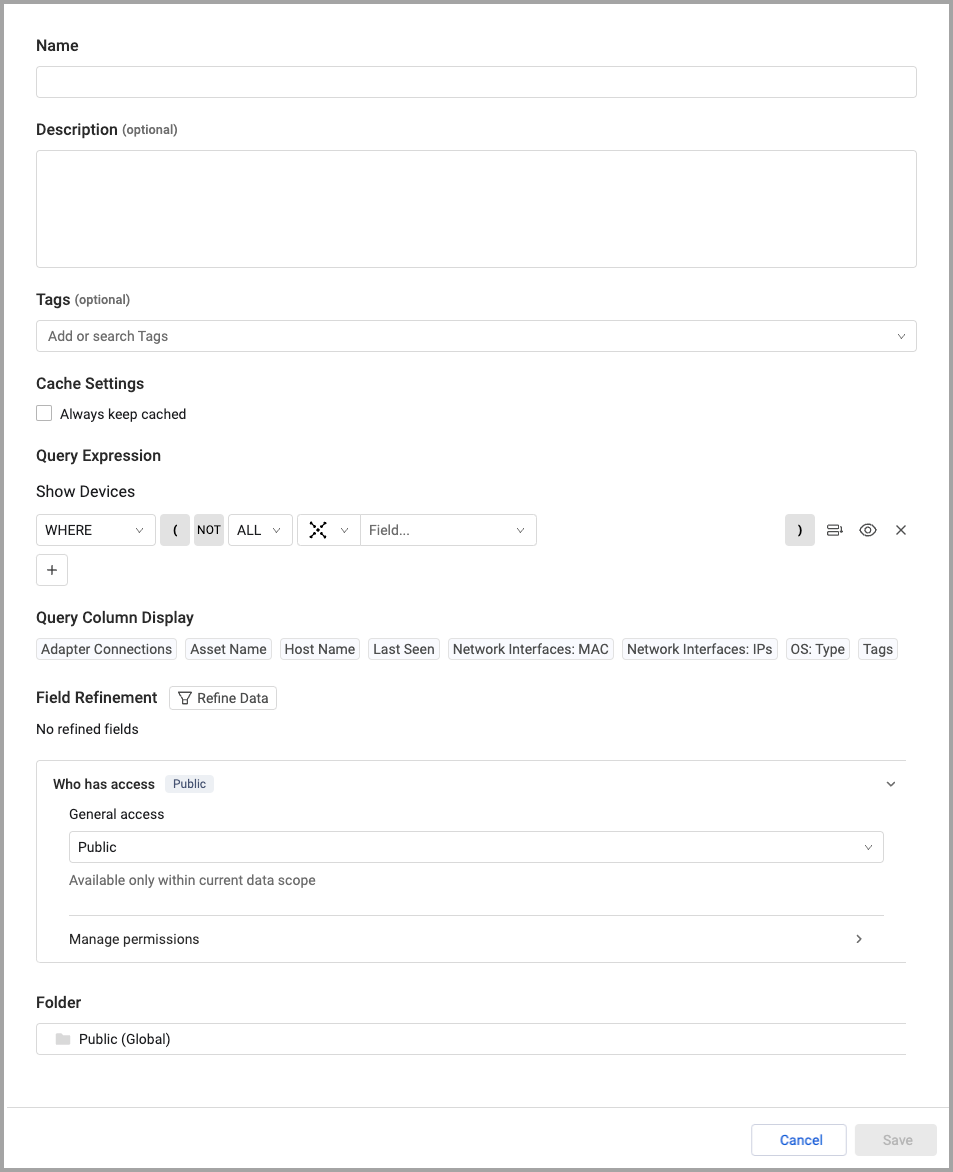
To create a new query
-
At the bottom of the query list, click + Add Query. The query drawer opens.
-
In Name, enter a name for the new query.
-
In Description, enter a description that includes what assets the query returns.
-
In Tags, add tags if necessary.
-
In Cache Settings, select whether to Always keep cached or deselect to not keep cached. When selected, query results are updated and stored in cache. This makes the query run faster.
NoteThis option only appears when the Enable caching on recently used queries option is enabled in the Cache and Performance settings.
- In Query Expression, select the query parameters. For more about using the Query Wizard, see Creating Queries with the Query Wizard.
- In Field Refinement, click Refine Data to refine the query results, if required. This customizes the asset data displayed in the final table. Refer to Refining the data displayed in table columns and rows for detailed instructions.
- In Who has access, configure the access privileges for the query.
- In Folder, select the folder where the new query will be saved. Depending on the access configuration, the folder may be selected automatically.
- To save the query, click Save. Click Cancel to close the Query Wizard page without saving any changes.
Selecting the Enforcement Set Action
This section describes how to select the main action that the Enforcement Set runs.
The Enforcement Action library is grouped by vendor (based on the action's adapter, except for 'Axonius Utilities'). For each vendor, the library displays the number of actions and the categories of the actions. It is possible to click the vendor to see all its actions, grouped by category.

- The Requires Credentials badge (yellow) appears near vendors with no configured adapter connection.
- You can toggle on Show Only Configured Adapters to show only vendors with configured adapters. In this case, the Requires Credentials badge does not appear on this page.
- You can click Expand All to expand all vendors to view their actions; Collapse All to hide all vendors' actions.
- Click a vendor to expand it and view all its actions.
In the screen below:
-
The Airtable vendor has three Enforcement Actions of the category Manage Users and User Groups. The down arrow can be clicked to view these three actions.
-
The Amazon Web Services (AWS) vendor has six Enforcement Actions and is expanded to show the actions grouped by the three categories - Notify, Manage AWS Services, and Manage Software.

Note
You can also use the Enforcement Action Library to view the available Enforcement Actions. This page lists all available Enforcement Actions in alphabetical order within each category, with a link to each action's documentation page.
To select the action
-
In the Create Enforcement Set drawer, click the Select Action tab. The Select an action page opens.
-
To show only those Enforcement Actions with configured adapters, toggle on Show Only Configured Adapters.
-
Select an Enforcement Action in one of the following ways:
-
Scroll the list of vendors (in alphabetical order) until you reach the required vendor, click the vendor to view its actions, and click the Action you want.
-
In the Search Action field, begin typing the name of the Action you want. The list is automatically filtered as you type.
-
From the Category dropdown, select one or more categories, and then open the Action under the required Vendor.
The configuration screen of the selected action opens. It has a tab for Required Fields and one or more tabs for additional optional fields divided into categories - one tab per category, to the right of the Required Fields tab. If there is only one category, the tab is labeled Additional Fields.
The following is an Enforcement Action with fields divided into four tabs.
-
-
In the Required Fields tab, fill in the following fields:
-
In Action name, use the default name provided or type a new name. The given name must be unique.
-
If you want to configure dynamic values for this action, toggle on Configure Dynamic Values and Define the statement with the assistance of the Dynamic Value Statement Wizard or the Syntax Helper with Autocomplete feature (the default; see screen below). To learn more about statement syntax, see Creating Enforcement Action Dynamic Value Statements.
-
If you want to use stored credentials from the adapter used for the Enforcement Action, toggle on Use stored credentials from adapter.

-
-
Fill in the remaining Required Fields for the Main Action. To learn more about each Enforcement Action and its required fields, navigate to the Enforcement Action documentation from the Enforcement Action Index.
-
Once all required credential fields are filled in, you can test the connection to the Adapter by clicking Test Connection. This functionality is not available for all Enforcement Actions.
-
If the Enforcement Action is of the Create Incident or Ticket category, optionally link the Tickets to a Case to create a Binding Set.
-
For the Create new case Enforcement Action, optionally link the Case to a Ticket to create a Case Set.
-
Click each additional tab and provide values for the optional fields that you want to use. See the Enforcement Action Index for details on each field of each Enforcement Action.
Note
At any time, you can click Replace Action to switch to and configure a different enforcement action.
Learn more about each Enforcement Action's required and optional fields, by navigating to the Enforcement Action documentation by clicking the ? near the Enforcement Action name.

Linking a Case with a Ticket
You can link the Create new case enforcement action to a ticket using the Create a Case Set wizard. You can then monitor the Case Set from the Case Management > Case Sets page.
To link Tickets to the Case
-
In the Select Action tab of the Create Enforcement Set or Edit Enforcement Set drawer of a Create new case enforcement action, click Link with a Ticket.
-
Using the Create a Case Set wizard that opens,configure the Case Set.
Linking Tickets with a Case
You can link a Create Incident or Ticket (category) enforcement action to a Case using the Create a Case Set wizard. You can then monitor the Case Set from the Case Management > Case Sets page.
To link a Case to the Tickets
- In the Select Action tab of the Create Enforcement Set or Edit Enforcement Set drawer of a Create Incident or Ticket enforcement action, click Link with a Case.
- Using the Create a Case Set wizard that opens,configure the Case Set.
Scheduling the Enforcement Set Runs
By default, Enforcement Sets are run every Discovery Cycle. You can configure scheduling in order to run the Enforcement Set automatically at specified times.
To schedule Enforcement Set runs
- In the Create Enforcement Set drawer, click the Select Schedule tab.
- In the Select a Schedule Plan page that opens, click On.
- Set the scheduling parameters.
Naming the Enforcement Set
This section describes how to name the Enforcement Set and provide a description of it. The Enforcement Set name must be unique.
To name the Enforcement Set
- Click the Enforcement Set Name tab.
- In the Enforcement Set name field, use the default name provided or type a name for the Enforcement Set.
- In Description, optionally type a description of the Enforcement Set.
Configuring Success, Failure, and Post Enforcement Actions
An Enforcement Set can include one or more Success, Failure, or Post Actions.
- Success Actions are run on each asset for which the Main Action completes successfully.
- Failure Actions are run on each asset for which the Main Action does not complete successfully.
- Post Actions are run on ALL assets matching the query after the Main action has completed.
As actions are added, they are organized under the Main Action as shown below:

To configure Success, Failure, and Post Enforcement Actions
- At the bottom of the Create Enforcement Set drawer, click Advanced options. A two-pane Enforcement Set drawer opens with Overview in the left pane and a description of the selected item in the right pane.
Note
It is only possible to click Advanced options once you have selected a main Enforcement Action.

-
To add an Action, hover the mouse pointer over
 button under Main Action. The types of actions you can add are displayed.
-
Click one of the Action type buttons:
- If you select + Success Actions, the Add Success Action drawer opens.
- If you select + Failure Actions, the Add Failure Action drawer opens.
- If you select + Post Actions, the Add Post Action drawer opens.
-
In the drawer that opens,select a Success/Failure/Post Action to add. A Success Actions / Failure Actions /Post Actions title is added (indented) under the Main Action, and the selected Action tile appears under that title. Action details are displayed in the right pane. Configure all required fields and whatever optional fields you want.

-
To remove or replace a Success/Failure/Post Action, click the More Actions menu in the tile of the action, and click Remove Action to remove the action or Replace Action to select another action of the same type (Success, Failure, or Post) as the replaced action.

-
To add more Actions:

-
By default, the Main Action is run first, then all other Actions are run concurrently.
- To require all actions in the Enforcement Set to run serially in the order of their configuration, at the top of the Overview pane, click the gear icon and toggle on Apply action execution order.
.png)
When this option is enabled, all Success Actions are run according to their configured order. Then, all Failure Actions are run according to their configured order. Lastly, all Post Actions are run according to their configured order.
Note
Enabling this option affects the time it takes the Enforcement Set to run. Running Actions concurrently generally takes less time than running them in order.
- By default, all actions following the Main Action run as soon as they appear in the ready to execute queue. To delay the execution of a Success, Failure, or Post Enforcement Action, click the Immediate button on the Action pane, and configure the delay of the action. Learn more on how to configure the action delay.
- When you have added and configured all the Actions you want, do one of the following:
- To save the Enforcement Set and continue editing, click Save. The Enforcement Set is saved.
- To test the outcome of the Actions, click Test Run. See Testing an Enforcement Set for more information on using Test Run.
- To save the Enforcement Set and run it, click Save and Run. The Action Center page is displayed with the All Enforcements folder selected. You can view the results of all Enforcement Set runs on the Run History page. See Viewing Run History.
Delaying Enforcement Action Execution
You can configure a Post, Success, or Failure action to execute immediately when its turn arrives in the 'ready to execute' queue (the default), or delay its execution by a certain number of days or weeks.
Note
You cannot delay a Main Action. You can schedule it to begin executing at a specific time in the future.
Example
You want to send an email reminder to customers to let them know that their software license is expiring and will be revoked in a month. You want to automate the actual revoking of the license to occur one month later in order to give the customers time to investigate similar software options or renew the license. In this case, the Main Action is Axonius - Send Email and the Post Action is revoking permissions to the software license. You delay this Post Action by one month.
To delay Enforcement Action execution
-
In the top right of the Success/Failure/Post Action configuration pane, click the Immediate button. A dialog opens for selecting Immediate (the default) or Delay.

-
Select Delay, and then define the length of the delay:
- From the second dropdown, select the unit of time: Days or Weeks.
- From the first dropdown, select the number of units.
The button shows the configured delay. For example, Delayed by 5 weeks.

Updated 6 months ago