
LDAP Login Settings
The LDAP settings enable you to log in from an existing domain controller using the LDAP protocol.
Enabling and Defining LDAP Settings
To enable LDAP logins, under the LDAP Login Settings section, toggle on Allow LDAP Logins.
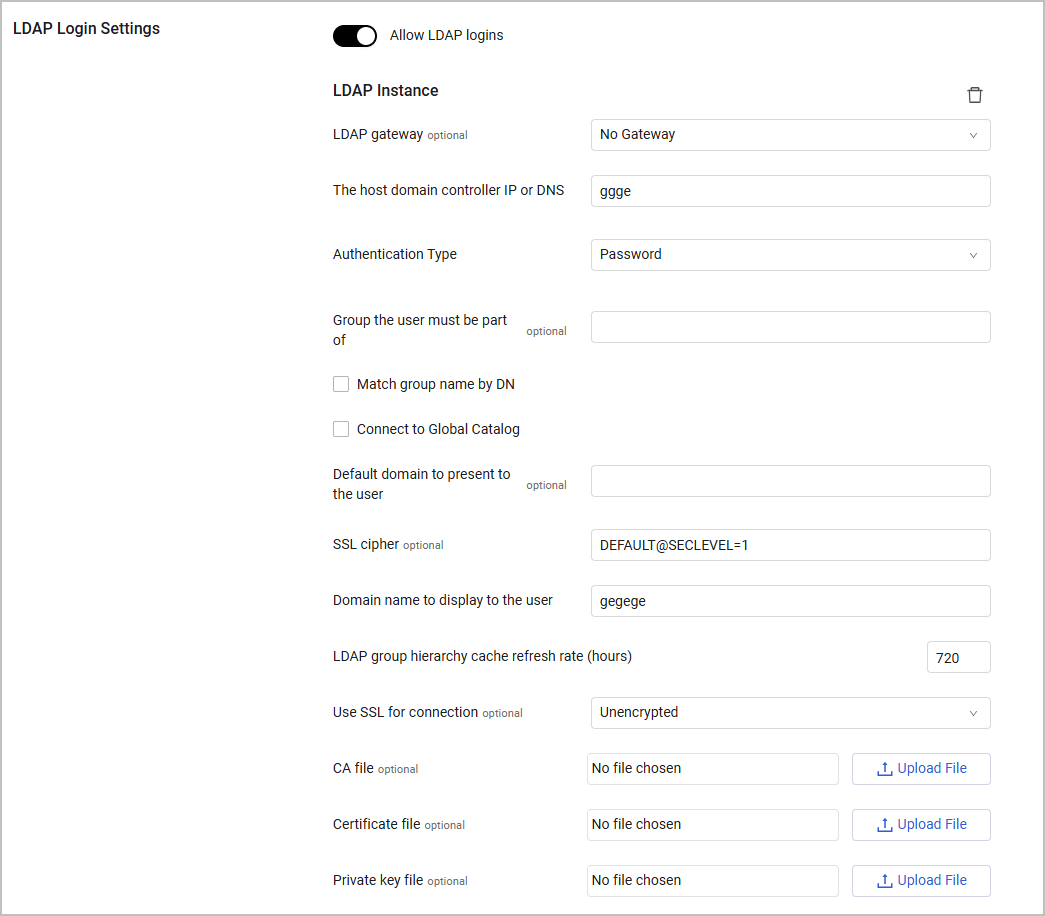
Once switched on, you need to define the following credentials for the Domain controller:
-
LDAP Gateway - Select the gateway to use for the LDAP connection
-
The host domain controller IP or DNS (required) - Enter the IP address or host of the Domain Controller of Microsoft Active Directory (AD) which verifies the credentials. If you set Use SSL for connection to Verified, this field must contain an FQDN. The setting for the host domain controller IP address or DNS must be unique when working with more than one LDAP.
-
Authentication type (required, default: Password) - Select the LDAP Authentication type.
- Password – configure authentication using a password. See Configuring Password Authentication.
- Smartcard – configure authentication using a Smartcard. See Configuring Smartcard Authentication.
Configuring Password Authentication
To configure authentication using a password.
- In Authentication Type, choose Password .
- Configure all settings in Additional LDAP Settings.
Configuring Smartcard Authentication
When you select Smartcard for LDAP Authentication, user identification is done by a smartcard using CAC PIV cards (Common Card Access Personal Identity Verification).
When the user inserts their card, the browser prompts the user to enter their PIN. The browser then prompts the user to select a certificate for authentication.
To configure authentication using a Smartcard:
- In Authentication Type, select Smartcard .
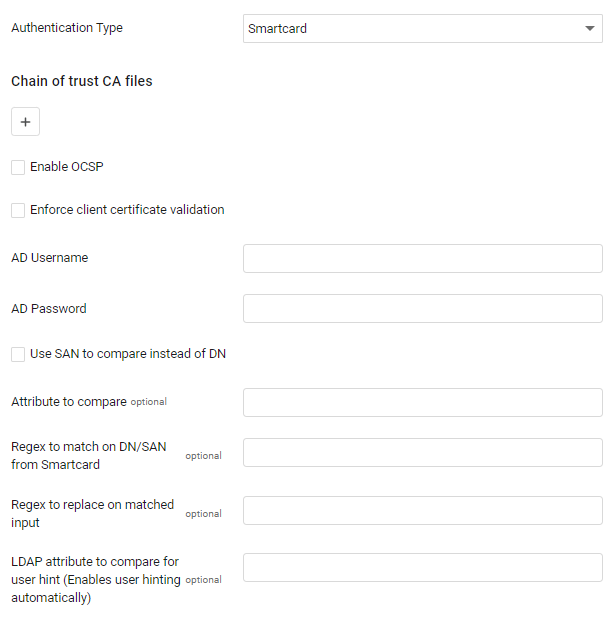
Then, configure the following:
-
Chain of Trust CA Files (Required) – Click
+to upload files to verify the Smartcard digital signature. Chain of Trust CA files must be in PEM format. You can upload both concatenated PEM files or a number of single PEM files.
Click+to add files, or X to remove.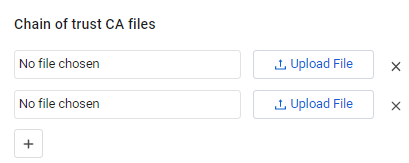
-
Enable OCSP (optional) - Enable OCSP to check a list of revoked certificates from the OCSP server that is part of the SSLv3 headers of the root/intermediate CA that signed the client certificate. Axonius contacts these URLs on every login attempt to get the list of revoked certificates, and caches every response for one day.
-
Enforce client certificate validation (optional) - Select this option to only allow users to access your system with a smartcard. A user will not be able to access Axonius without a smartcard.
-
AD Username and AD Password (required) - Enter the user name and password as used in AD. These connect to the domain controller and make sure that every user with a valid certificate is also signed into the domain and then assigns the default roles that should be assigned to a new LDAP user.
-
Use SAN to compare instead of DN - Select to compare the SAN (Subject Alternative Name) of the certificate in the CAC instead of the DN (Distinguished Name).
-
Attribute to compare - It is possible to select to which LDAP attribute setting the Smartcard DN should be compared. The default value is
distinguishedName. -
Regex to match on DN from Smartcard (optional, default empty) - Enter a Regex to match in the DN.
-
Regex to replace on matched input (optional, default: empty) - Enter a string which will replace the matched groups in the smartcard DN which replaces the matched groups. Note that the actual replacement is made using the python
re.subfunction. -
LDAP attribute to compare for user hint (Enables user hinting automatically) - Set this option to enable a username hint in the logon screen. The value of this attribute is usually
altSecurityIdentities. When you use this value, you should generally enterUserPrincipalNamein the value of the Attribute to compare field. -
Configure all settings in Additional LDAP Settings.
-
Click Save at the bottom of the page and then refresh your system.
-
The system now requests your client certificate and the smartcard PIN.
-
Once you click OK, the Axonius login opens to 'Login with Smartcard'.
-
Click Login with Smartcard and enter the domain to authenticate.
Every user who logs onto your system can now log in with smartcard authentication.
Note
When you choose smartcard, the Mutual-TLS settings are not available.
Additional LDAP Settings
For all LDAP options, configure these settings.
-
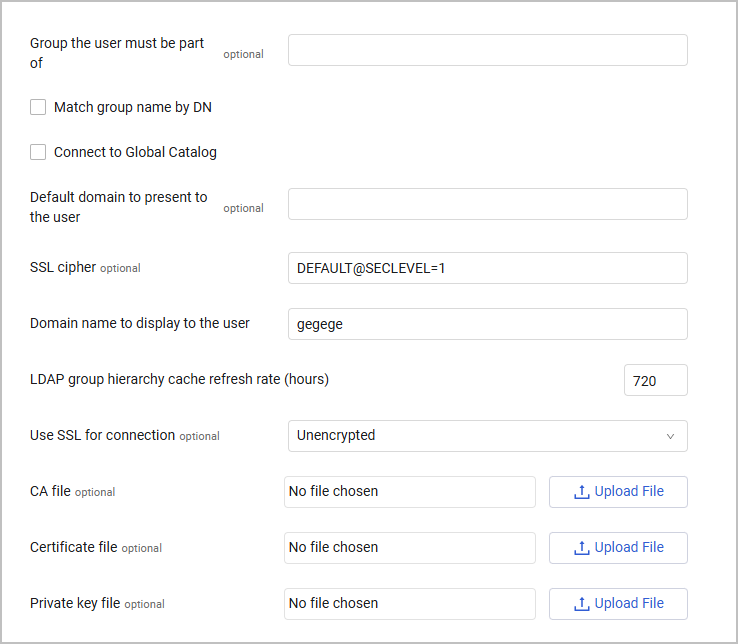
Group the user must be part of (optional) - A ; (semicolon) separated list of group names or nested group names of which the logged on user must be a member.
-
Match group name by DN - When enabled, matches the groups by their distinguished name and the user must be a member of all those groups. When disabled, it matches by their normal name which follows a specific dot (.) format and uses only the first block up to the dot.
-
Connect to Global Catalog - Select this option to connect to the DC in Global Catalog (GC) mode, on the AD GC port (3268), instead of connecting to a regular active directory DC on the regular LDAP port.
-
Default domain to present to the user** - The default domain for which the user is logged in (for example, if the value is "CORPNET" and the user will be logging as "user", Axonius will try to log into the DC with "CORPNET\user").
-
SSL cipher (optional) - Enter an SSL cipher to use for the TLS object of the connection. Using a stronger cipher can solve connection failures when using the default cipher. See Examples of OpenSSl ciphers.
-
Domain name to display to the user - The default name of the domain that will be displayed to the user for login options.
-
LDAP group hierarchy cache refresh rate (hours) (required, default: 720) - Configure the login cache refresh rate and when changes will be reflected in Axonius.
- Changes in the group hierarchy (groups added/remove/moved) will be reflected in Axonius only in the next login cache recalculation. Added/remove users from/to specific groups will be reflected in Axonius immediately and is independent on the next login cache recalculation.
- A low number means that login may be slower, as the login cache will be calculated more frequently, but it will be more accurate.
- A high number means that login may be faster, as the login cache will be calculated less frequently, but it may be less accurate.
- The default value for this setting is 720 hours (one month).
-
Use SSL for connection (optional) - The type of communication. Can be either:
- Unencrypted
- Unverified (Encrypted but unverified)
- Verified (Encrypted and verified)
Note
If you choose 'Verified', make sure The host domain controller IP or DNS field contains an FQDN.
- CA file - Upload a Certificate Authority (CA) file. After the file is uploaded, click Show certificate details to view relevant certificate information such as issuer, validity period, and fingerprints.
- Certificate file - Upload a certificate file for the LDAP connection. After the file is uploaded, click Show certificate details to open a read-only modal containing technical and validity data.
- Private key file - Upload the private key file that is associated with the certificate. After the file is uploaded, click Show certificate details to view the technical metadata of the key.
Viewing the Certificate Details
After you have uploaded a certificate (such as a CA file, IdP Signing certificate, or Private Key), the Show certificate details button becomes available. Clicking it opens a read-only modal with the following information:
- Certificate Information - Displays the Certificate Name/Alias, Issuer (CA), Subject, and Serial Number.
- Validity Information - Shows the Issued Date, Expiration Date, and the total Validity Period.
- Technical Information - Includes the Public Key Algorithm, Key Size, Signature Algorithm, and the Certificate Fingerprint (SHA-256 hash).
- Certificate Status - Indicates the Revocation status and whether the certificate is Self-Signed.
- Metadata - Displays system-related information, including the Upload Date and the user who performed the upload.
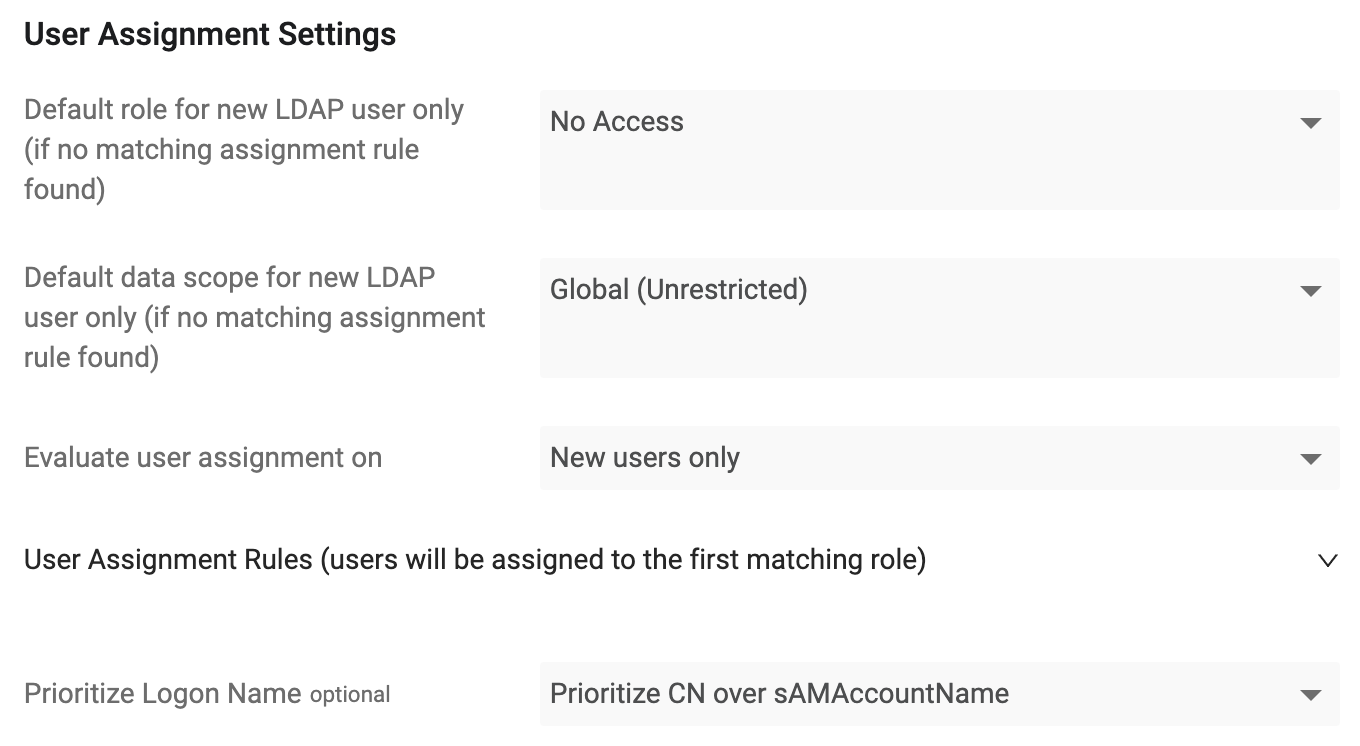
LDAP User Assignment Settings
-
Default role for new LDAP user only (if no matching assignment rule found) (Required, default: No Access) - The default role that will be associated with new LDAP users. For details on managing user roles in Axonius, see Managing Roles.
-
Default data scope for new LDAP user only (if no matching assignment rule found) (optional, Default: Global (Unrestricted)) - Select the Data Scope to assign to new users. For details about data scopes, see Managing Data Scopes.
-
Evaluate role assignment on (required, default: New users only) - Select whether to evaluate role assignment for new users or for new and existing users.
- If New users only is selected, role assignment will be evaluated only for new users. Roles for existing Axonius users will not be reevaluated and will remain unchanged.
- If New and existing users is selected, role assignment is evaluated for new users and also for existing users on every login.
-
Role Assignment Rules (users will be assigned to the first matching role) (optional, default: empty) - Configure a ranked list of rules to determine the user's role.
- Each role consists of:
- Category:
- Email address - User email address, for example:
[email protected] - Email domain - The email domain, for example:
example.com - Group - a user group Common Name (CN). If the Match group name by DN checkbox is enabled, the group will refer to the user group Distinguished Name (DN). For example, for the LDAP group name: "
CN=test-group-0,CN=Test Groups,DC=TestDomain,DC=test", the field value should be "test-group-0".
- Email address - User email address, for example:
- Value - Case-sensitive exact match.
- Role - The user role to be assigned.
- Category:
- To reorder the rules, hover over the rule to use the drag-and-drop functionality.
- When a user logs in to Axonius with LDAP, the user's assigned role is determined based on the Using Identity Providers.
- Each role consists of:
-
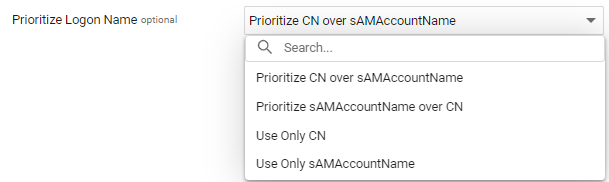
Prioritize Logon Name (optional) - You can select the username to prioritize when users log in with LDAP.
The following options are available:
- Prioritize CN over sAMAccountName - This is the default option. If there is a CN username, it will be used. If not, the sAMAccountName username will be used.
- Prioritize sAMAccoutnName over CN - If there is a
sAMAccountNameusername, it will be used. If not, the CN username will be used. - Use Only CN - If there is a CN username it will be used. If not, the login will fail.
- Use Only sAMAccountName - If there is a
sAMAccountNameusername, it will be used. If not, the login will fail.
Adding a New LDAP Connection
Click Add new LDAP. An additional LDAP Configuration section opens.
Note
- Adding an additional LDAP is not applicable to smartcards and may only be used when logging in using a password.
- Multiple LDAP is not supported when you are working with a tunnel.
- Choose Password in Authentication Type.
- Configure all settings in Additional LDAP Settings.
- Make sure that the setting for the host domain controller IP address or DNS is unique.
Now when a user logs in with LDAP, the domain name is displayed. In cases where the Domain name to display to the user is the same for both LDAPs, the second IP address is displayed. When the user logs in, they must select the correct domain.
See Using Identity Providers for general information about using identity providers.
For information about SAML-based login settings, see SAML-Based Login Settings.