
Managing Users
Implement Axonius Role Based Access Control (RBAC) and compartmentalized access by assigning each Axonius user to a specific role and Data Scope. A role consists of a predefined set of permissions for working with Axonius modules and capabilities. This means that any changes to the role permissions affect all the users to whom the role is assigned. Assign users a data scope to control the data each user can see.
All changes to users and roles are recorded in the Activity Log.
See Manage Roles for more information about managing roles.
Required Permissions
To manage users, a user must have an administrator role and have the Manage Users permission.
Accessing the Users Page
To access the Users page:
- From the top right corner of any page, click
 . The System Settings page opens.
 - In the Categories/Subcategories pane of the System Settings page, expand User and Role Management, and select Users.
The page displays the list of defined Axonius users, and each user's role and permissions. 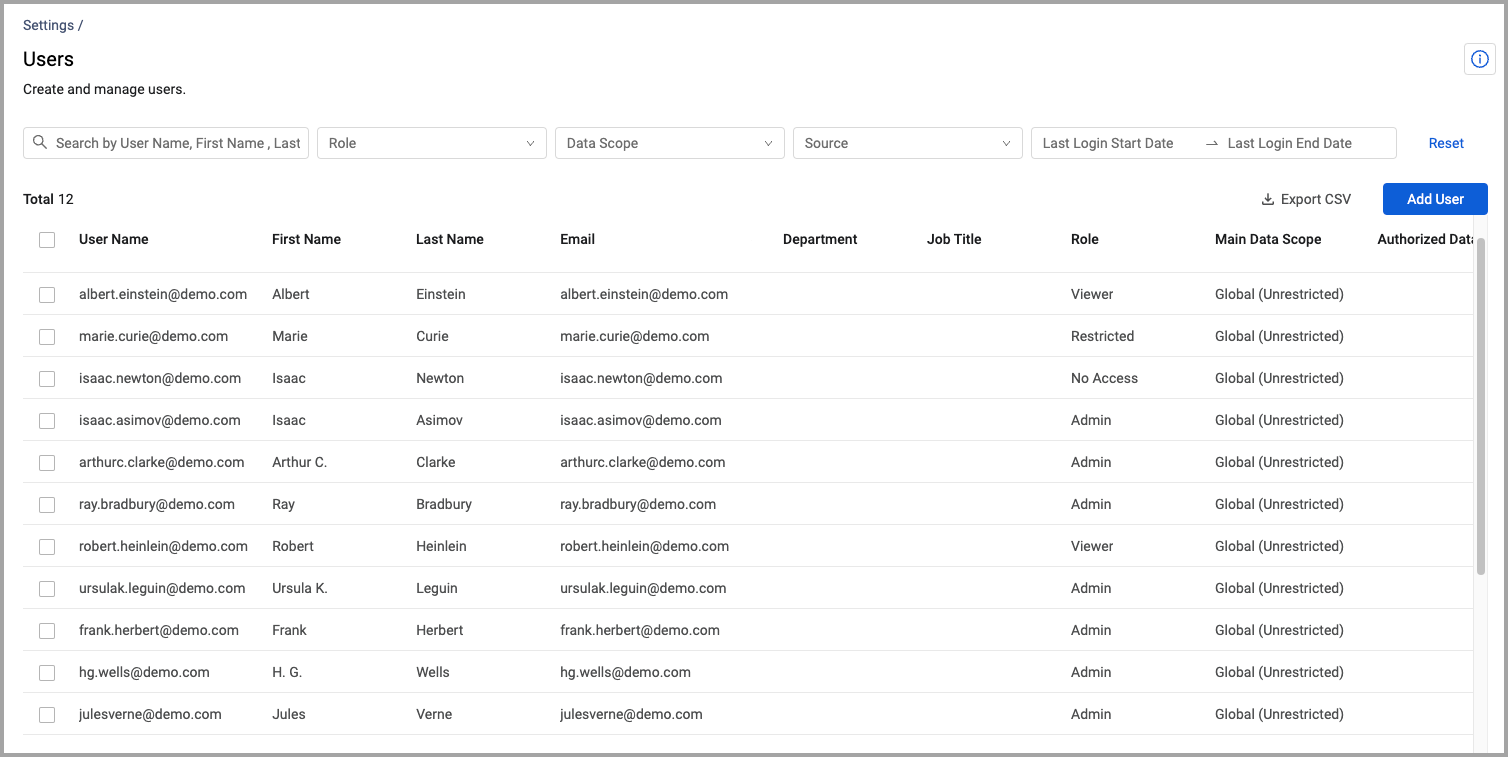
Searching and Filtering the Users List
Use the Search bar at the top of the page to find a specific user and to filter the list of users displayed.

- Search - Enter a user name, first name, last name, email, department or job title to search by one of these parameters; the system returns all users whose details contain these values.
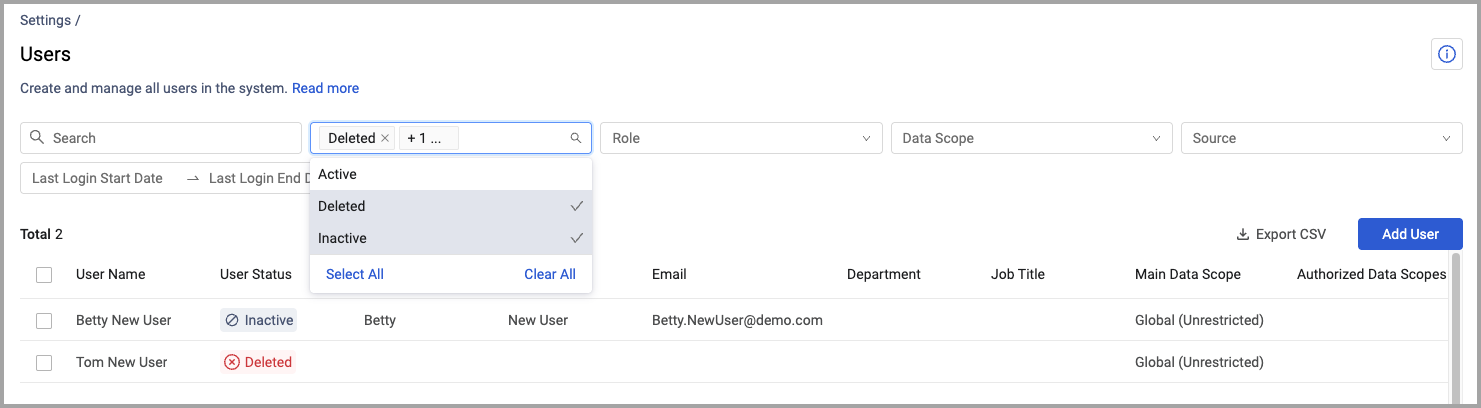
- User Status - Every user in the system has a status and you can filter the table by user status. See Managing User Status.
- Role - Filter users by role. This includes both the system roles, and any custom roles that were added. All users with that role are displayed. Click Clear All to clear all selections.
- Data Scope - Filter users by data scope.
- Source - Use Source to filter the display users according to their Identity Providers Settings: Internal, LDAP or SAML. Click Clear All to clear all selections.
- Date - Use the date picker to filter the display by users whose last login was on a certain date or in a certain date range.
Click Reset to clear the search and filters. The User Status filter defaults back to show only "Active" and "Inactive" users, while users with a status of "Deleted" are not shown.
Adding a New User
- From the Users page, click Add User. The New User drawer appears.
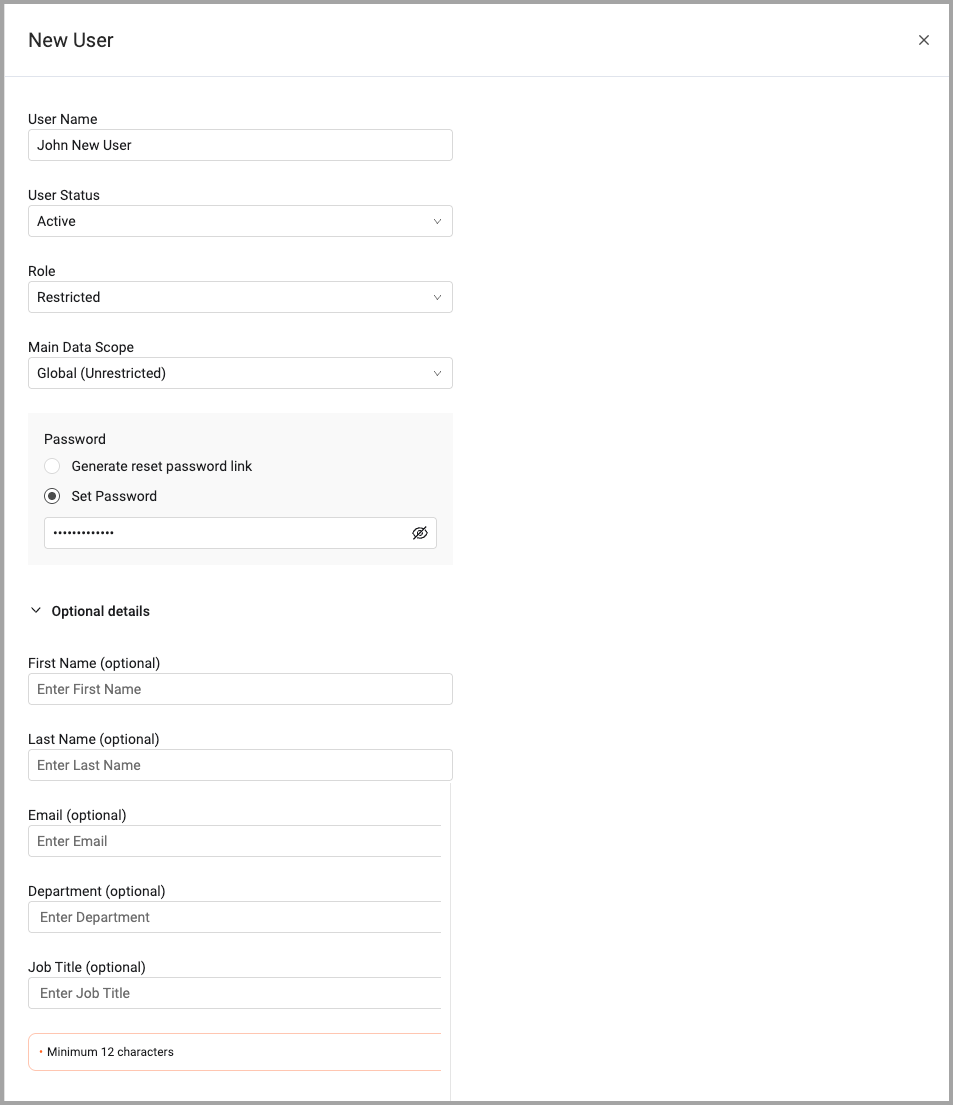
- In the New User drawer, specify the following user details:
-
User Name (required) - The user name of the user as it should appear in the Axonius system. This is a unique field and cannot be changed. Note that the user name is case sensitive.
-
User Status (required) - Select a status for the user: Active or Inactive. See Managing User Status
-
Role (required) - Select a role from the predefined roles. Roles can be reassigned later per user or by using bulk operation. Axonius provides a few predefined roles. You can set more roles according to your own requirements. See Managing Roles.
-
Main Data Scope - Select the data scope this user has access to when they log in to Axonius. Data scopes determine what data, dashboards, queries and other objects a user can see. See Managing Data Scopes for more information on Data Scopes. The data scope name appears in the Data Scope column on the Users page. Admin users are automatically assigned the Global data scope.
-
Allow visiting other Data Scopes - Users with the "Move between data scopes" permission can access other Data Scopes in addition to the Main data scope selected above. Select one of the following:
- All data scopes - Available only for users with Global data scope as their main data scope. Select if this user is authorized to connect to all data scopes.
- Specific data scopes - Select if this user is authorized to connect to specific data scopes only. Select the authorized data scopes from the list.
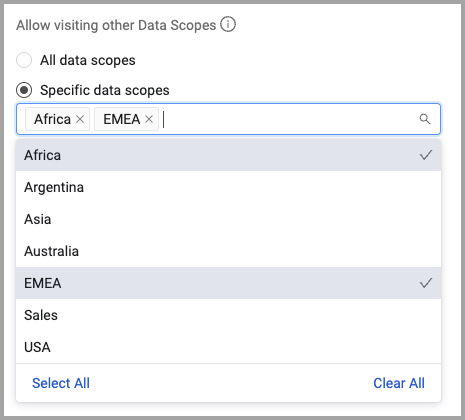
-
NOTE
Admin users with the Manage data scopes permission can assign data scopes to other users.
- (When logging in with a SSO) Ignore user assignment rules - Ignore the configured rules for when this user logs in. See Using Identity Providers.
-
(When logging in with a SSO) Source - Identifies the SSO source of the login.
-
Password (required) - Select one of the following:
- Generate reset password link - This generates a reset password link URL which you can copied or send to the user, where they can set their own password.
- Set password - Enter a password to associate with the user. The password is visible for 5 seconds.
-
- Under Optional Details, enter these details for the user:
- First Name and Last Name - The first and last name of the user.
- Email - The email of the user. This is used to create or to reset a password.
- Department - The department in which the user works.
- Job Title - The job title of the user.
- Click Save.
Note
If you are using an Identity Provider Login, for example SAML, any user logging in for the first time is added to the users list. The user is assigned to a role based on the configured role assignment rules. For details, see Identity Provider Settings.
Managing User Status
Axonius makes it easy to set user status. When creating users, the user status can be set to "Active" or "Inactive".
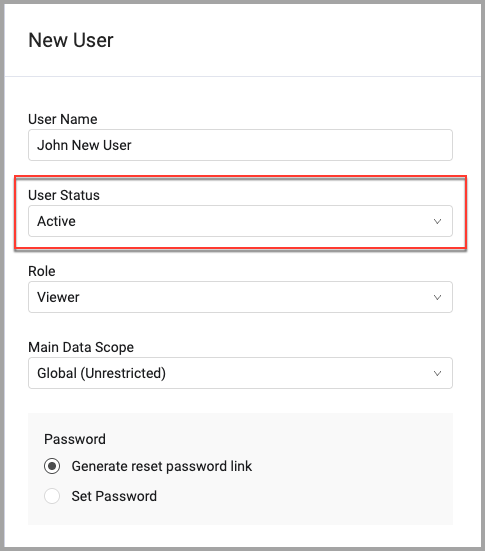
The "User Status" field on the Users page indicates the current status of all users, and the table can be filtered by user status.
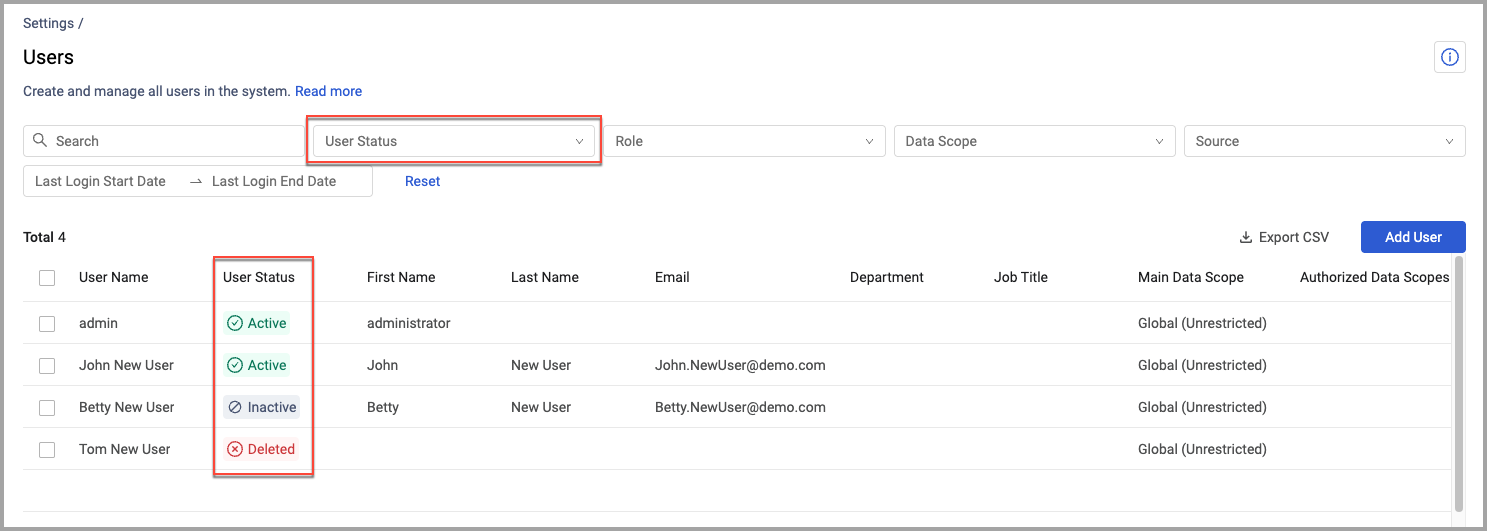
The following statuses are available:
- Active - The user can log in and perform tasks for which they have permission.
- Inactive - The user exists but cannot log in to Axonius. A user with an "Inactive" status can be changed to "Active".
- Deleted - The user has been deleted and cannot log in but is maintained in the system. See Deleting Users. Deleted users have a status of "Deleted" and are filtered out by default. To show users with a status of "Deleted" by default, either clear all filters or select "Deleted" in the User Status filter field. This selection is persistent.
Notes:
- You can impersonate a user with "Deleted" status to view items that were private to that user and not available any other way.
- When performing bulk actions on more than one user, select only users with the same user status.
Editing an Existing User
- To update an existing user, from the Users page, click a user record. The User details drawer appears.
- Update the user's configuration:
- For internal users, you can change the user's: first name, last name, email, department, job title, role or password.
- For external users (SAML/LDAP), you can change:
- The user's role.
- Select whether to enforce the current user's role regardless of the Role Assignment Settings configuration under the Identity Providers Settings. When Ignore user assignment rules is enabled the role assignment settings are ignored for all future logins.
- The user's Main data scope.
- The data scopes the user is allowed to move between. When a user is granted permission to move between Specific data scopes, you must select at least one data scope the user is allowed to visit. The user must be granted the "Move between data scopes" permission.
- Click Save.
Notes
You can only edit internal users who were created in Axonius by an Admin or by any other authorized user.
Only Admin users can modify the system default Admin user. Allowed changes are limited to email and password.
Reset a User Password
- To reset a password for an existing user, from the Users page, click a user record. The User drawer appears.
- You can choose to reset a password using one of the following methods:
-
Setting a new password manually
- Enter a new password in the Password field and then click Save.
-
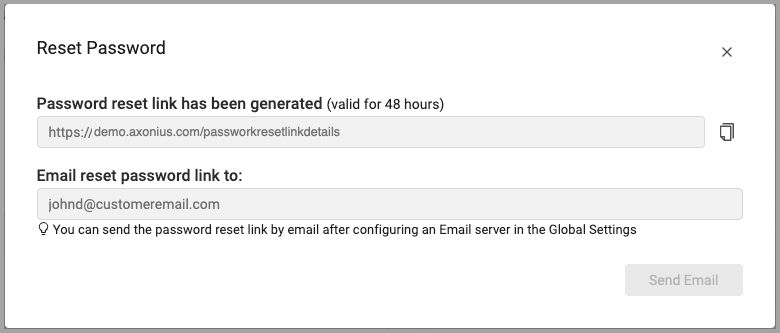
Creating a reset password link for the user to reset their own password. a. Click the Reset Password icon in the title bar of the user drawer.

b. A new reset password link will be generated each time and will be visible in a dialog.
- The reset password link is valid according to the expiration configured in the Password Reset Settings.
- The reset password link also expires when the user sets a new password through the reset password link or when a new reset password link is generated for this user.
- The reset password link can either be copied or sent by Email (If an Email server is configured in the Email Settings).
-
Deleting Users
When users are deleted, they are retained in the system with a user status of "Deleted" and are listed on the Users page with that status. You may need to adjust the User Status filter to show deleted users.
To delete a single user, click the Actions button at the right side of the relevant row and select Delete Users. To delete multiple users, select the relevant rows and click Delete Users above the table.

Note
The system admin user cannot be deleted.
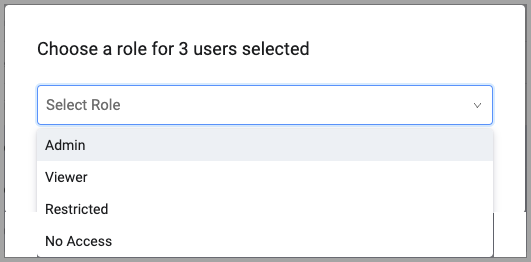
Assigning a Role Users
To assign role to a users:
-
On the Users page, select the relevant user rows and click Assign Role above the table.
-
In the dialog, select the role to be assigned for the selected users and click Assign.
Assigning a Data Scope to Users
You can assign users a data scope from the Users page. See also Managing Data Scopes.
To assign a data scope to a single user, click the Actions button at the right side of the relevant row and select Assign Data Scope. To assign a data scope to multiple users, select the relevant rows and click Assign Data Scope above the table.
In the Assign Data Scope dialog, select a data scope from the list and click Assign.
Exporting User Data to CSV
You can export Users table data to a CSV file.
To export user data to CSV:
- Above the right side of the Users table, click Export CSV. The file is automatically downloaded to your local computer.
For general information about working with tables, refer to Working with Tables.
Updated 17 days ago