
Viewing and Editing Case Details
From the Case Management table, you can click any Case row to open its Case drawer. The drawer is organized into three main tabs for comprehensive Case management:
- Case - Displays Case details, the progress bar, status, and links to related items (queries, enforcements).
- Case Assets - Lists all assets associated with the Case.
- Comments - Lists all existing Case comments, and enables adding new comments.
Case Tab
The Case tab displays configuration details, allows you to track remediation progress, and enables pivoting to related assets.
Viewing Case Information
The Case tab displays all configuration information, including Case Title, Description, Base Query, Due Date, Priority, and Assignee.
To view Case details
-
In the Case Management page, click a Case. The Case drawer - Case tab opens. The Progress bar shows the case progress by assets (the default).
-
View the Case information that you set when creating or editing the Case, including Due Date, Status, Status Update (Auto-update status), Priority, Created On, Case Title, Description, Type, Assignee, Base Query, Additional Queries, and Enforcements Links. An explanation of these fields is provided in Creating a New Case.
-
Due Date badge - The number of days until the Due Date is displayed in color next to the date, only if it is coming up in 1-10 days or is Overdue.
-
For Cases created using the Create a new case enforcement action, a notification confirms the source under Base Query. For example:

-
-
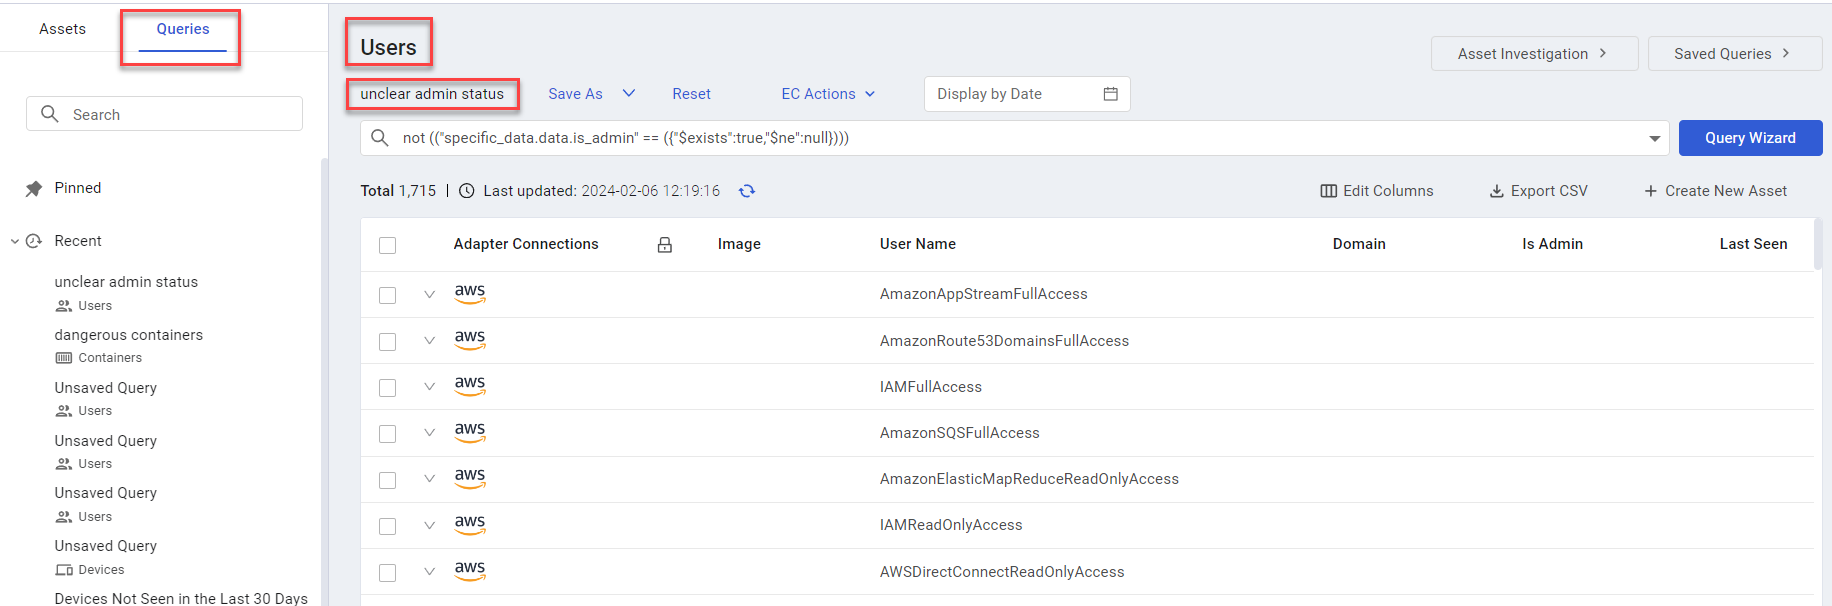
Pivot to Base query assets: To view the assets resulting from the base query, click the base query under Base Query. The Assets page opens in a new tab. Click the Queries tab. The following screen shows an example of Users resulting from the unclear admin status query.
-
Pivot to Additional Queries: To see the assets resulting from an additional query, click a query under Additional Queries. The Assets page opens in a new tab, displaying the assets resulting from the selected query.
-
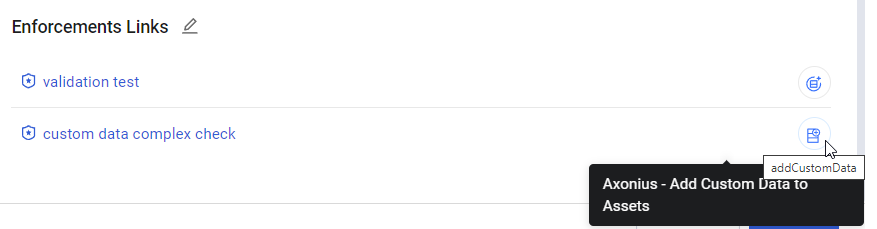
Pivot to Enforcements: To view the configuration of an Enforcement Set linked to the Case, under Enforcements Links, click the Enforcement Set name. The Enforcement Set configuration page opens. Learn more about the Enforcement Set fields. Note that you can hover over the icon on the Enforcement Set row to view its main Enforcement Action.
Tracking Planned Automated Actions
You can track the status and roadmap of automated activities scheduled to run for a specific case directly from its Case Details view.
- Open the Case Details view for the relevant case.
- Locate the Enforcements Links section to view a list of associated actions.
- Review the Action Name and Event Type to identify which future automations are scheduled for this specific case.
Tracking Case Progress
The progress bar at the top of the Case tab tracks the Case's overall progress (also displayed in the Case Management table under the Case Progress column).
- Progress Bar - The green portion shows the percentage of resolved assets; the gray portion shows unresolved assets.
- Progress Views - If the Show Case progress by tickets status UI setting (Settings> GUI> UI) is enabled, two buttons (Case Progress By Assets and Case Progress By Tickets) appear above the Progress bar, allowing you to switch between the two views.
- If this option is not enabled, the Progress bar shows the Case progress by assets, and no buttons appear above the bar.
- Progress Updates - Progress is updated automatically each time Asset Investigation is performed or every Discovery Cycle. Click the Refresh icon
 to manually recalculate the progress at an earlier time.
Note
When pivoting to assets after the date of Case creation, it is likely that there are fewer assets than were in the initial query, as they may have been removed from the system since then (assets are constantly being correlated and deleted over time). If you want to display on the Assets page all assets that existed at the time that the Case was created, you can change Display by Date on the Assets page to that date.
Progress Calculation Methods
You can switch between two views using the buttons that appear above the progress bar (if the necessary UI setting is enabled):
- Case Progress by Assets (default view) -
- Calculated by dividing the number of resolved assets by the total number of assets returned from the initial query, and then multiplying that result by 100 to get a percentage.
- An asset is considered resolved when it no longer meets the original query criteria.
- Example: If a query linked to a case returns 200 assets and 20 of those assets are resolved, the progress is 20/200 = 0.1 = 10%.
- Click the View Query Results link to pivot to the initial list of assets returned by the Base query on the date of Case creation. This initial list of assets is compared to the resolved assets to determine the progress of the Case.
- Case Progress by Tickets -
- Requires the Show Case progress by tickets status UI setting to be enabled (Settings > GUI > UI).
- Calculated by dividing the number of resolved ticket-associated assets by the total number of ticket-associated assets returned from the initial query, and then multiplying that result by 100 to get a percentage.
- A ticket-associated asset is resolved when the linked ticket is updated to a final status such as Done, Solved, Resolved, or Closed.
- Example: If a Case has 10 assets with two tickets, and the first ticket (linked to four assets) is
In-progresswhile the second ticket (linked to six assets) isClosed, the Case progress by ticket is 60%. 6/10= 0.6 = 60%. - Click the View Query Results link to pivot to the list of ticket-associated assets returned by the Base query on the date of Case creation. This initial list is compared to resolved ticket-associated assets to determine the Case's progress.
Editing Case Details
You can modify most of the Case's configuration directly from the Case tab. You can't modify the Created On date or the Base Query.
To edit Case information
-
In the Case drawer (see screen in Viewing Case Details above), click a field's value to open the editing options.
-
Modify any of the following fields, as required:
-
Due Date - Click the x near the date to remove it, then click Select Date to open the calendar, or click the current date to open the calendar. Then, from the calendar, select a new date and, optionally, a new time, and click Ok. The badge changes accordingly or is removed if the new date is more than 10 days away.
-
Status, Priority, Type - Hover over the field value, click it to open its dropdown list, and then select a new value. Learn more about Case status and using an action to change it.
-
Auto-update Status - Hover over the field value and select the checkbox to enable auto-update status; clear to allow only manual status updates.
-
Case Title, Description - Hover over the field value, and when a blue frame encloses the field value, click inside the field and type or overtype a new value.
-
Assignee - Hover over the field value, click it to open its dropdown list, and then select or replace an assignee. Or, click the trashcan icon to delete the assignee. You can choose one later on.
-
Additional Queries, Enforcements Links - To modify, add, or remove an Additional Query / Enforcement Set, hover over the Additional Queries / Enforcement Links title and click the Edit icon
 that appears. Replace a Query / Enforcement Set by choosing a different one from the dropdown, remove a Query / Enforcement Set link by clicking the adjacent Delete icon, or add a new one by clicking the
 +icon for each one that you want to add.
-
-
After making an edit to at least one field in the Case drawer, the Cancel and Save buttons appear on the bottom of the Case drawer. After making changes, you can do either of the following:
-
Click Save to save all your changes to the Case information. The Case drawer closes, and the Case Management page is updated with the edited Case information.
-
Click Cancel to erase all your changes. The Case drawer closes, and the Case Management page opens, displaying the same Case information as before.
-
Case Assets Tab
Within the Case Assets tab of the Case drawer, you can view a list of assets associated with a Case that was opened and pivot to the main Assets page for detailed information on these assets.
To view Case assets
-
On the Case Management page, click a specific Case to see.
-
In the Case drawer that opens, click the Case Assets tab. The Case Assets page opens, displaying the following:
- Total Assets - The total number of resolved Case assets from the initial Base query configured in the Case.
- Total Tickets - This count is displayed above the table only if the Case was created via a Case Set and is associated with Tickets. It shows the number of tickets opened for the Case assets and its value is determined by the ticketing method used in the Case Set:
*
1 - If the Case Set was configured to open a single ticket for all Case assets.
*
Total number of assets - If the Case Set was configured to open one ticket per individual Case asset. - Adapter Connections - Icons of the adapter connections that fetched the resolved asset. When there are more than four adapter connections, a tag shows the number of additional adapter connections.
- Resolved Date - The date that the Case asset was identified as resolved within this Case. This date reflects when the Case's progress percentage increased due to this asset being resolved. This field remains empty if the asset has not yet been resolved as part of this Case.
- Ticket fields that appear only if the Case was created via a Case Set and is associated with a Ticket:
- Related Ticket - Displays the name of the Ticket associated with the Case asset.
Clicking this name link opens the corresponding Ticket profile page. - Ticket ID - Displays the unique identifier of the Ticket related to the Case asset.
- Ticket Status - Displays the current status of the Ticket linked to the Case asset.
- Related Ticket - Displays the name of the Ticket associated with the Case asset.
- Asset Name - The name of the Case asset that was resolved. The asset name is taken from the field in the column after Adapter Connections on the Assets page default view. The column name in the Assets page varies according to the Asset Type. For example, for Device assets, the asset name is used; for Users, the user name is used; for Security Finding, the Vuln ID is used, and so on.

Pivoting to the Assets Page
Click the Open in Asset Page link to open the Assets page of the selected Asset Type (Module) in a new tab, displaying the complete list of assets related to the Case.
- This dedicated Assets page includes two additional columns to the right of Asset Name, beyond the standard columns found on any Assets page:
- Linked Tickets: Case Name - Shows the name of the Case related to the asset.
- Linked Tickets: Case ID - Displays the unique ID of the Case associated with the asset
Note
These fields only contain values if the Case is part of a Cases Set.
- Click the Refresh icon near the Last updated date and time to ensure you are viewing the most current list of assets.
- Click the arrow at the start of an Asset row to expand and view details per Adapter Connection.
- Hover over the Adapter Connections to view a table showing the icons of the Adapter Connections and their names, including the additional ones whose icons are not displayed in the table.
- When you pivot to the assets list, it lists the assets at the time that the Case was created (based on a historical snapshot from the time of the alert). As assets are constantly added, deleted, and correlated over time in the system, it is possible that some assets originally included in the list may no longer be present in the system. Change the date to the current date in the Display by Date field (above, enclosed in a red rectangle) to view a current, up-to-date asset list
Note
Verify that Historical Snapshot Retention Settings are enabled.
Case Comments Tab
The Comments tab lists all comments related to a Case. You can also add a new comment.
Viewing Case Comments
To view the Case comments
- In the Case Management page, do one of the following:
- Click a Case row, and in the Case drawer that opens, click the Comments tab to open it.
- Under the Comments column, click the number link.
- The number of comments appears in parentheses and the most recent comment added appears on top of the list.
- Each comment in the list shows:
- The user name of the user who added the comment.
- The date and time the user added the comment.
- The comment text.
Adding Case Comments
To add a new comment to the Case
- In the box, write a comment of up to 1000 free-text characters. As you type, the character counter increments.
- If your message exceeds 1000 characters, the character count is displayed in red, and the Save button becomes disabled. You must reduce your message to 1000 characters.
- Click Save.
- The new comment is added to the top of the comments list, including the user's name, timestamp and the the total number of comments is incremented by one.
Case Comments Tab
The Comments tab lists all comments related to a Case. You can also add a new comment, and optionally attach up to 10 files to it.

Viewing Case Comments
To view the Case comments
- In the Case Management page, do one of the following:
- Click a Case row, and in the Case drawer that opens, click the Comments tab to open it.
- Under the Comments column, click the number link.
- The number of comments appears in parentheses and the most recent comment added appears on top of the list.
- Each comment in the list shows:
- The user name of the user who added the comment.
- The date and time the user added the comment.
- The comment text.
- The links to the files are attached to the comment. Click on a link to download the file to your computer, you are notified of a successful download.
Adding Case Comments
To add a new comment to the Case
- In the box, write a comment of up to 1000 free-text characters. As you type, the character counter increments.
- If your message exceeds 1000 characters, the character count is displayed in red, and the Save button becomes disabled. You must reduce your message to 1000 characters.
- Optionally attach one or more files (each up to 5 MB) to the comment:
- Click the Upload button at the top left of the comment box, and select the file to add.
- A red error is displayed if the added file is in an unsupported format.
- Before saving the comment, you can click the x near an attached file to remove it from the comment.
- Click Save.
- The new comment is added to the top of the comments list, including the user's name, timestamp, and a link to the attached file.
- The total number of comments is incremented by one.
Updated 6 months ago