
Abnormal Security
Abnormal Security is an email security provider that helps companies protect against targeted email attacks.
Asset Types Fetched
- Users, Alerts/Incidents, Secrets
Note
This adapter only brings users that have been noted in threats in the past 7 days from the fetch.
Before You Begin
Required Ports
- TCP port 80/443
Authentication Methods
- API Token
APIs
Axonius uses the Abnormal Security Client API.
Permissions
Consult with your vendor for permissions for reading the objects.
Supported From Version
Supported from Axonius version 6.1
Connecting the Adapter in Axonius
To connect the adapter in Axonius, provide the following parameters:
Required Parameters
- Host Name or IP Address - The hostname or IP address of the Abnormal Security server.
- Email Domain - Email domain for filtering emails inside threats. Example of a valid email domain: axonius.com. Also can be a comma-separated list of email domains, i.e., axonius.com,axonius.io.
- Token - An API Token associated with a user account that has permissions to fetch assets. For information on how to generate the token, see Generating the authentication token.
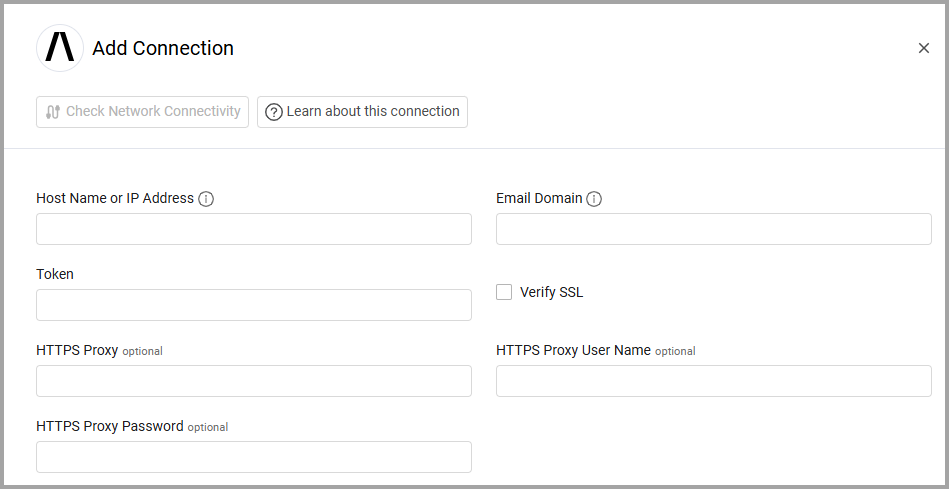
Optional Parameters
- Verify SSL - Select whether to verify the SSL certificate of the server against the CA database inside of Axonius. For more details, see SSL Trust & CA Settings.
- HTTPS Proxy - Connect the adapter to a proxy instead of directly connecting it to the domain.
- HTTPS Proxy User Name - The user name to use when connecting to the value supplied in Host Name or IP Address via the value supplied in HTTPS Proxy.
- HTTPS Proxy Password - The password to use when connecting to the server using the HTTPS Proxy.
To learn more about common adapter connection parameters and buttons, see Adding a New Adapter Connection.
Advanced Settings
Note: Advanced settings can either apply to all connections for this adapter, or to a specific connection. Refer to Advanced Configuration for Adapters. To learn more about Adapter Configuration tab advanced settings, see Adapter Advanced Settings.
Global Endpoints Config
Fetch from last X hours - Configure the time range for fetching data from the Abnormal Security API. Enter the number of hours of historical data to retrieve.
- Default value: 24 hours
- Maximum value: 48 hours
This setting applies to all endpoints.
Endpoints Config
Select and enable the settings listed in this section to enrich employees' data with additional data from specific endpoints.
Employee Enrichment Options:
- Enrich Employee with Employee identity - Enable this option to enrich employees with identity information from the
/employee/{emailAddress}/identityendpoint. - Enrich Employee with Employee logins - Enable this option to enrich employees with login activity data from the
/employee/{emailAddress}/loginsendpoint. - Enrich Employee with Campaigns details - Enable this option to enrich employees with abuse campaign information from the
/abusecampaigns/{campaignId}endpoint.
Threat Data Options:
You can enrich employees with threat information using one of two methods. Do not enable both methods simultaneously.
-
Enrich Employee with Threats details - CSV - Enable this option to enrich employees with threat information from the
/threats_export/csvendpoint. This method uses CSV export for better performance with large data volumes. If you enable this, don't enable Enrich Employee with Threats - API. -
Enrich Employee with Threats - API - Enable this option to enrich employees with threat information from the
/threatsendpoint. This method provides real-time threat data. If you enable this, don't enable Enrich Employee with Threats details - CSV. When you enable this option, the following nested setting becomes available:- Enrich Threats - API with Threats details - API - Enable this option to enrich threat records with detailed message information from the
/threats/{threatId}endpoint.
- Enrich Threats - API with Threats details - API - Enable this option to enrich threat records with detailed message information from the
Additional Endpoints:
- Fetch Users of sub type recipient from Recipient Employees - Enable this option to fetch users of the subtype "recipient" from the
/aggregations/recipient_employeesendpoint. - Fetch Incidents of sub type summary from Summaries - Enable this option to fetch incident summary data from the
/aggregations/dashboard_summaryendpoint. - Fetch Incidents of sub type trend from Trends - Enable this option to fetch trending attack data from the
/aggregations/trending_attacksendpoint. - Fetch Incidents of sub type threats from Incidents: Threats - Enable this option to fetch threat data for incidents from the
/threatsendpoint.
Threats details CSV context - applies context on the following endpoints: Incidents: Threats, Employee Fetch
- Secret from SOAR Tokens - Enable collection of SOAR API tokens from Abnormal Security.
Note: To learn more about Adapter Configuration tab advanced settings, see Adapter Advanced Settings.
Updated 14 days ago