
Configuring Dynamic Value Statements for Workflow Actions
Dynamic Value Statements allow you to dynamically populate Action fields within a Workflow Action node. To use this feature, enable Configure Dynamic Values in your Workflow Action.
Workflow Dynamic Value statements are similar to Enforcement Action Dynamic Value statements, with the following key differences:
- The Dynamic Value Statement Wizard,Syntax Helper, and Autocomplete feature don't support Event fields.
- In Workflow Actions, you can select asset modules other than the default asset type, under Asset Fields in the Syntax Helper.
- You can directly copy data from previous Workflow nodes into your Dynamic Value Statement using the Workflow Data repository.
- Enabling Fail the action if dynamic values fail only stops the current action; the Workflow continues to run subsequent nodes.
- Some non-trigger Action configurations require you to provide missing information before the Simulator can function. Learn more about how the Simulate feature works.
Using Data from Previous Nodes
When you enable Configure Dynamic Values, the Workflow Data repository appears. Expand it by clicking the + icon in the header. From here, you can copy data from any prior Workflow nodes directly into your statement.
Learn more about using the Workflow Data repository.
Using the Workflow Dynamic Value Statement Simulator
The Simulator allows you to test Dynamic Value Statements without actually running the entire Workflow. This helps you debug and confirm that your statements produce the intended results.
- The Simulator operates similarly to the Enforcement Action simulator.
When the Simulator Runs Instantly (No Missing Data)
The Simulator runs instantly on a random asset when:
- The Workflow Action runs on a built-in static query (i.e., based on static fields), inherited from the previous Action node or created in the current node.
- The Dynamic Value Statement includes only static fields.
When Missing Data is Required for Simulation
Otherwise, you must provide missing data before the simulation can run. This typically happens when:
- The Workflow Action doesn't run on a query based on static fields.
- The Dynamic Value statement includes non-static fields without data (i.e., fields that usually come from the Workflow Data repository).
The table below describes the scenarios where you will need to provide data for the Action, Dynamic Value Statement, or both, before the simulator can run:
| Action/Statement Configuration | Data Required |
|---|---|
| Action runs on a built-in custom static query (created in current Action or inherited from previous Action) | N/A |
| Action runs on a built-in query that includes a non-static field from the Workflow Data repository (from previous nodes) | Fill in a value for the non-static field. |
| Action runs on an Event asset retrieved from the previous node or on any asset from the Workflow Data repository (i.e. from any previous node) | Create a query based on the 'Runs on' asset type to provide sample assets. |
| All Statement fields are static. | N/A |
| Statement includes one or more non-static fields without data from the Workflow Data repository (from previous nodes) | Fill in a value for each non-static field. |
Debugging a Workflow Action Dynamic Value Statement with the Simulator
To debug your Dynamic Value statement
- Make sure that the Dynamic Value statement is valid and that you have saved the Workflow.
Note
The Simulator only works on validated statements in saved Workflows. If not validated, a Syntax validation error occurs and the Simulator does not work.
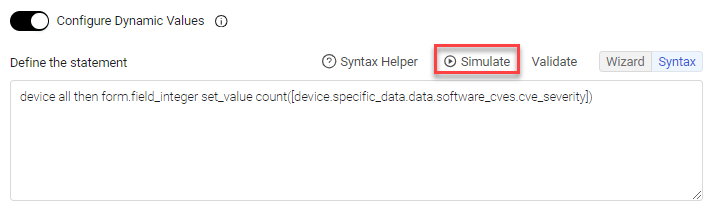
- Above the Dynamic Value statement in Syntax mode, click Simulate to activate the Simulator.
-
If the action runs on a query with static fields and the statement includes only static fields, Simulator Mode opens. The Simulator immediately selects a random asset for the simulation. Learn more about a Simulator that requires no additional data.
-
If there is missing data in the action or statement, the Simulator - Add Missing Data dialog opens.Fill in the missing data and click Apply.
- If the Result shows an error (in red), depending on the error (for example, the component is incompatible with the statement or there are no assets that match the selected query), either choose another asset, or if this is not possible or does not work, click Exit Simulator Mode and return to step 2.
- Otherwise, the Simulator selects a random asset and begins the simulation.
-
The name of the randomly selected asset (max 12 characters) appears above the statement near Simulated on. Hover over the asset name to see the full name.
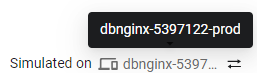
-
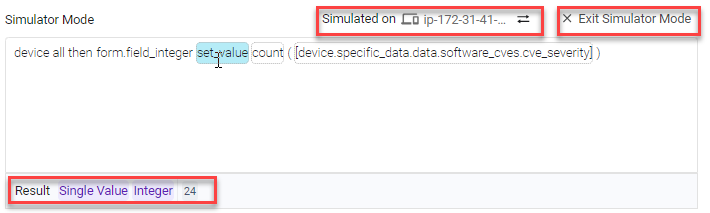
Hover over any component in the statement (function or field) to test it. The simulation immediately executes on the turquoise-highlighted component, and the Result of the simulation appears below the statement box.
- It is recommended to first test the innermost component, as if it results in an error, simulation of any outer component will result in the same error.
- When the component is compatible with the statement, the Simulator shows the results in terms of Field type, Value type, and Value.
-
Click the asset to open its asset profile in a new tab.
-
Click the Replace button
 to replace the asset or modify the data used for simulation.
 -
When you finish debugging the statement, click Exit Simulator Mode to leave the Simulator.
Your Workflow action is now ready to run - either manually or according to its configured schedule.
No Missing Data Simulation
When a Workflow action runs on a built-in query (inherited or newly created) and the Dynamic Value statement uses only static fields, clicking Simulate initiates the simulation immediately. No additional data input is required.
See Example 1 below.
Adding Missing Data for Simulation
When the Simulator can't run due to one or more of the following reaons, the Simulator - Add Missing Data dialog opens:
- The action doesn't have a built-in query that returns assets.
- The action's built-in-query uses a non-static field, such as an event field.
- The Dynamic Value Statement includes one or more non-static fields.
Depending on what data is missing, do the following:
- Create a query that retrieves assets.
- Update a query with appropriate values.
- Assign real values to non-static fields in the Dynamic Value Statement.
Adding a Query to Action
Actions without a query (for example, those operating on assets resolved from an Event or data from the Workflow Data repository) are not able to return assets for the simulator to run on.
In this case, in the Simulator - Add Missing Data dialog that opens, define a query. This query must retrieve assets of the appropriate type (matching any non-static fields the action uses).
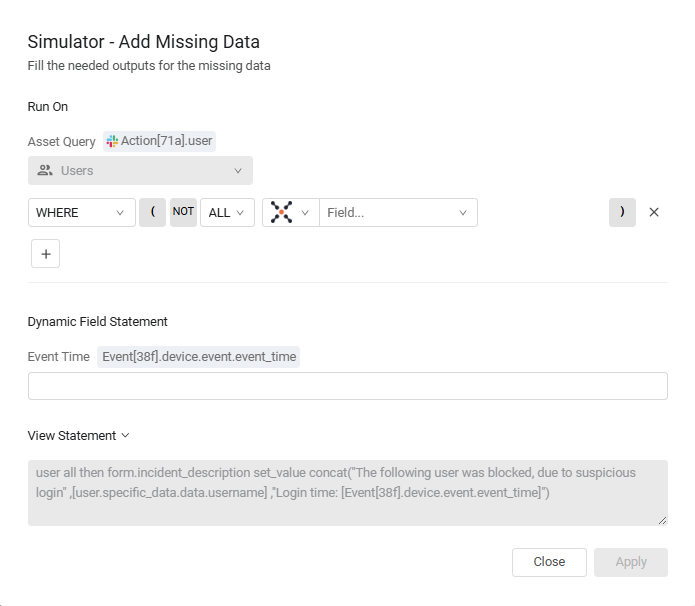
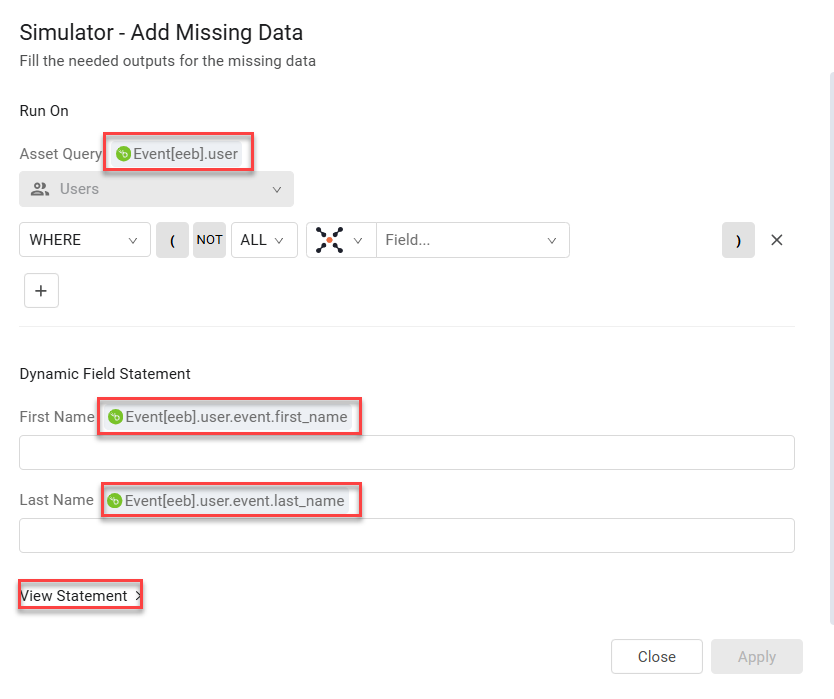
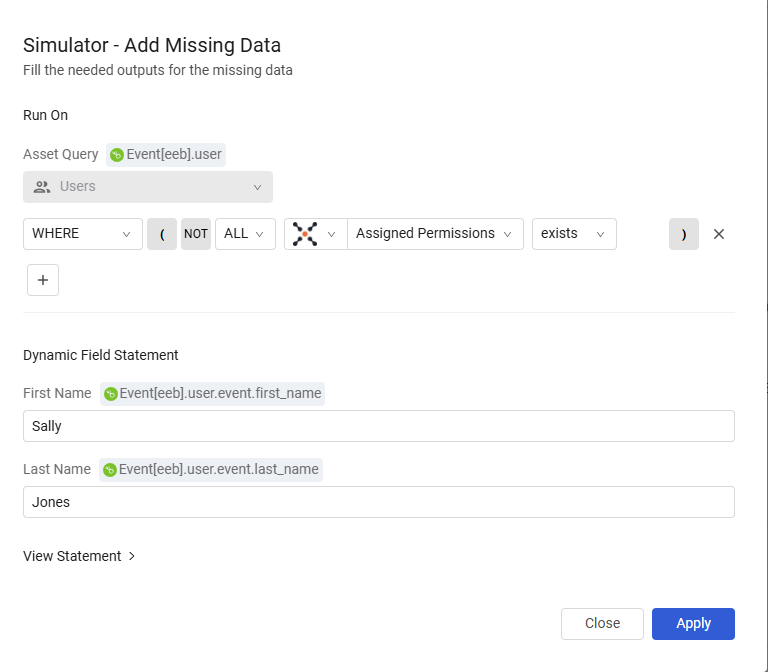
For example, the action in the following screen runs on a user retrieved from previous Action node 71a (copied from the Workflow Data repository). Under Run On, create a Users query to provide sample assets for the simulation.
See Example 2 below.
Assigning Values to Non-Static Fields in Action Query
When a Workflow action runs on a query that uses non-static fields from preceding nodes (from the Workflow Data repository), the simulator is not able to retrieve assets for the run.
In this case, the Simulator - Add Missing Data dialog prompts you to provide actual values for these non-static fields.
For example, the following screen shows an Action query with non-static fields.

In the Simulator - Add Missing Data dialog, click View Query to show the query with the non-static field. Under Run On, enter a relevant value for the non-static ID field.

Assigning Values to Non-Static Fields in Dynamic Value Statement
When a Workflow action's Dynamic Value Statement includes one or more non-static fields, the simulation requires actual values to proceed. The Simulator - Add Missing Data dialog prompts you to assign actual values to each non-static field. See bottom part of screen below. Click View Statement to see the non-static fields in the statement.
Note
The assigned values are only for the Simulator's use. They don't replace the non-static fields in your actual statement.
See Example 2 below.
Replacing Workflow Statement Asset or Data
The Replace button works according to whether the Dynamic Values statement is with or with no missing data:
-
For statements with no missing data (i.e., the Simulator runs instantly): Clicking the Replace button runs the statement on a different, randomly selected asset.
-
For statements requiring you to provide missing data: Clicking the Replace button presents a menu with two options:
- Replace Asset - This option prompts the system to run the statement on a different query result (randomly selected), while maintaining the currently entered data.
- Replace Data. This option opens the Simulator -Add Missing Data dialog. Here you can modify the values of non-static fields in the statement or query. The simulator then runs the statement using this new data on a new query result (randomly selected).
To run the Simulator on a new asset
- For a statement with no missing data: Click the Replace button.
- For a statement with missing data: Click the Replace button and from the menu that opens, click Replace Asset.
To run the Simulator on new data and a new asset
- Click the Replace button and from the menu that opens, click *Replace Data.
- In the Simulator -Add Missing Data dialog, change the data for the asset and/or query, and click Apply.
Examples
Example 1
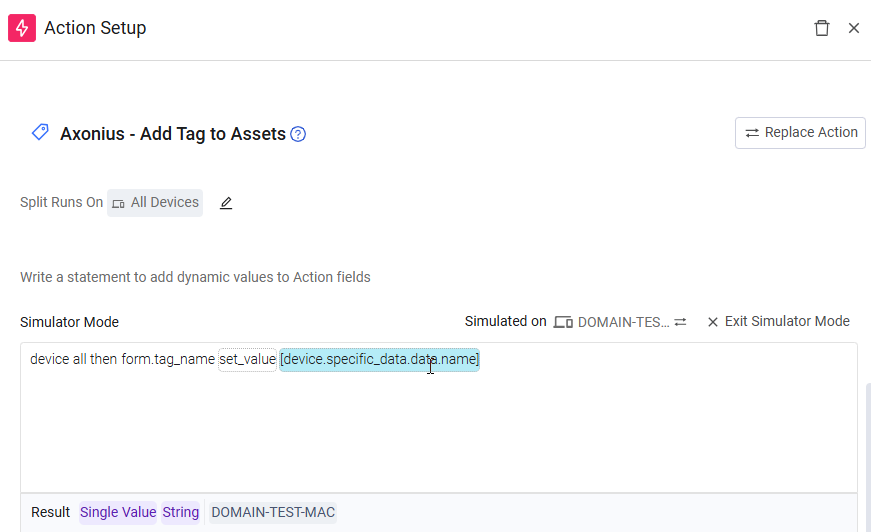
This is an example where there are a query and statement with no missing data.
The Axonius - Add Tag to Assets workflow action runs on the All Devices query that returns device assets, and the Dynamic Value Statement uses static fields only. Clicking Simulate runs the statement on a randomly selected asset.
Example 2
This is an example of an action that runs on a User asset retrieved by an Event and a Dynamic Value statement with non-static fields.
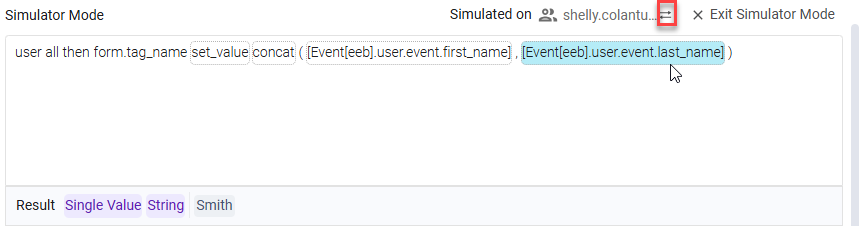
The Axonius - Add Tag to Assets action runs on the user on which the previous event occurred, and the tag name is set to the concatenation of event_first_name and event_last_name of that user.
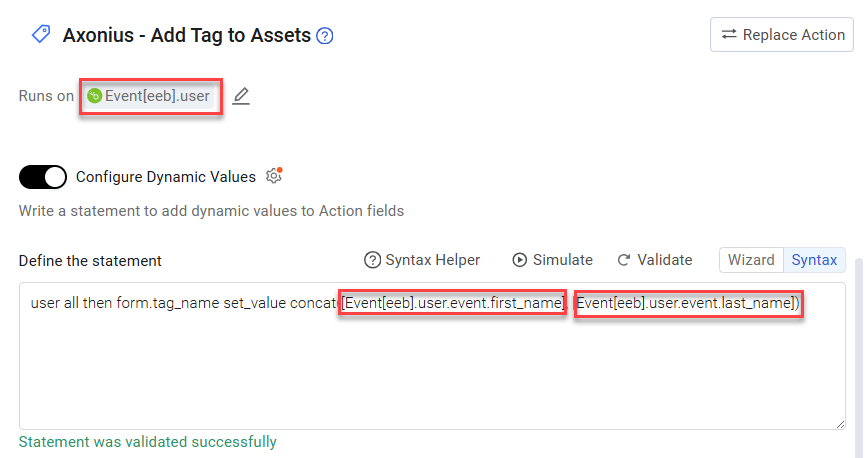
Clicking Simulate above the statement opens the Simulator - Add Missing Data dialog. The non-static fields are indicated in the screen.
Clicking View Statement opens the Dynamic Value Statement (next screen).
The following screen shows the query built to return assets and real data assigned to the non-static fields in the statement.
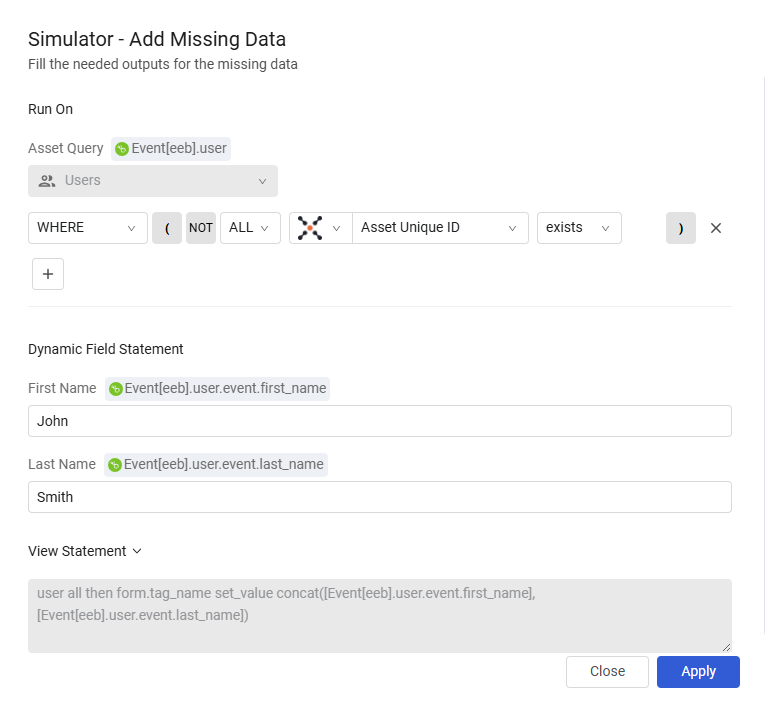
When clicking Apply in the above screen, the Simulate begins immediately.
Clicking the Replace button opens a menu where you can Replace Asset or Replace Data.

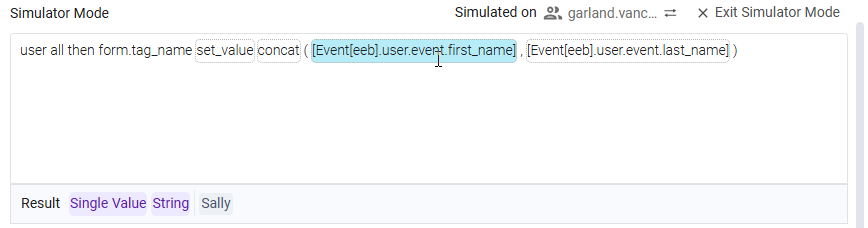
The screen opens with the current data filled in (second screen of this example). The following screen shows a new query and new data filled in for the statement.
When clicking Apply in the above screen, the Simulate begins immediately on the new data and new asset.
Updated 9 months ago