
Integrating Slack with Axonius for Workflows
Axonius supports Slack Message and Slack Message Response as Workflow events. Before Slack can send these events to Axonius (or if the URL or Signing Secret changes), you need to integrate Slack with Axonius.
To integrate Slack with Axonius
- In Axonius:Set up Axonius to receive webhook events from Slack.
- In Slack:Register the Axonius Slack Webhook URL and configure event webhook parameters.
- In Slack:Verify and activate the event webhook.
- In Axonius:Begin receiving ongoing event notifications.
The following sections describe how to integrate Slack with Axonius on both the Axonius and Slack sides.
Axonius Configuration
Axonius provides a dedicated Webhook URL to receive webhook events from Slack.
To set up Axonius to receive Slack Webhook events
-
Navigate to System Settings> External Integrations> Workflow Events.
-
In the Select Product dropdown, select Slack. The Workflows Events dialog displays the Slack settings.
The Workflows Events dialog includes the following information for Slack:
- Axonius Webhook URL - This dedicated URL is predefined in the system to receive Slack webhook events. Click the Copy icon to copy this URL. You will paste this URL into the Request URL fields in Slack's Event Subscriptions and Interactivity & Shortcuts screens (see below). When events occur in Slack, Slack sends HTTP POST requests to this URL.
- Signing Secret - Copy the Signing Secret string value generated in Slack (viewable in Slack's Basic Information settings) into this field. This Signing Secret is used for extra authorization security on both the Slack and Axonius sides.
Note
You only need to configure the Axonius Custom webhook URL in Slack and the Signing Secret in Axonius once, unless their values change.
Slack Configuration
To register the Axonius Custom webhook in Slack and generate the Signing Secret
- Navigate to Slack API Your Apps, and click Create New App.
- In the Create an app screen that opens, click From scratch.
- In the Name app & choose workspace screen that opens, type an App Name, select your Axonius workspace, and click Create App. The Basic Information screen opens, displaying secret credentials Axonius needs to access the Slack API. This includes:
-
Client Secret - This secret must be sent with the client ID when making an oauth.v2.access request. You can click Show to view it or Regenerate to generate a new one.
-
Signing Secret - Slack signs the requests it sends to Axonius using this secret. Axonius can confirm that each request comes from Slack by verifying this secret. You can click Show to view it or Regenerate to generate a new one.
-
- Copy the signing secret into the Signing Secret field in the Slack Webhook settings in Axonius. Each event sent from Slack includes this signing secret as extra authentication for Axonius that the event originated from Slack.
- If you make any changes to the Basic Information screen, click Save Changes.
To subscribe Axonius to Slack events
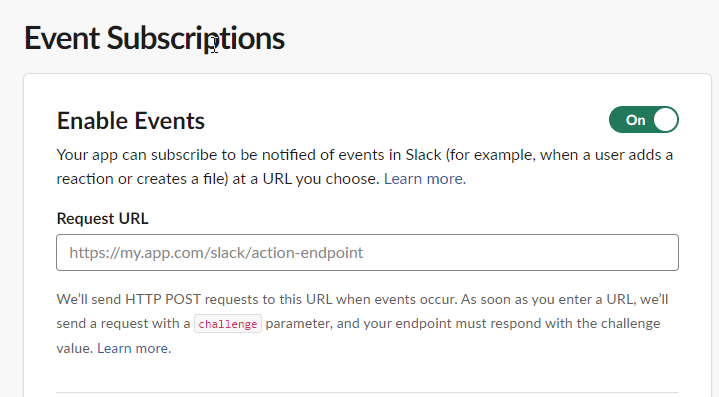
- In the left pane, under Features, click Event Subscriptions.
- In the dialog that opens, toggle on Enable Events.
- Paste the Axonius Webhook URL (copied from the Axonius Workflows Events dialog for Slack) into the Request URL field. This is the URL where Slack will send an HTTP Post request to Axonius each time a Slack event occurs. As soon as you input or change this URL, Slack performs a one-time verification. Slack sends a request with a 'challenge' parameter to the URL. Once Axonius responds with the challenge value, the URL is verified and can be used for Slack to send events to Axonius.
To enable interactive webhooks on the Slack app (if required)
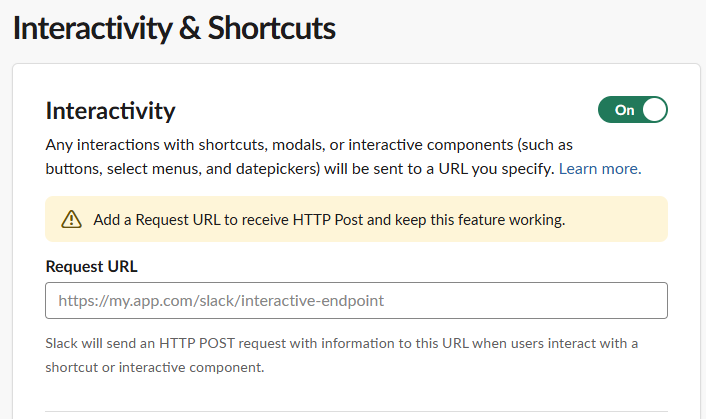
- In the left pane, under Features, click Interactivity & Shortcuts.
- In the dialog that opens, turn on the Interactivity toggle.
- Paste the same URL as in Event Subscriptions into the Request URL here. Slack will send an HTTP POST request with information to this URL when users interact with an interactive component (such as a button).
Verifying the Event Webhook
After you enter or modify the Axonius webhook URL in Slack, Slack verifies the Axonius event webhook URL before it begins sending events of subscribed event types.
This one-time verification works as follows:
- Slack passes a verification value ('challenge' parameter) to Axonius.
- Axonius returns the verification value to Slack.
- Slack verifies that the values are the same.
Following successful verification, the newly created webhook URL is listed as Active. After a short wait period, the Slack webhook begins sending ongoing events to the Axonius webhook URL for Slack.
Slack Event Delivery to Axonius
After Axonius and Slack are configured and the connection is verified, the Slack webhook is activated, and the Slack app begins sending webhook events to the Axonius Webhook URL.
- Slack sends each event to Axonius in an HTTPS POST request with a custom header.
- It also sends the Signing Secret in a custom HTTP header (typically named 'X-API-Key'). This value should be configured both in the Basic Information screen in Slack and in the Axonius System Settings for Slack.
- Slack checks if the Signing Secret value in its custom header matches the value configured for the key in Axonius System Settings. If it matches, Slack sends the event to Axonius.
- Axonius accepts the event only if the Signing Secret values match. This provides enhanced security in the communication channel between Slack and Axonius.
:::
Updated 9 months ago