
Adapters Fetch History
Use the Adapters Fetch History page to review the fetch results over time for each adapter and for specific adapter connections.
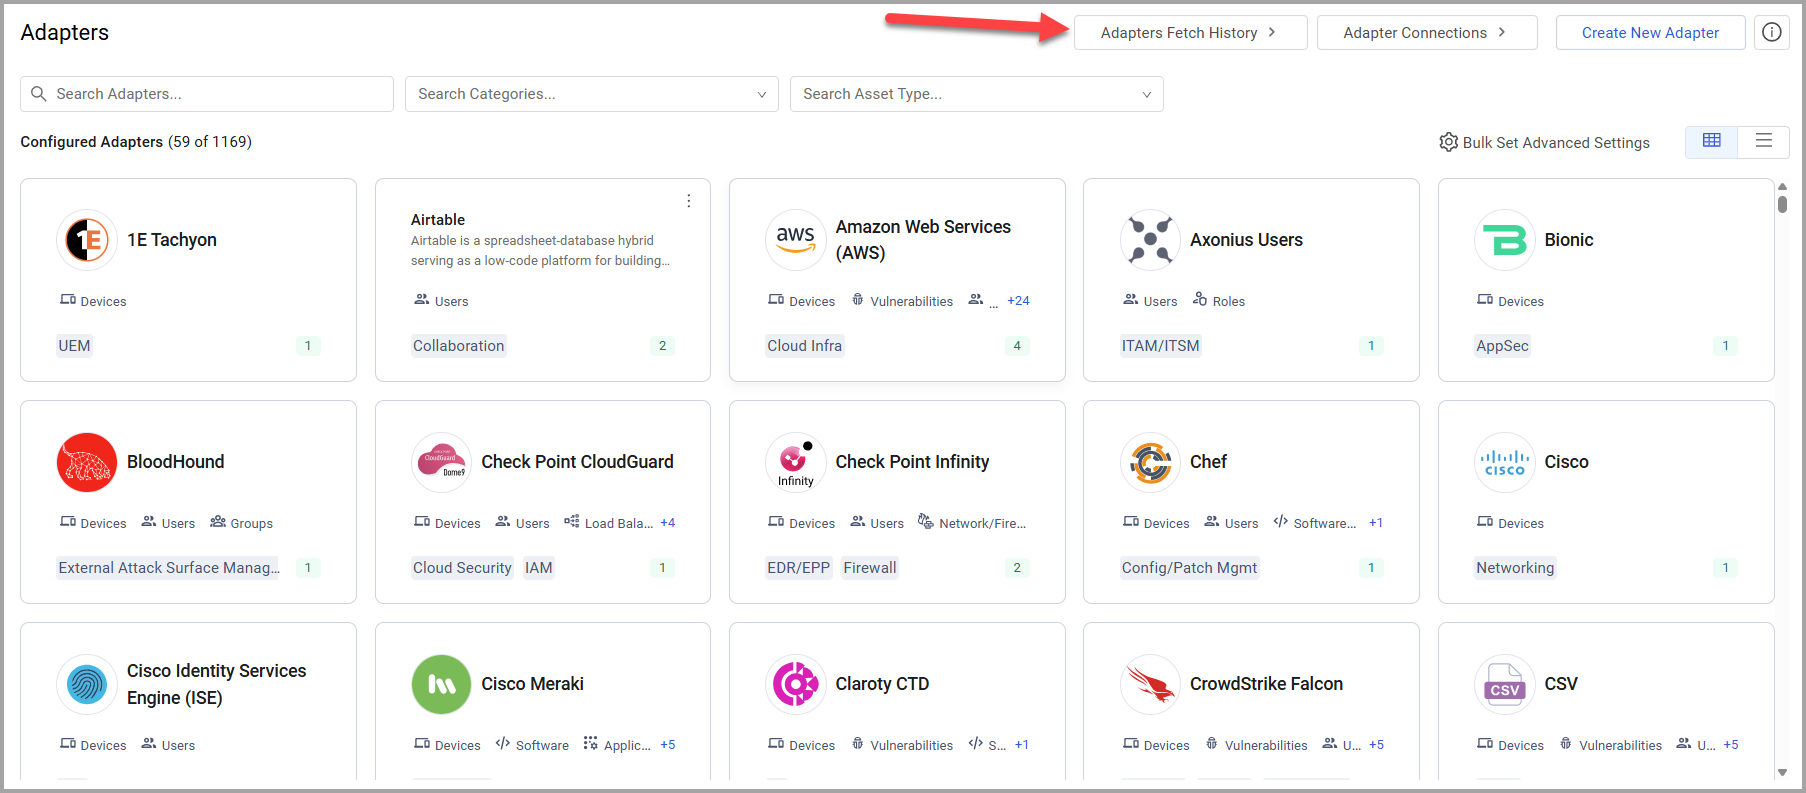
To open the Adapters Fetch History page, click the Adapters icon on the left panel. In the Adapters page, click Adapters Fetch History. In the Adapters page you can also right click Adapters Fetch History to open it in a new tab.
In Axonius New Navigation Experience you can also access Adapter Fetch History from the Adapters menu.
You can also open the Adapters Fetch History page from a specific adapter. In this case the Adapters Fetch History is filtered on the specific adapter. When there are no connections defined for an adapter, the Adapters Fetch History button isn't available on the specific adapter page.
Viewing Fetch History Data
Use this page to view Adapters Fetch History for any fetch action performed in the system, whether it is part of the Discovery Cycle, Manual or Custom Scheduled.
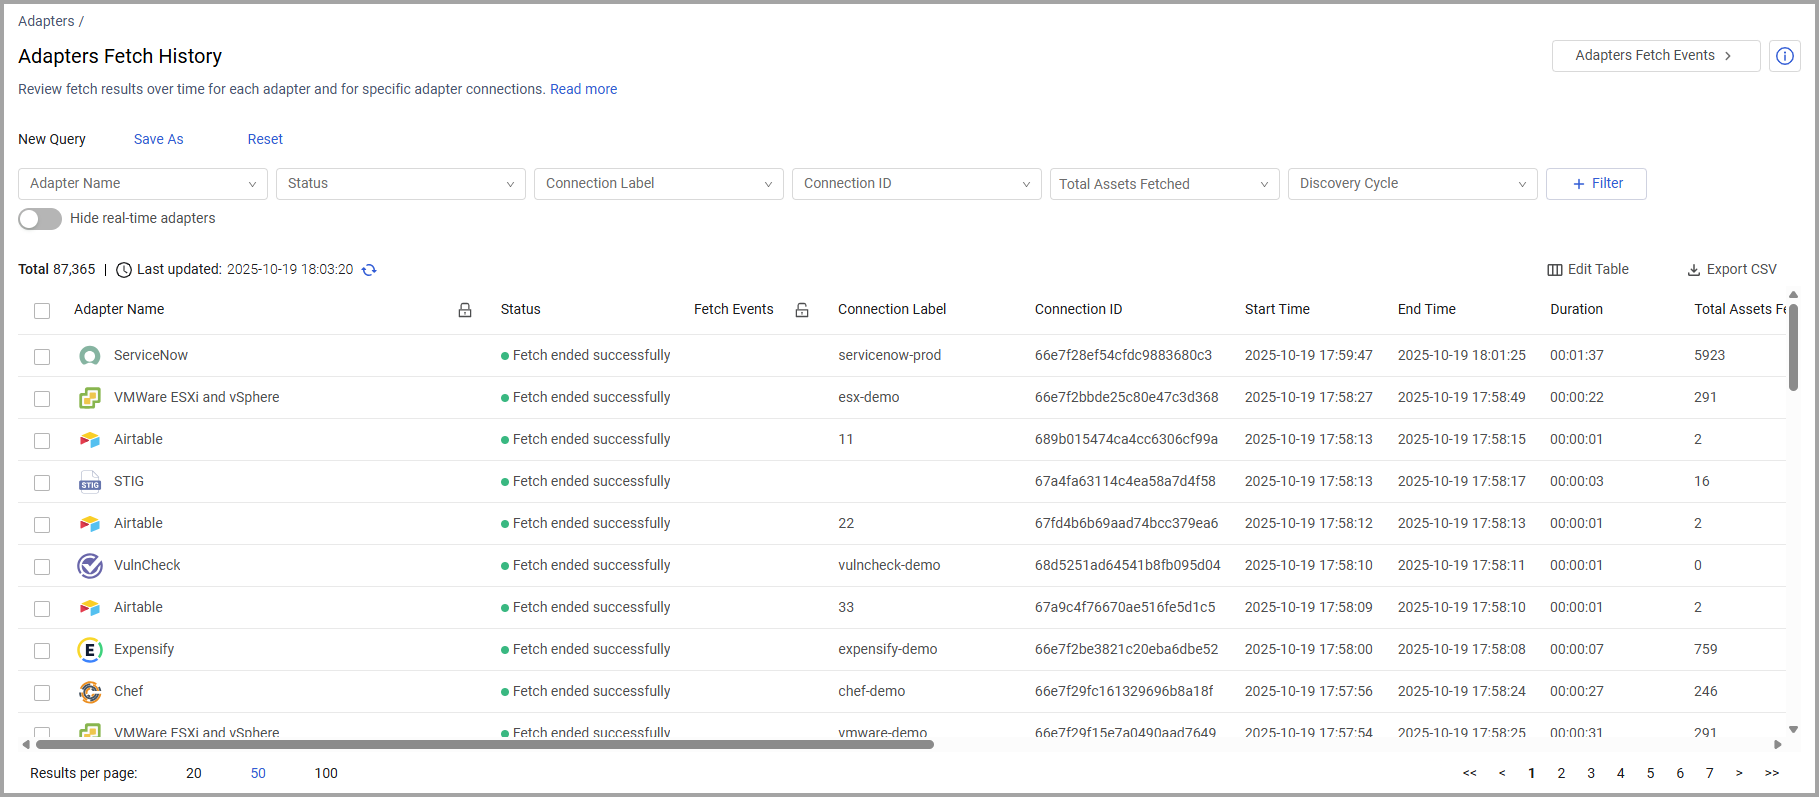
The data is displayed for each fetch action and is auto-refreshed based on the auto-refresh rate definition.
If a specific adapter has only an inactive connection, or the adapter never fetched data, the specific adapter is not displayed in the adapters filter.
The following columns are displayed for each fetch action:
- Adapter Name - The adapter that fetched the data.
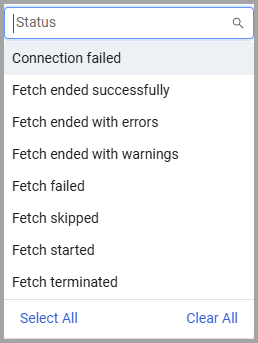
- Status - Presents the fetch status.
- Contains the following values:
- Fetch started - The fetch process was initiated.
- Fetch ended successfully - The fetch ended successfully with no errors, and results are presented.
- Fetch ended with warnings - The fetch ended with one or more warnings, but no errors. This allows the user to create a saved query that returns warnings about which they will be alerted (i.e. using Findings or EC actions).
- Fetch ended with errors - The fetch ended but there was one or more errors.
- Fetch failed - The fetch process failed.
- Connection failed - There was a connection error for the specific connection.
- Fetch skipped - When there is a Gateway configured, and the Gateway status was disconnected.
- Fetch terminated - The fetch process was terminated by the user.
- Contains the following values:
- Fetch Events - The number and type of Fetch Events. The types of events are indicated by a color that indicates the severity. Hover over to see how many of each event type. Click on this column to open the Adapter Fetch Events page filtered by the specific fetch for the adapter.
- Compute Node - The specific Compute Node the adapter and connection were initiated from (displayed in Customer-hosted (on-premises) deployments).
- Connection Label - The connection label (if configured).
- Connection ID - The connection ID.
- Start Time - The fetch process start time.
- End Time - The fetch process end time.
- Duration - The calculated total fetch duration, in HH:DD:MM format.
- Total Assets Fetched - The total number of non-unique assets fetched. You can add more "Total Fetched" columns manually for all other asset types that you have in your system. Hover over the value to see a tooltip that shows the breakdown of assets fetched according to asset type.
- Total Devices - The total number of non-unique devices fetched.
- Ignored Devices - The number of devices that were not seen by the source in the last X hours (X is defined in Adapter Advanced Settings).
Note
When you hover over a row in this column, a tooltip appears with the different reasons why devices were ignored.
- Total Users - The total number of non-unique users fetched.
- Ignored Users - The number of users that were not seen by the source in the last X hours (X is defined in Adapter Advanced Settings).
Note
When you hover over a row in this column, a tooltip appears with the different reasons why users were ignored.
- Discovery Cycle - The identifier of the discovery cycle in which the activity occurred. This is presented as the start date and time of the discovery cycle.
- Last Connection Update - Shows if the adapter or the connection configuration were updated since the last fetch. The field will either show Yes or No. If the connection was updated, Yes is a link that opens the Activity Log page filtered to the change made, displayed by the start date of the previous fetch start time. The Message column shows details of the old configuration and the new configuration, hover over to see them, or Export to CSV.
- Connection update can be:
- Configuration change to the adapter connection itself.
- Configuration change on the adapter level that affects the connection, for instance if the connection is not customized and ignores an adapter configuration change.
- Connection update can be:
- Installed Version - The Axonius installed version at the time the fetch was initiated. This is the value that is displayed in “About” under System Settings.
- Error Details - The details of errors - displayed when the status is Connection Failed or Fetch Failed.
Setting Page Columns Display
Use Edit Columns to set the columns displayed on the page and save them as a Saved View and thus see fields most relevant to you. Drag and drop columns on the table to arrange them in the order you want.
Terminate Fetch
Sometimes the Fetch process might take a long time, and you therefore want to stop the Fetch process of an adapter connection. To stop the Fetch process
- From the Adapter Fetch History page hover over one adapter, or select one or more adapters.
- Click Terminate Fetch on the right side of the page just above the table.
The system terminates the fetch process of the adapter connections selected if they are in the middle of the fetch process.
A message is displayed in the Adapter Fetch History pane showing that the adapter fetch was terminated. 
Note
Terminate Fetch only stops the current Fetch process. If you do not want this adapter connection to be fetched in the future, you need to set the adapter as inactive in the Adapter page
You can see which adapter connections were terminated by filtering by Fetch Terminated in the Fetch Status dropdown.
Filtering
-
You can filter on the values to be displayed in the table. You can then use the filters to create system queries based on the filters and also save them as queries which can be used later on.Read more about System Queries.
-
The following filters are available:
-
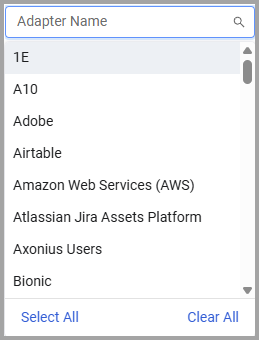
Adapter Name - To view the fetch history of a specific adapter. Once you filter by adapter name, the Connection label, Connection ID and Compute node displayed are those relevant for that adapter.
-
Compute Node - Show only fetch history from a specific Compute Node.
-
Status - Display only fetch history with a specific status.
-
Connection Label - Display only fetch history from one or more specific connection labels (when set for a connection).
-
Connection ID - Display only fetch history from one or more specific connection IDs.
-
Total Assets Fetched - From the dropdown, select an operator (Equal to, Greater than, Less than) and enter the number of total assets that you want to filter.
-
Total Devices - From the dropdown, select an operator (Equal to, Greater than, Less than) and enter the number of total devices that you want to filter.
-
Total Users - From the dropdown, select an operator (Equal to, Greater than, Less than) and enter the number of total users that you want to filter.
-
Time Range - You can filter for specific fetch data by date with the date range picker or by a specified last number of days, weeks, months, or years or for a time range prior to the number of days set.
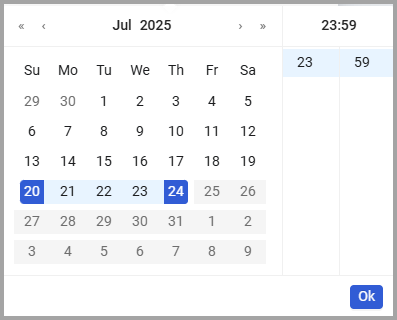
To filter by date range:
- From the Time Range dropdown, select In range.
- Select Start date and End date to indicate the date range to display results.
- To filter results only for a specific date, select the same date twice.
- If you want to include specific times in the date range, click Select Time in the date range picker.
- Click OK to set the Time Range filter.
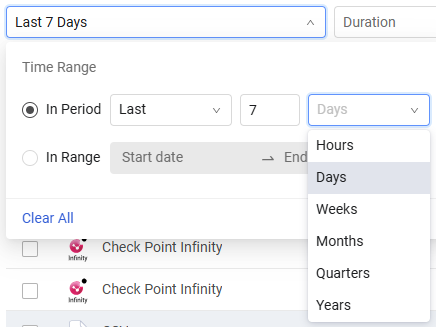
To filter by the last number of hours, days, weeks, months, or years:
- From the Time Range dropdown, select Last and specify a value in the field next to Last.
- By default, the value is the number of days. If you want to filter by hours/weeks/months/years, select the relevant option from the days dropdown.
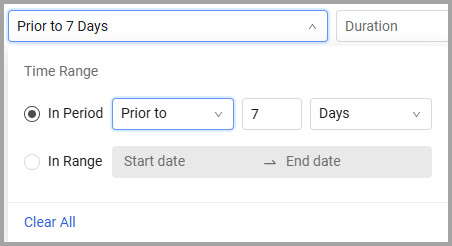
To filter by the number of days ago:
You can set a Time Range to show only the events prior to the number of hours, days, weeks, months, or years set.
- From the Time Range dropdown, select Prior to.
- In the number field, enter a value or use the arrows to select the value you want.
- By default, the value is the number of days. If you want to filter by hours/weeks/months/years, select the relevant option from the days dropdown.
-
Duration - From the dropdown, select an operator (Equal to, Greater than, Less than) and enter the time duration (in HH:MM:SS) format) that you want to filter.
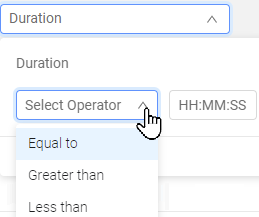
- To set seconds, highlight SS and enter a number, up to 59 seconds.
- To set minutes, highlight MM and enter a number, up to 59 minutes.
- To set hours, highlight HH and enter a number, up to 99 hours.
-
Discovery Cycle - Display only fetch history from a specific Discovery Cycle, or Cycles.
-
-
Click Clear All to clear all selections in a specific filter.
-
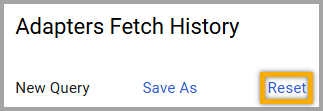
Click Reset from the top of the Adapters Fetch History page to clear all filters and display the entire fetch history.
-
Hide real-time adapters - If there is an adapter configured for real-time fetch, when switched on, the real-time related fetch history is hidden.

-
Filter - Add a filter for any of the table's fields to display data that includes specific values for those fields.
-
Saving Filters and Searches
You can save filters and searches you configure on this page as System Queries, Refer to System Queries (Creating Queries Using Filters) for full details. Once you save a query, you can see it on the Queries page. Use: Save As - to save the filters/search as a Query Reset - to reset the display
Exporting Adapter Fetch History to CSV
You can export the Adapter Fetch History table data to a CSV file. To export the results to a CSV file:
In the Adapter Fetch History page, click Export CSV on the right side of the page just above the table.
The Export Data screen opens: 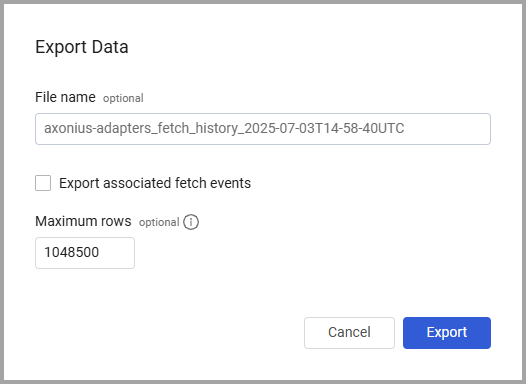
File name - Set a name for the CSV file. A default name appears for the CSV file, with the format axonius-adapter_fetch_history< date >T< time >UTC.csv You can change the file name if you wish.
Select Export associated fetch events to include information about the fetch events in the CSV file created.
Maximum rows (optional, default: 1048500) - Specify the maximum number of rows to be included in the CSV file. When you enter a value the generated CSV file includes the top x rows, based on the specified values. Otherwise the generated CSV file includes the default maximum rows, set as 1048500 (note that this value is the maximum value supported by Excel, setting a higher value generates a file that can't be displayed fully or correctly in Excel).
Click Export, the file is created and downloaded to your system.
Adapters Fetch History Retention
The Adapters Fetch History page always displays the last 100,000 activities.
For general information about working with tables, refer to Working with Tables.
Updated 23 days ago