
MobileIron EMM
MobileIron EMM (now part of Ivanti) enables enterprises to secure and manage modern operating systems on mobile devices and desktops.
The MobileIron EMM adapter enables Axonius to fetch and catalog managed mobile devices and their applications, ensuring comprehensive visibility into device compliance, security posture, and hardware inventory across the enterprise.
Asset Types Fetched
- Devices
- Software
- SaaS Applications
- Certificates
Before You Begin
Authentication Methods
- Username and Password
Required Permissions
The value supplied in User Name must have the following roles to access devices:
-
App and Content Ready Only
-
Device Read Only
-
User Read Only
-
System Read Only
Creating a User Account and Assigning API Permissions
-
Create a user account by clicking the menu options per the screen shot below. Alternately, select an existing user account to be used.
.png)
-
On the Admin tab, select the user, and access the Actions dropdown.
.png)
-
Select Assign to Space and assign the user to the Global admin space.
.png)
-
Select Edit Roles, and set the right permission for the following categories:
- Device Management - select View device page, device details.
- Privacy Control - select View apps and ibooks in device details.
- Label Management - select View Label.
- User Management - select View User.
- App Management - select:
- View app
- View app inventory
-
Under Other Roles, assign the API role to the user.
.png)
Connection Parameters
To connect the adapter in Axonius, provide the following parameters.
Required Parameters
-
MobileIron Domain - Enter the hostname or IP address of the MobileIron server. For example:
https://m.mobileiron.net -
Is MobileIron Cloud (default: false) - Select whether to use the MobileIron Cloud solution:
- If enabled, Axonius will use the MobileIron Cloud API to fetch assets data from MobileIron Cloud.
- If disabled, Axonius will use the MobileIron API to fetch assets data from a specified MobileIron server.
-
User Name and Password - Enter the credentials for a user account that has the Required Permissions to fetch assets.
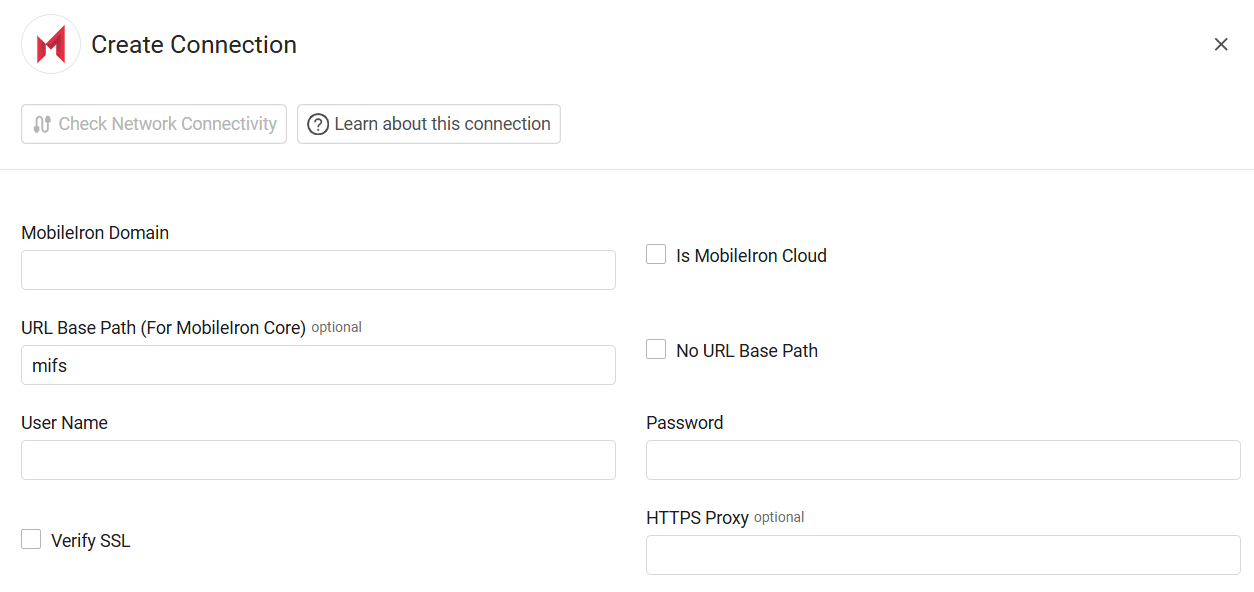
Optional Parameters
-
URL Base Path (For MobileIron Core) (default:
mifs) - If you are using the MobileIron Core solution, specify your MobileIron Enterprise name.
.png)
-
No URL Base Path (default: false) - Select to use the default URL base path.
-
Verify SSL - Specify whether to verify the SSL certificate offered by the value supplied in MobileIron Domain. For more details, see SSL Trust & CA Settings.
-
HTTPS Proxy - Enter an HTTPS proxy hostname or IP address to use when connecting to the value supplied in MobileIron Domain.
- If supplied, Axonius will utilize the proxy when connecting to the value supplied in MobileIron Domain.
- If not supplied (default), Axonius will connect directly to the value supplied in MobileIron Domain.
To learn about additional optional/common adapter connection parameters, see Adding a New Adapter Connection.
Advanced Settings
Note
- Advanced settings can apply to either all connections of this adapter, or to a specific connection. For more detailed information, see Advanced Configuration for Adapters.
- For more general information about advanced settings, see Adapter Advanced Settings.
-
Fetch applications - Select this option to fetch installed application from MobileIron.
-
Exclude no 'Last Seen' devices - Select this option to exclude devices that do not have 'last seen' indication.
-
Fetch Hardware Inventory from Cloud - Select this option to fetch more information about the hardware. You can only select this option if the Is MobileIron Cloud option is selected.
-
Status include list - Use this field to only fetch Core Devices whose Status field matches at least one of the values listed in this field. The values are comma separated. This is case insensitive.
- If supplied, all connections for this adapter will fetch only Core Devices that comply with this condition.
- If not supplied, all connections for this adapter will fetch all Core Devices.
-
Use IMEI as device serial - Select this option to use the device IMEI as the device serial number.
-
Registration State exclude list - Use this field to exclude devices that have any of the specified registration state values, separated by a comma. Examples of registration states include:
ACTIVE,ENROLLMENT_PENDING,UNKNOWN,RETIRED,RETIRE_SENT,WIPED, WIPE_SENT. -
Fetch spastic partitions IDs - Enter partition IDs to fetch as a comma separated list. If no partition IDs are entered, then all partitions are fetched.
-
Certificate Enrollment (CE) names to fetch certificates from - Click Add to specify a list of Certificate Enrollment (CE) names. If configured, the adapter will fetch certificates associated with these specific enrollments for the devices.
Updated 7 months ago