
Custom Files
The Custom Files adapter imports CSV, JSON, TXT and XML files with inventory information from the asset types listed.
Asset Types Fetched
- Devices, Aggregated Security Findings, Users, Software, Application Extensions, Admin Managed Extensions, User Initiated Extensions, Application Add-Ons, Application Extension Instances, Admin Managed Extension Instances, User Initiated Extension Instances, Application Add-On Instances, Application Keys, SaaS Applications, Networks, Containers, Alerts/Incidents, Databases, Network Services, Certificates, Firewalls, Load Balancers, URLs/Domains, Network Routes, License, Roles, Permissions, Application Settings, Compute Services
See the list of fields imported with a custom file for each asset type.
Example Files
CSV file
JSON file
TXT file
hostname=server01 ip=192.168.1.10 os="Windows Server 2019" status=active mac=00:1A:2B:3C:4D:5E serial=SRV001
hostname=server02 ip=192.168.1.11 os="Ubuntu 22.04 LTS" status=active mac=00:1A:2B:3C:4D:5F serial=SRV002
hostname=workstation01 ip=192.168.1.50 os="Windows 11 Pro" status=active mac=00:1A:2B:3C:4D:60 serial=WKS001
hostname=laptop01 ip=192.168.1.100 os="macOS Ventura" status=inactive mac=00:1A:2B:3C:4D:61 serial=LPT001
hostname=db-primary ip=10.0.0.5 os="Red Hat Enterprise Linux 9" status=active mac=00:1A:2B:3C:4D:62 serial=DB001
hostname=web-proxy ip=10.0.0.10 os="Debian 12" status=active mac=00:1A:2B:3C:4D:63 serial=PRX001
Connection Parameters
-
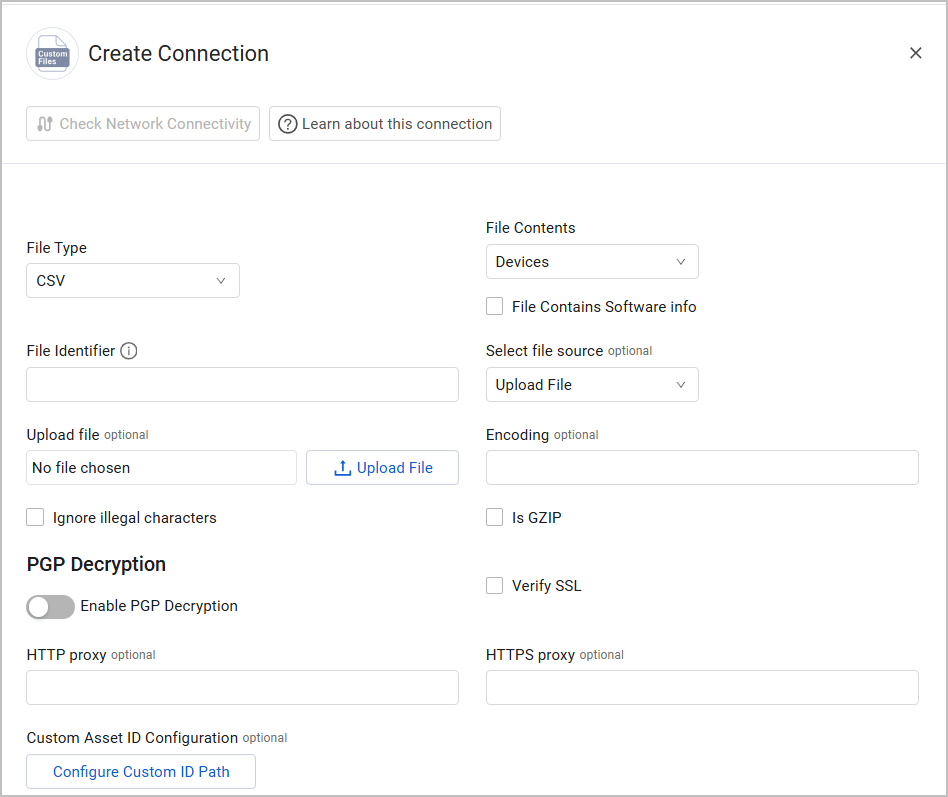
File Type (required) - Select CSV, JSON, XML, or TXT.
CSV File Type Options
When the file type is CSV, the following optional field appear:
- Custom CSV Headers - Provide a comma-separated list of column headers for headerless CSV files, in order. When set, the first data row is NOT treated as a header. For example:
['id', 'hostname', 'ip', 'mac']
How It WorksWithout Custom CSV Headers (Default behavior) - The adapter assumes the first row of the CSV file contains column headers
Example CSV file:id,hostname,ip,mac cld001,hostname_a,10.0.0.1,00:AA:BB:CC:DD:01 cld002,hostname_b,10.0.0.2,00:AA:BB:CC:DD:02With Custom CSV Headers - The adapter treats ALL rows as data (no header row). You provide the column names in the configuration.
Example CSV file (headerless):cld001,hostname_a,10.0.0.1,00:AA:BB:CC:DD:01 cld002,hostname_b,10.0.0.2,00:AA:BB:CC:DD:02ValidationThe adapter validates that the number of custom headers matches the number of columns in the CSV file. This validation helps you quickly identify and fix header configuration mismatches.
- If you specify too few headers, an error message identifies which configured headers have no corresponding column.
- If you specify too many headers, an error message identifies which CSV columns have no configured header.
JSON File Type Options
When the file type is JSON, the following optional fields appear:
- Path to entities - Provide a slash-separated path to the array of records within the JSON document (e.g.
results/data,report/items/devices). Leave this field empty to use the document root. - Context fields to merge - Provide a list of slash-separated paths to fields that should be extracted from the document and merged into every entity. This field supports two scopes:
- Global - Path is outside the repeating parent (e.g.
cluster,metadata/scan_date), the same value is merged into all entities. - Per-item - Path is a sibling of the target array within a repeating parent (e.g.
report/items/sourcewhen entities are atreport/items/devices). Each entity receives the value from its own enclosing parent.
In all cases, entity fields take precedence over context fields on collision. Merged fields appear as custom fields prefixed withcustom_files_, with dots and slashes replaced by underscores (e.g.metadata/scan_date→custom_files_metadata_scan_date).
- Global - Path is outside the repeating parent (e.g.
Example - Path to entitiesIf your JSON structure is:
{
  "data": {
    "items": {
      "devices": [
        {"hostname": "device1", "ip": "10.0.0.1"},
        {"hostname": "device2", "ip": "10.0.0.2"}
      ]
    }
  }
}
Set Path to entities to:
data/items/devicesExample - Context fields to mergeIf your JSON structure is:
{
  "report_id": "RPT-2026-001",
  "metadata": {
    "cluster": "prod-east-1",
    "scan_date": "2026-04-26"
  },
  "data": {
    "items": [
      {
        "source": "trivy",
        "scanner_version": "0.45.1",
        "devices": [
          {"hostname": "device1", "ip": "10.0.0.1"},
          {"hostname": "device2", "ip": "10.0.0.2"}
        ]
      }
    ]
  }
}
Set Context fields to merge into each entity to:
report_idmetadata/clusterdata/items/sourcedata/items/scanner_version
Result: Each device entity will include the merged context fields:
{
  "hostname": "device1",
  "ip": "10.0.0.1",
  "report_id": "RPT-2026-001",
  "metadata_cluster": "prod-east-1",
  "data_items_source": "trivy",
  "data_items_scanner_version": "0.45.1"
}
TXT File Type Options
When the file type is TXT, a field titled Field Separator appears. This field defines the character that separates the
key=valuepairs in each line of the TXT file.
Explanation about the TXT file format: This file type parses files containingkey=valuepairs. Each line in the file represents one asset, with multiple fields separated by a delimiter defined in Field Separator. Values containing spaces must be wrapped in double quoteskey1=value1<separator>key2=value2<separator>key3="value with spaces" - Custom CSV Headers - Provide a comma-separated list of column headers for headerless CSV files, in order. When set, the first data row is NOT treated as a header. For example:
-
File Contents (required) - Select the file contents according to the required Asset Type. If you select Devices, a File Contains Software info checkbox appears. Select this option to import an installed software list instead of devices. See Fields Imported with a Software Applications File for more information.
-
File Identifier (required) - Provide a unique name for the adapter connection. The value supplied here is populated in the File Name field for the data supplied by a specific adapter connection.
-
Select file source - The Custom Files adapter supports upload of files from a variety of file sources. The parameters you need to enter change according to the file source that you select. The default is Upload File. See File Sources for more information.
-
Encoding - Specify a specific file encoding or let Axonius decode it. When you enter an encoding type Axonius tries to decode the CSV file based on the specified file encoding type (for example, utf-8) for this connection. Otherwise Axonius tries to decode the CSV file based on common file encoding types for this connection. Refer to the list of standard, built-in codecs in Python.
-
Ignore illegal characters - Select this option to ignore illegal characters during the data import. An illegal character is any character that cannot be translated in the specified file encoding. If you do not select this option, and an illegal character is found, the entire data import fails.
-
Is GZIP - Mark whether this file is a compressed GZIP file or not. If it's GZIP, the adapter will unzip the file before parsing it.
-
Enable PGP Decryption (optional, default: disabled) - Enable this option to decrypt a PGP-encrypted CSV file. When enabled, you need to provide your PGP credentials: PGP Private Key and PGP Private key passphrase (optional).
-
Verify SSL - Select whether to verify the SSL certificate of the server against the CA database inside of Axonius. For more details, see SSL Trust & CA Settings.
-
HTTP Proxy - A proxy to use when connecting to an HTTP(S) URL specified in Select file source.
-
HTTPS Proxy - Connect the adapter to a proxy instead of directly connecting it to the domain.
-
Custom Asset ID Configuration (optional) - Use this capability to configure a custom ID path to generate unique asset identifiers. This is useful when the default ID fields don't match your data structure. Click Configure Custom ID Path and in the dialog that opens, enter one or more field names that should be used to create the asset ID.
Important guidelines:-
Editing the Custom ID Path will delete all existing assets from this connection and re-create them with new IDs based on the updated path. This is necessary because asset IDs are used to track and correlate data across fetches. Therefore, before editing this setting, ensure you understand the impact on your asset inventory, and consider the effect on any saved queries, reports, or Enforcement Actions that reference these assets.
-
This capability is intended for files that cannot be modified at the source. If you have control over the file format, it is recommended to rename your fields to match the standard ID fields rather than using a custom ID path. This ensures better compatibility and avoids potential issues with ID changes.
-
Field names are case-sensitive - for example,
Serial_Numberis different fromserial_number. -
For nested fields, use / as a separator - for example,
metadata/device_id. -
For nested arrays, use numeric indices to get a specific item. For example, for the first item, use
devices/0/id.Attention
- Using array indices is risky because array order might change, leading to inconsistent IDs and potentially causing duplicate assets.
- Without an index, values from all items in the array will be used. For example,
tags/namewill collect the name field from every item in the tags array. This can also lead to inconsistencies when items in the list change.
-
-
Examples:
Custom ID Path Raw Data Generated ID serial_number {"serial_number": "SN123"}sn123 serial_number, cloud_id {"serial_number": "SN123", "cloud_id": "AWS001"}sn123_aws001 device/id {"device": {"id": "DEV001"}}dev001 tags/0/name {"tags": [{"name": "primary"}, {"name": "backup"}]}primary tags/name {"tags": [{"name": "primary"}, {"name": "backup"}]}['primary', 'backup'] -
Custom Aggregation Configuration - (optional) - Use this capability to handle flattened datasets where each row represents a combination of a parent asset and a sub-entity, for example, a Role with one of its assigned Permissions.
-
Click Configure Aggregation and toggle on Enable custom aggregation.
-
Provide a List of non aggregated fields - representing the parent asset (optional). Add each field path separately, for example:
"hostname", "serial_number". For nested fields, use "/" as a separator:"data/id". -
Click Done to save the changes.
Custom Aggregation Configuration - Example Use Case
If your CSV file looks like this:
role_name,role_id,permission_name,permission_scope
Admin,R-001,Read Users,Global
Admin,R-001,Write Users,Global
Admin,R-001,Delete Users,Global
Editor,R-002,Read Content,Department
Editor,R-002,Write Content,Department
Configure the following:
-
Enable custom aggregation:
true -
List of non aggregated fields:
["role_name", "role_id"]
Then, the adapter will create 2 Role assets - Admin and Editor - each with their respective permissions as nested data.
-
-
To learn more about common adapter connection parameters and buttons, see Adding a New Adapter Connection.
File Sources
The CSV adapter supports upload of files from a variety of file sources. See File Sources for a detailed list.

Advanced Settings
Note
Advanced settings can either apply to all connections for this adapter, or to a specific connection. See Advanced Configuration for Adapters.
- Parse entity fields dynamically - Selected by default. When selected, the adapter will parse all fields in the file and add a custom prefix.
- Set Time Zone (optional) - Set the time zone of date fields fetched with this adapter. Default is UTC.
- Multi-value fields delimiter (optional) - Specify a delimiter to separate values within the same field in the imported file. For example:
'\n'or'|'or';'. When you specify a delimiter, Axonius considers fields that contain this delimiter as multi-value fields. If you don't specify a delimiter, Axonius considers all imported fields as single-value fields. - Custom Parsing - See Adapter Custom Parsing.
Note
For details on general advanced settings under the Adapter Configuration tab, see Adapter Advanced Settings.
Supported From Version
Supported from Axonius version 6.1.
Updated 20 days ago