
1E
1E is a remote endpoint management solution built on a single agent for speed, visibility, and control of all endpoints.
Use Cases the Adapter Solves
- Endpoint Visibility Across All Managed Devices: Identify every device managed by 1E — including hardware details, OS version, and agent status — giving security and IT teams a unified view of the endpoint estate.
- Agent Health and Version Monitoring: Track 1E agent versions and connection states across all endpoints to ensure agents are current and communicating, enabling proactive remediation of stale or disconnected devices.
Asset Types Fetched
- Devices
Data Retrieved through the Adapter
Devices - Fields such as Hostname, FQDN, OS Version, OS Architecture, Domain
Before You Begin
Required Ports
- TCP port 80/443
Authentication Methods
Select an authentication method to connect the adapter based on your 1E environment:
| 1E Environment | Authentication Methods |
|---|---|
| Cloud | User Name and Password |
| On-prem | Access Token |
| SaaS | JWT Token, or Certificate File (with Certificate Passphrase, JWT Issuer (Client ID), and JWT Audience (AUD)) |
APIs
Axonius uses the Tachyon SDK. The following endpoints are called:
POST api/Authentication/RequestJwtAuthenticationPOST Tachyon/api/Authentication/RequestJwtAuthenticationGET Consumer/Devices
Consult with your vendor for permissions for reading the objects.
Setting Up 1E to Work with Axonius
For User Name and Password or Access Token authentication, consult your 1E administrator or 1E support for instructions on generating API credentials.
For certificate-based (non-interactive) authentication, follow the procedure in Initial Adapter Setup. For background, see the 1E documentation on authenticating against the platform and obtaining a token.
Initial Adapter Setup
Use this procedure to set up certificate-based (non-interactive) authentication between Axonius and 1E. Run the certificate steps on a Windows machine.
The same certificate is used twice: the public key (.cer) goes to your Entra ID application, and the certificate with its private key (.pfx) goes to Axonius. Axonius signs the JWT itself, so it needs the private key.
-
Open an administrative PowerShell prompt.
-
Create a new self-signed certificate:
New-SelfSignedCertificate -Subject "CN=AxoniusIntegration" -CertStoreLocation "Cert:\LocalMachine\My\" -KeyAlgorithm "RSA" -KeyLength 2048 -Provider "Microsoft Software Key Storage Provider" -KeyExportPolicy ExportableThe certificate subject can be any name.
-
Copy the Thumbprint value. You need it for the principal mapping and for verification.
-
Open the local certificate store (
certlm.msc) and navigate to Local Machine. -
Locate the newly created certificate and export the public key:
- Right-click the certificate and select All Tasks > Export.
- Select No, do not export the private key.
- Select Base-64 encoded X.509 (.CER) and save the file.
-
Export the certificate again, this time with the private key:
- Right-click the certificate and select All Tasks > Export.
- Select Yes, export the private key.
- Select Personal Information Exchange - PKCS #12 (.PFX).
- Set a password and save the file. You enter this password in Axonius as the Certificate Passphrase.
-
In the Entra ID app registration, go to Certificates & secrets and upload the
.cerfile. -
Ask a 1E Full Administrator to map the certificate to a 1E principal. This must be done before the first connection:
-
Get the
kidvalue, which is the Base64 thumbprint of the certificate:Get-1EJwkFromCertificate -certthumbprint CERTTHUMBPRINT -
Create the mapping:
Add-1EJwtPrincipalMapping -identifier KID -principal PRINCIPAL
- The principal must already exist in 1E role-based access control (RBAC), with a role that can read the inventory. Groups cannot be used as principals.
- The Entra App ID must match the
ClientAssertionAppIdsetting of the 1E tenant (orDirectoryAppId, ifClientAssertionAppIdis not set). In 1E SaaS, this setting is managed by 1E. Confirm it with 1E. - For more information, see the 1E role-based access control cmdlets.
-
-
In the adapter configuration in Axonius, enter the following:
-
Copy the Entra App (Application) ID to the JWT Issuer (Client ID) field.
-
Upload the
.pfxfile to the Certificate File field. -
Enter the password you set when exporting the
.pfxfile in the Certificate Passphrase field. -
In the JWT Audience (AUD) field, enter the Entra token endpoint:
https://login.microsoftonline.com/<tenant-id>/oauth2/v2.0/token. -
Leave the JWT Token field empty.
Note: Do not upload the
.cerfile to Axonius. The connection fails with the error "Failed to extract private key from certificate". -
-
If a connection error occurs, perform the certificate authentication verification process (see Verify Certificate Authentication).
Verify Certificate Authentication
-
Download the 1E PowerShell Toolkit.
-
Import the 1E PowerShell module:
import-module .\PS1EToolkit -
Log in. Fill in the certificate thumbprint and Entra App ID values:
set-1eserver URL -AppID ENTRAAPPID -certthumbprint CERTTHUMBPRINT -
Confirm the principal mapping:
get-1ejwtprincipalmapping -
Confirm that the
kidvalue of the certificate matches the mapped principal:get-1ejwkfromcertificate -certthumbprint CERTTHUMBPRINT
Connecting the Adapter in Axonius
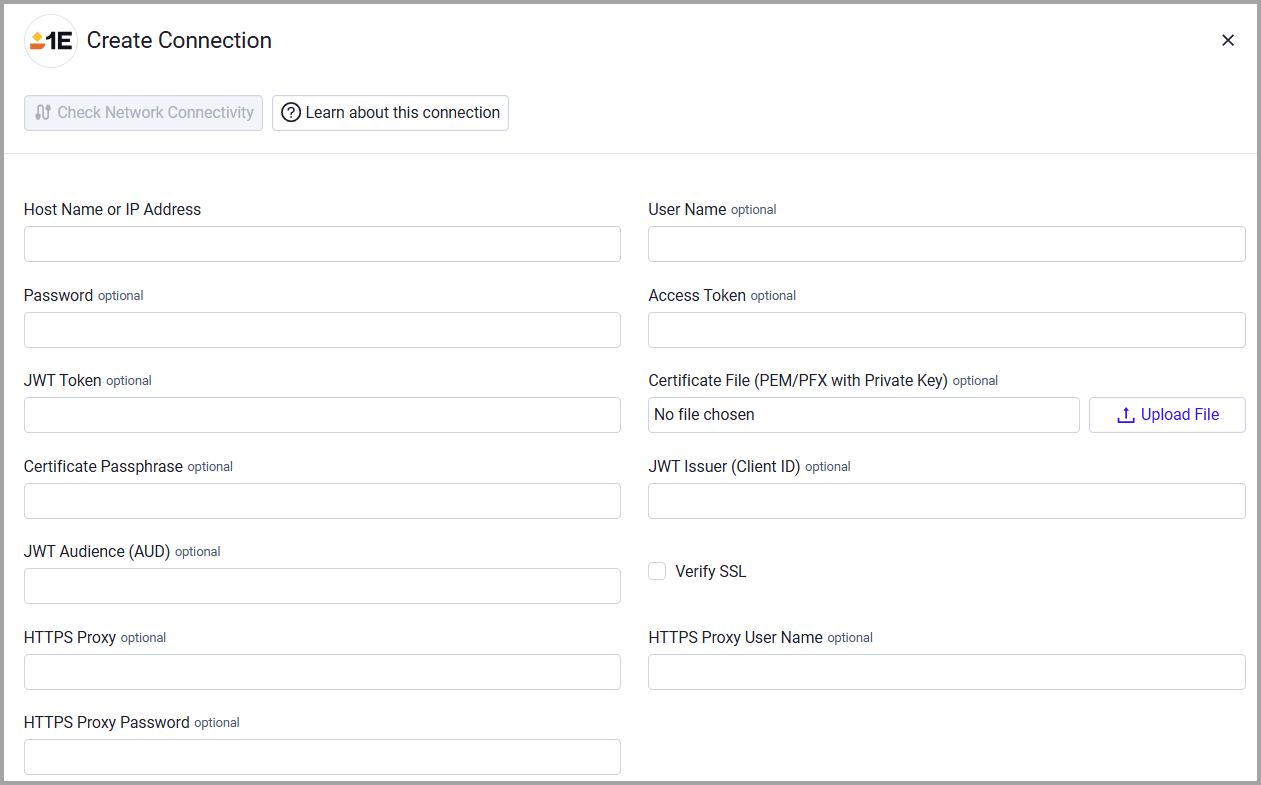
To connect the adapter in Axonius, provide the following parameters:
Required Parameters
- Host Name or IP Address - The hostname or IP address of the 1E server.
- Select one of the following authentication methods based on your 1E environment. See Authentication Methods for details.
- User Name and Password - The credentials for a user account that has the permissions to fetch assets.
- Access Token - An Access Token associated with a user account that has permissions to fetch assets.
- JWT Token - A Token associated with 1E's Non-Interactive Authentication flow. You can obtain a Token using a JWT you already have. To do so, make a POST request to either of the endpoints listed below. Your token needs to be wrapped in double quotes in the payload since the endpoint expects a string. If the JWT is valid, you receive a Token in return. See the 1E documentation for more details.
https://your.tachyon.server/Tachyon/api/Authentication/RequestJwtAuthentication(for versions 9.X and 23.X)https://your.platform.server/api/Authentication/RequestJwtAuthentication(for versions 24.1 and newer)
- Certificate File (PEM/PFX with Private Key) - The certificate file containing the private key used to sign the JWT. Accepted file formats are PFX/PKCS12 or PEM. A PEM file must contain both the private key and the certificate. Do not upload the public-key
.cerfile. For instructions on creating and exporting the certificate, see Initial Adapter Setup. Use either JWT Token or Certificate File, not both. If both are filled in, the connection fails. - Certificate Passphrase - The password used to decrypt the private key. Enter the password you set when exporting the PFX file. Leave this field empty only for an unencrypted PEM file.
- JWT Issuer (Client ID) - The application or client ID registered in your identity provider. For Microsoft Entra ID, this is the Entra App (Application) ID. See Initial Adapter Setup.
- JWT Audience (AUD) - The audience claim (
aud) for the JWT. Required for Microsoft Entra ID and 1E SaaS. For Entra ID, enter the Entra token endpoint:https://login.microsoftonline.com/<tenant-id>/oauth2/v2.0/token. If the field is empty, the 1E server URL is used as the audience, and 1E rejects it with the errorTokenAudienceDoesNotMatch. Axonius does not look up this value automatically.
Optional Parameters
- Verify SSL - Select whether to verify the SSL certificate of the server against the CA database inside of Axonius. For more details, see SSL Trust & CA Settings.
- HTTPS Proxy - Connect the adapter to a proxy instead of directly connecting it to the domain.
- HTTPS Proxy User Name - The user name to use when connecting to the value supplied in Host Name or IP Address via the value supplied in HTTPS Proxy.
- HTTPS Proxy Password - The password to use when connecting to the server using the HTTPS Proxy.
- Consumer Name - The name sent to 1E in the
X-Tachyon-Consumerheader. The default value isExplorer. Get the value from your 1E administrator.
To learn more about common adapter connection parameters and buttons, see Adding a New Adapter Connection.
Updated 4 days ago