
ServiceNow - Move or Copy Attachment
ServiceNow - Move or Copy Attachment moves or copies the attachment from a ServiceNow record to a record in a specified destination table for:
- Assets returned by the selected query or assets selected on the relevant Assets page.
Note
There is a fundamental difference between moving and copying an attachment. The Copy action is more complex.
Each flow begins by identifying both the attachment and its intended destination:
Retrieve the attachment ID from the endpoint:
- endpoint: table/sys_attachment
- sysparam_query:
table_sys_id={table_sys_id}^table_name={table_name}Retrieve the destination record sys_id using a query mapped with Dynamic Values.
- endpoint:
table/{table}- sysparam_query: number=INC00001
For each attachment, the subsequent steps vary based on whether you're moving or copying the attachment.
Move flow:
Change the attachment record destination by putting in a new value.
- endpoint:
table/sys_attachment/{attachment_sys_id}- body params: table_name=new_table_name, table_sys_id=new_table_sys_id
Check if the destination record contains the moved attachment.
- endpoint: table/sys_attachment
- sysparam_query:
table_sys_id={table_sys_id}^table_name={table_name}Copy flow:
Download the attachment file to Axonius.
- endpoint:
attachment/{attachment_sys_id}/fileUpload the attachment file to the destination record.
- endpoint: attachment/file
- URL parameters: table_name=table_name, table_sys_id=table_sys_id, file_name=file_name
- body: File content
See Creating Enforcement Sets to learn more about adding Enforcement Actions to Enforcement Sets.
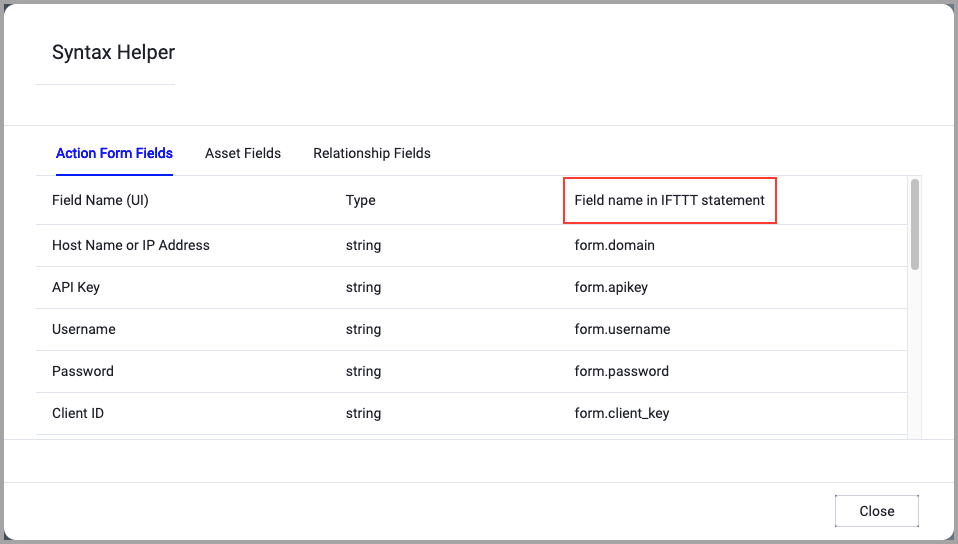
When accessing an enforcement action using the API, you must use the backend form of field names.
Use the Syntax Helper to find the correct name. In the enforcement action, enable Configure Dynamic Values and select Syntax Helper.
Note
- Not all asset types are supported for all Enforcement Actions.
- See Actions supported for Activity Logs, Adapters Fetch History, and Asset Investigation modules.
- See Actions supported for Aggregated Security Findings.
- See Actions supported for Software.
Required Fields
These fields must be configured to run the Enforcement Set.
- Action name - The name of this Enforcement Action. The system sets a default name. You can change the name.
- Configure Dynamic Values (optional) - Toggle on to enter a Dynamic Value statement. See Creating Enforcement Action Dynamic Value Statements to learn more about Dynamic Value statement syntax.
-
Use stored credentials from the ServiceNow adapter - Select this option to use credentials from the adapter connection. By default, the first connection is selected.
-
When you select this option, the Select Adapter Connection drop-down becomes available. Select the adapter connection to use for this Enforcement Action.
Note
To use this option, you must successfully configure a ServiceNow adapter connection.
-
-
Attachment Action - From the dropdown, select one of the following:
- Copy - Copies the attachment from a ServiceNow incident record to a record in the destination table.
- Move - Moves the attachment from a ServiceNow incident record to a record in the destination table.
-
Destination table name - The name of the table where you want to copy or move the attachment.
-
Destination table query - Do not enter anything in this field. Using a Dynamic Value statement, set the ServiceNow sysparm_query to filter and bring a single incident record from ServiceNow.
See an example of the statement configured using the Wizard and its syntax:
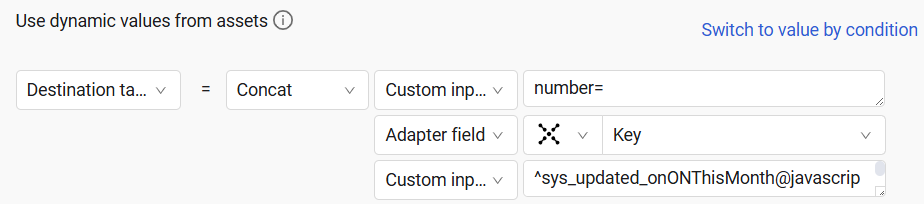
ticket all then form.destination_table_query set_value concat("number=" ,[ticket.specific_data.data.display_id] ,"^sys_updated_onONThisMonth@javascript:gs.beginningOfThisMonth()@javascript:gs.endOfThisMonth()")-
Compute Node - The Axonius node to use when connecting to the specified host. For more details, see Working with Axonius Compute Nodes.
Additional Fields
These fields are optional.
Connection and CredentialsWhen Use stored credentials from the adapter is toggled off, some of the connection fields below are required to create the connection, while other fields are optional.
ServiceNow Domain - The full URL for your ServiceNow instance.
User Name and Password - To connect to ServiceNow, you need to create a user with action privileges to create and manage assets.
OAuth Client ID and OAuth Client Secret - The credentials for OAuth-based access to ServiceNow. Refer to OAuth 2.0 with Inbound REST for full details on how to obtain the OAuth Token.
OAuth Refresh Token - When using the OAuth method of authentication, enter the value of the Refresh Token issued by a ServiceNow instance. This token is used to obtain new access tokens without requiring the user to reauthenticate.
OAuth Custom Endpoint Path - Specify a custom endpoint path to be used instead of the default
oauth_token.do.Enable sending OAuth requests as JSON - Enable sending the request in JSON format instead of the standard
www-form-urlencodedformat.Apigee URL - The URL of the domain that the GET request is sent to for acquiring the Apigee token.
Resource Apigee - The specific resources that the Apigee token is configured to access.
Verify SSL (Optional) (default: enabled) - Selects whether to verify the SSL certificate of the server against the CA database inside of Axonius. For more details, see SSL Trust & CA Settings. This setting is enabled by default on all new adapter settings. If you need to disable SSL verification, make sure you disable this setting.)
HTTPS Proxy (optional) - Connect the adapter to a proxy instead of directly connecting it to the domain.
Gateway Name - Select the Gateway through which to connect to perform the action.
Gateway Name - Select the Gateway through which to connect to perform the action.
For more details about other enforcement actions available, see Action Library.
Updated 5 months ago