
Jira Service Management (Service Desk) Fetch Tickets
Jira Service Management (Service Desk) is a project management tool that helps software development teams plan, track, and release software.
Asset Types Fetched
![]() Tickets
Tickets
Before You Begin
APIs
Axonius uses the The Jira Cloud platform REST API to fetch tickets.
Minimum Scope Sets
The following minimum scope sets are required to use the adapter:
read:issue:jira
read:field:jiraNote
Child work items and differential fetch do not require additional scopes.
Supported From Version
Supported from Axonius version 6.1
Connecting the Adapter in Axonius
Using Scoped Credentials
This adapter detects and supports four credential modes based on the field values provided. The credential mode is determined automatically - no need to configure any additional settings in the adapter's Add Connection screen.
The credential mode is auto-detected based on the following decision tree (evaluated top-to-bottom):
| Priority | Condition | Credential Mode | Authentication Method |
|---|---|---|---|
| 1 | Not cloud OR cloud without a username | On-prem / Bearer token | Authorization: Bearer <token> |
| 2 | Cloud + Username contains no @ | OAuth 2.0 2LO (Client Credentials)
| Bearer (fetched via OAuth token endpoint) |
| 3 | Cloud + Username ends with @serviceaccount.atlassian.com | Service account scoped API token | Basic auth (username:token) |
| 4 | Domain already starts with api.atlassian.com/ex/jira/<cloudId> | Scoped API token (user or service account, pre-configured URL) | Basic auth (username:token) |
| 5 | Cloud + Standard email username + Standard .atlassian.net domain | Classic cloud API token (non-scoped) | Basic auth (username:token) |
Notes
- Mode 1 is for on-prem/server installations.
- Modes 2, 3, and 4 use granular scoped credentials and require specific OAuth scopes - classic scopes such as
read:jira-workorwrite:jira-workare not sufficient. The OAuth app or service account must be granted the specific granular scopes listed in the relevant minimum scope set.- Mode 5 uses classic API tokens where scopes are not applicable.
Prerequisites
- The scoped API base URL is
(https://api.atlassian.com/ex/jira/<cloudId>/rest/... - "Fetch Comments" does not require the
read:comment:jirapermission - comments are explicitly excluded from API responses by the adapter (fields: ["*all", "-comment"]).
How to configure each mode in the Axonius interface
Each credential mode requires different values for the Axonius fields when connecting the adapter:
Mode 2: OAuth 2.0 Client Credentials (Service Account)
| Axonius Field | Required Value |
|---|---|
| User Name | OAuth Client ID |
| API Token | OAuth Client Secret |
- The adapter will automatically fetch a Bearer token from
https://auth.atlassian.com/oauth/token. - Token has a 1-hour TTL and is refreshed automatically.
Mode 3: Service Account Scoped API Token
| Axonius Field | Required Value |
|---|---|
| User Name | Service account email (must end with @serviceaccount.atlassian.com |
| API Token | The Scoped API Token |
| Host Name or IP Address | Your standard Jira domain, for example, https://your-domain.atlassian.net |
Mode 4: Scoped API Token (Pre-configured URL)
| Axonius Field | Required Value |
|---|---|
| User Name | Your Atlassian account email |
| API Token | The Scoped API Token |
| Host Name or IP Address | The scoped API gateway URL: https://api.atlassian.com/ex/jira/<your-cloud-id>
|
Mode 5: Classic API Token (Default Behavior)
| Axonius Field | Required Value |
|---|---|
| User Name | Your Atlassian account email |
| API Token | A classic API Token |
| Host Name or IP Address | Your standard Jira domain, for example https://your-domain.atlassian.net |
Connection Parameters - Axonius Interface
Required Parameters
-
Host Name or IP Address, User Name and API Token - See Using Scoped Credentials for information on the different authentication methods and the values required for each of these fields.
Note
The API Token is not the same as the Admin Key. For information on how to create an API Token, see Manage API tokens for your Atlassian account.
-
Verify SSL - Select whether to verify the SSL certificate offered by the value supplied in Host Name or IP Address. For more details, see SSL Trust & CA Settings.
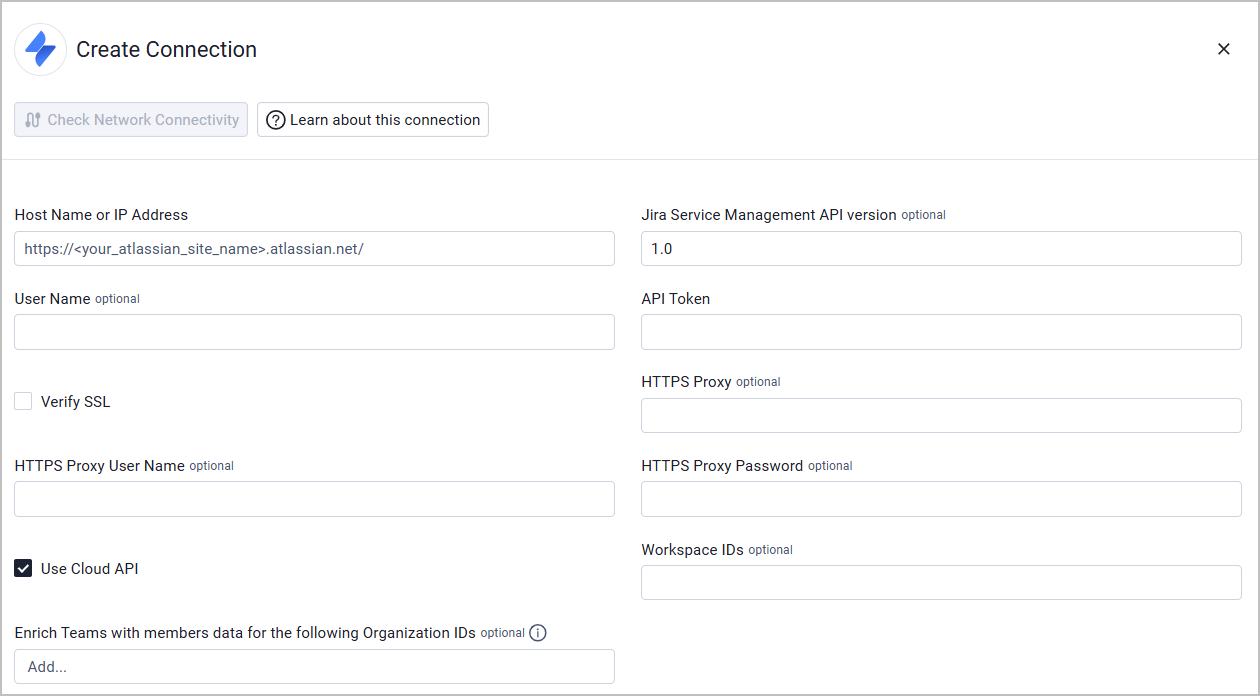
Optional Parameters
- Jira Service Management API version - The version type. The default value is 1.0
- HTTPS Proxy - A proxy to use when connecting to the value supplied in Host Name or IP Address.
- HTTPS Proxy User Name - The user name to use when connecting to the value supplied in Host Name or IP Address via the value supplied in HTTPS Proxy.
- HTTPS Proxy Password - The password to use when connecting to the value supplied in Host Name or IP Address via the value supplied in HTTPS Proxy.
- Use Cloud API - Use this option to add support for cloud-based installations of Jira Service Management (Service Desk) with Jira Insight.
- Workspace IDs - Enter an optional list of Workspace IDs to use. If no Workspace IDs are entered, the adapter queries the configured hosts for all Workspace IDs.
- Enrich Teams with members data for the following Organization IDs - Organization ID is required to enrich Tickets with Jira Team data and memberships. Enter one or more Organization IDs as an array of strings. Then, when you run a fetch:
-
The adapter automatically detects if tickets have a Team field assigned.
-
Team information is fetched from the Jira Teams API for the organizations you specified.
-
Team member lists are retrieved for each team.
-
Tickets are enriched with team data and member information. The enriched data includes Team ID, Display Name, Creator ID, Team Type, Member Account IDs, and more.
To find your Jira Organization ID:
- Log in to your Jira Cloud instance as an administrator.
- Navigate to Settings > Products.
- The Organization ID is displayed in the organization details.
-
To learn more about common adapter connection parameters and buttons, see Adding a New Adapter Connection.
Advanced Settings
Note
Advanced settings can either apply to all connections for this adapter, or to a specific connection. Refer to Advanced Configuration for Adapters.
-
JQL (optional) - Enter JQL code that will manually override the JQL query.
-
Enable Custom Parsing - Enable this option to define how to parse specific fields from the raw data fetched. You can choose to parse the data into an already existing field, or create a new one. This adapter supports Ticket Custom Parsing. See Adapter Custom Parsing for more information.
-
Fetch Child work items for Epic tickets (default: disabled)- Enable this option to fetch child work items (i.e., epic links) for each epic ticket.
-
Enable real-time asset updates (Supported events: New Tickets) (default: disabled) - For
{{variable.IDM}}only. When enabled, fetches newly created tickets after the last successful fetch run. If the JQL field is not empty, ' AND created>-{last_run}m' is appended to 'JQL'. When a new ticket is created, this enabled option causes the adapter to trigger a Jira Ticket Created event. -
Fetch EC Action ticket updates - Select this option to fetch ticket updates from the ticketing system for tickets that were created by Axonius EC actions.
Using Custom Schema Entries to Add JSON Text to Show in Basic View
You can use custom schema entries to add JSON text to show in basic view. Use the plus sign to add an entry to each field.
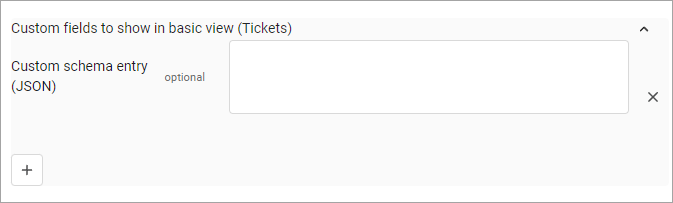
Enter fields in the following JSON format:
[
  {
    "label": "Asset ID",
    "raw_field": "asset_id",
    "field_type": "str"
  },
  {
    "label": "Updated at",
    "raw_field": "updated",
    "field_type": "datetime"
  }
]
Custom field example:
    {
    "label": "My Title",
    "raw_field": "fields/customfield_10907/value",
    "field_type": "str"
  }
For more information on custom asset schema and the format of the JSON file, refer to ServiceNow Advanced Settings - Custom Asset Schema.
Note
To learn more about Adapter Configuration tab advanced settings, see Adapter Advanced Settings.