
Creating a New Campaign
Create an access review campaign to assess whether users should retain their current access to applications and permissions.
The campaign creation process consists of four steps:
The following are some features of the Campaign Wizard:
-
The current step has a dark blue background.

-
A complete step has a checkmark with a light blue background.

-
An incomplete or unconfigured step has a light gray background.

-
Hovering over a gray step opens it, unless it is disabled.
-
Changes to a campaign are automatically saved.
To create a campaign:
Step 1: Approvers, Users, and Applications
-
Select an approver type from the Select Approver dropdown. See Selecting an Approver for details.
-
In the Users module, select a query from the Query dropdown.
-
To remove specific entitlements from the review, select Exclude Entitlements. See Excluding Entitlements for details.
-
To include entitlements granted by the Identity Management Rule Engine, select Revoke rule-based entitlements. See Revoking Rule-Based Entitlements for details.
-
Review the Query Preview to verify the users, applications, and approvers included in your campaign.
-
Click Next.
Step 2: Message and Response
-
Select a Message Method (Slack, Teams, or Email). See Message Method for details.
-
In Message Content, enter the message to send to approvers.
-
Review the Response Options (Approve and Revoke). See Response Options for details.
-
Click Next.
Step 3: Settings
-
Enter a Campaign Name.
-
Optionally, in Add description, include additional details about the campaign.
-
Set a Due Date for the campaign.
-
To send reminder messages to approvers, enable Send Reminder.
-
Click Next.
Step 4: Summary
-
Review the Summary section, which displays all settings you configured.
-
Review the Message Preview to verify the content.
-
If you need to make changes, click on a wizard step on the left to return to any previous step.
-
Select Run Campaign to start the campaign. The campaign configuration is saved automatically.
Selecting an Approver
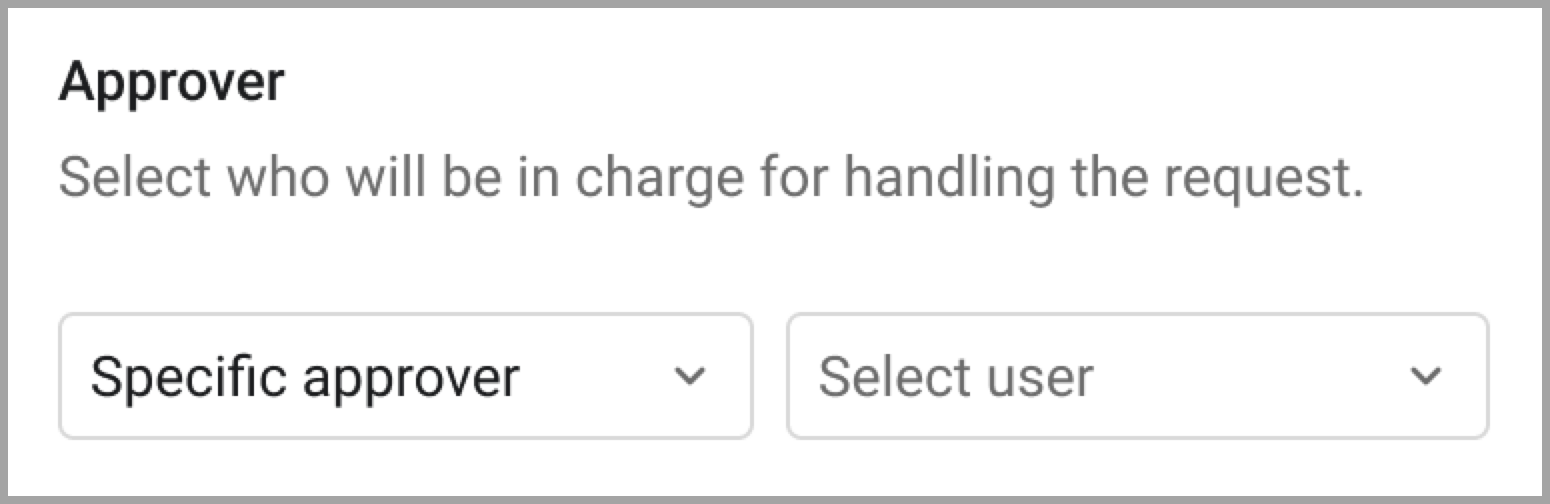
There are two options for configuring the approver for a campaign:
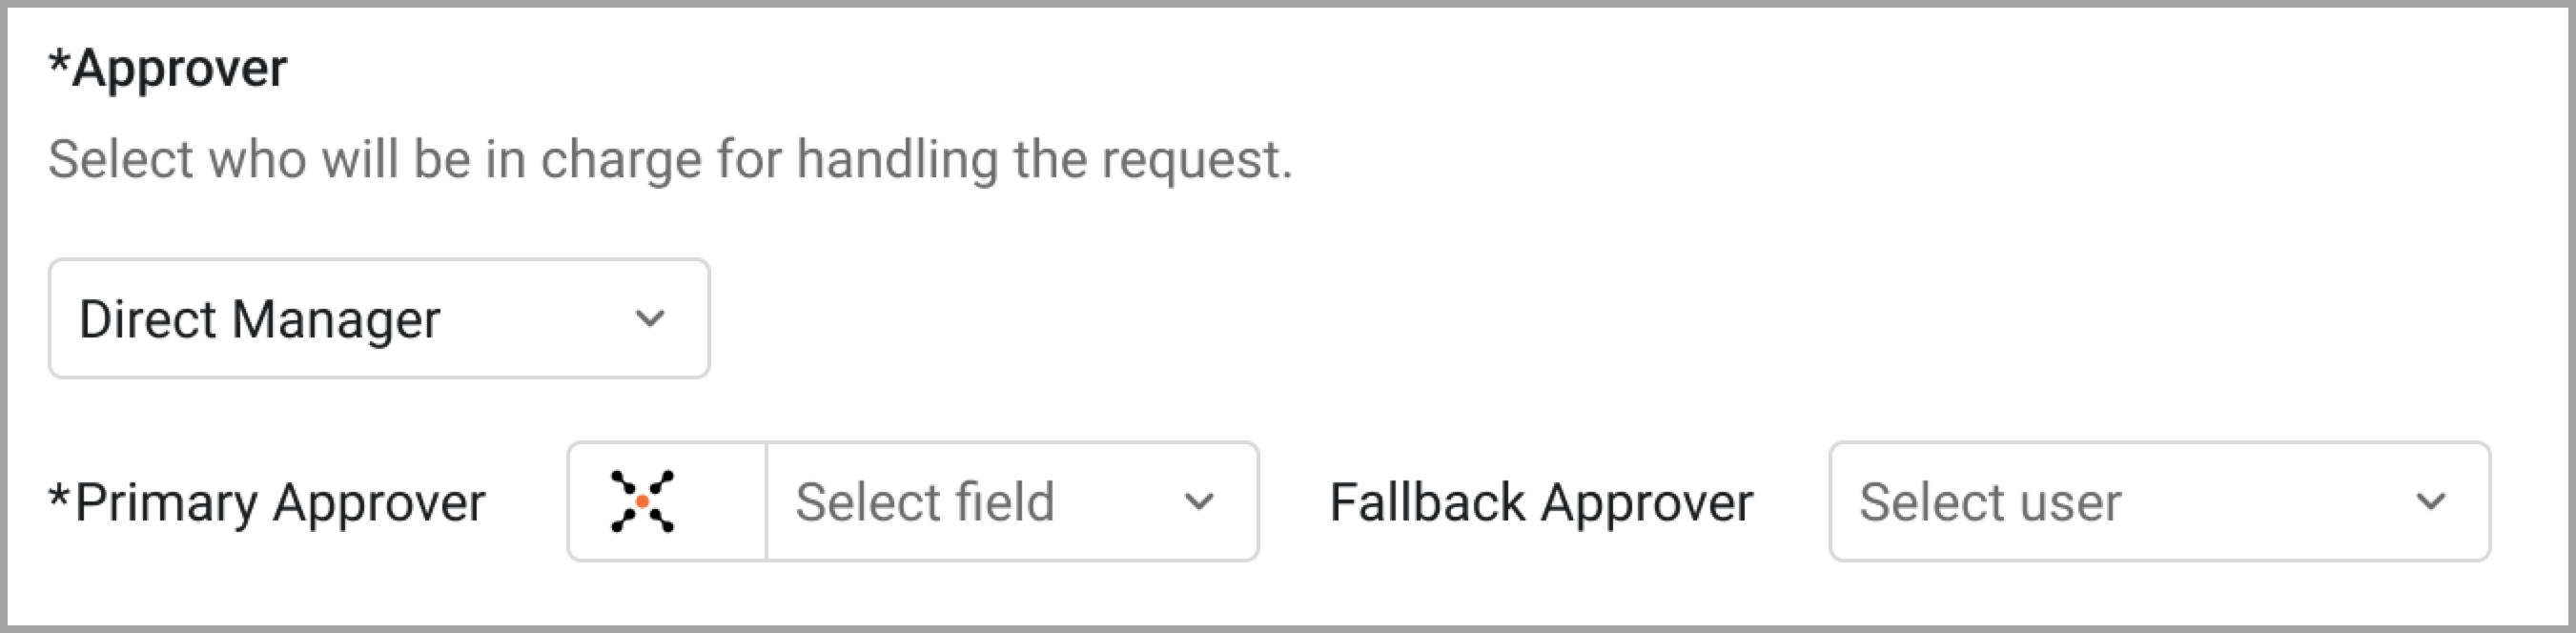
- Direct Manager - Assigns the user's direct manager, as specified by the default field or another selected field, to approve or revoke the user's access and entitlements.
- Specific Approver - Select one specific user as the designated approver for all users in the campaign.
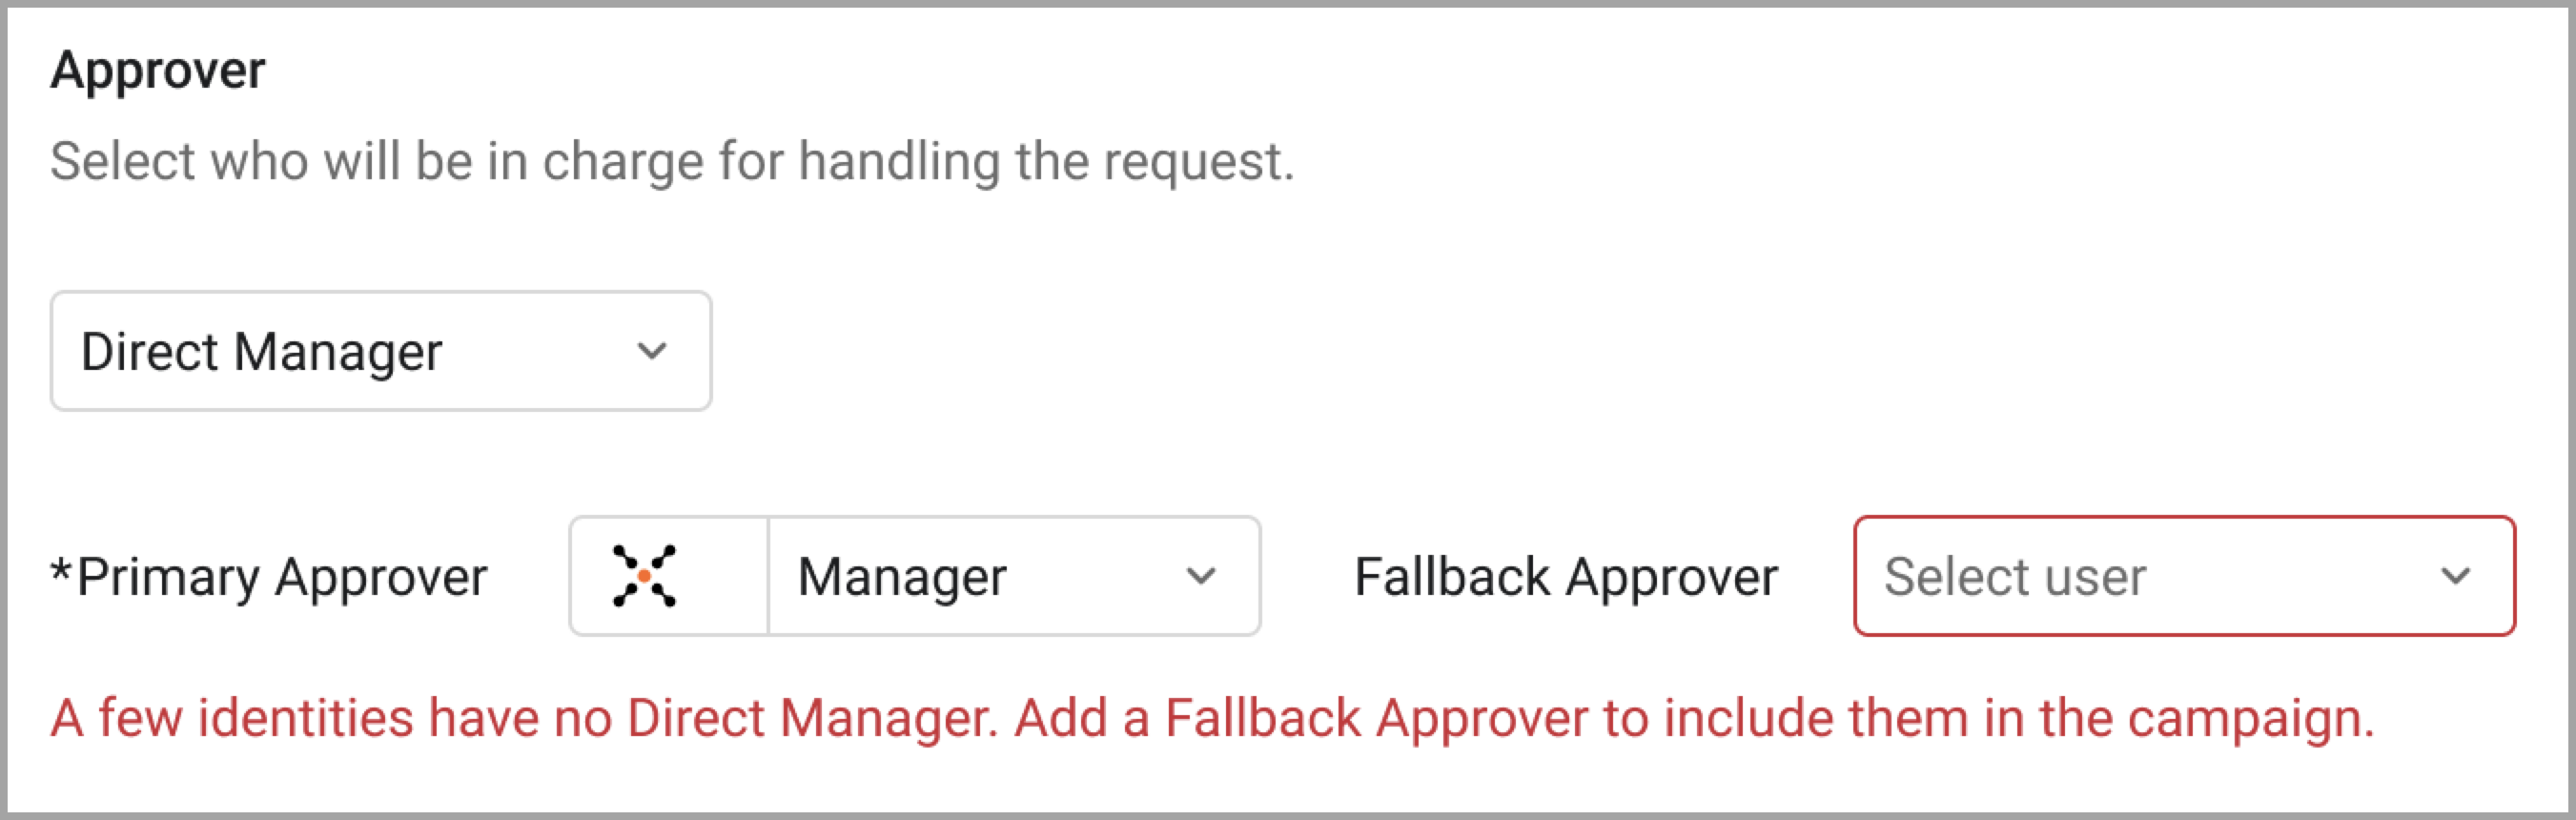
Designating the User's Direct Manager as the Approver
When Direct Manager is selected, the manager specified in the selected manager email field is sent an email message notifying them that they have been designated as an approver. The email includes a link to the campaign page where they can approve or revoke each user's current entitlements.
When you select Direct Manager:
-
Configure the Manager Field by selecting the connection and field that stores manager data. The default field is User Manager Email. If your organization stores manager information in a different field, select that field.
-
If identities in your query are missing manager data, assign a Fallback Approver:
- Select a user who will receive approval requests for any identities that don't have a direct manager assigned.
- This ensures all identities are included in the campaign.
- Important: If identities are missing a direct manager and you don't assign a fallback approver, those identities are excluded from the campaign.
-
If identities lack a direct manager, error validation appears:
-
The Fallback Approver field displays a red error stroke.
-
An error message appears: "A few identities have no Direct Manager. Add a Fallback Approver to include them in the campaign."
-
The Query Preview shows a counter for "Users without a direct manager" highlighted in red.
-
You must add a fallback approver to proceed.
-
Designating a Specific Approver for All Users in the Campaign
A single user approves all access requests in the campaign. Select the user from the dropdown.
Excluding Entitlements
By default, all entitlements assigned to a user are included in the access review. Use Exclude Entitlements to select entitlements you don't want to be part of the review. This option is only available after the approvers and a query are selected.
Note
You cannot exclude all entitlements from a campaign. You must include at least one entitlement to be able to save the exclusions.
Axonius Campaigns support the following entitlement types:
- Permissions (Field name: Assigned Permissions)
- Roles (Field name: Assigned Roles)
- Groups (Field name: Assigned Groups)
To exclude entitlements from an access review campaign:
-
Click Exclude Entitlements.
-
The Exclude Entitlements drawer opens. It lists all entitlements included in the query. Each entitlement row includes the following details:
- Entitlement Name - For example, a group name such as "All Company", "Design Team", or a username.
- Application - The application that the user(s) with this entitlement can access.
- Type - Entitlement type: Permission, Role, or Group.
-
From the top of the Exclude Entitlements drawer, you can:
- Use the Search box to search for specific entitlements.
- Filter your search by Entitlement Type (Permission, Role, or Group - the options available depend on the entitlement types included in the query) or Status (Excluded or Included).
- Click Reset to clear your search and show all entitlements again.
-
Hover over the right edge of an entitlement row and click
 , Change Entitlement Status, icon and select Exclude. To reinclude an entitlement, select Include.
 -
To include only one or a few entitlements quickly, select Exclude All on top of the All Entitlements table. Then you can go to the specific entitlements you want to include, hover over them and click Include. You can also choose to Include All entitlements.
-
To go back to the Campaign page, click Save. The Exclude Entitlements button changes to Edit Excluded Entitlements. You can return to this step in the Campaign creation process to add or remove additional entitlements.

Revoking Rule-Based Entitlements
By default, campaigns ignore entitlements granted by the Identity Management Rule Engine. These entitlements are not part of the approval process and are not visible in the campaign wizard at any stage. Additionally, they cannot be revoked or approved.
To include these entitlements in the Campaign, enable the Revoke rule-based entitlements checkbox. Note that this might affect the entitlement list displayed on the Exclude Entitlements drawer.
Message Method
Select how approvers will receive campaign messages.
- Slack - Send messages through Slack. Requires Slack adapter to be configured.
- Teams - Send messages through Microsoft Teams. Requires Teams adapter to be configured.
- Email - Send messages via email. Requires SMTP configuration. To send campaign notifications via email, configure your email server under Settings > External Integrations > Email. You will need to provide your SMTP or email provider details.
If an adapter is missing or not configured, a tag appears indicating that the adapter is missing.

Response Options
Configure the actions approvers can take when reviewing access requests.
- Approve - Approvers can approve user access. When selected, the user's access is updated in Axonius.
- Revoke - Approvers can revoke user access. When selected, the user's access is updated in Axonius.
Both response options are available by default and cannot be removed.