
Trend Micro Deep Security
Trend Micro Deep Security automatically shields servers, cloud environments, VDI systems, and applications from vulnerabilities through virtual patching.
The Trend Micro Deep Security adapter enables Axonius to fetch and catalog managed assets, providing visibility into their inventory details and protection status.
Use Cases the Adapter Solves
- Endpoint Security Visibility: Inventory all Deep Security-managed endpoints alongside their assigned security policy and the status of each security module (anti-malware, firewall, intrusion prevention, and others), giving security teams a unified view of protection coverage.
- Vulnerability Management: Identify devices matched to active intrusion prevention rules tied to known CVEs, enabling targeted patching workflows and risk prioritization.
- Application Control Compliance: Detect devices operating in Application Control Maintenance Mode or associated with specific rulesets, supporting policy compliance reviews and change-management processes.
Asset Types Fetched
- Devices, Aggregated Security Findings, Users, SaaS Applications, Networks
Data Retrieved through the Adapter
Devices - fields such as: Policy Details (policy name, ID, security module states), Application Control Ruleset (name, type, version, last modified), DSM Version, CVEs (CVE ID, CVSS score, severity)
Users - fields such as: Username, Display Name, Mail, Last Logon
Networks - fields such as: Name, CIDR Blocks
Before You Begin
Required Ports
- For On-Premise deployments - TCP port 4119 (default). Use this for traditional Trend Micro Deep Security Manager installed in your data center.
- For SaaS / Cloud One deployments - TCP port 443. Use this for Trend Micro Cloud One – Workload Security (formerly Deep Security as a Service) and AWS/Azure Marketplace deployments. You must manually change the Axonius default (4119) to 443 for these connections.
Authentication Methods
The Trend Micro Deep Security adapter supports two authentication methods:
- REST API Key (Recommended) — Axonius sends the key in the
Authorization: ApiKey {key}header. Use this for Cloud One / Workload Security and modern on-premises Deep Security Manager deployments. - Legacy API Key — Axonius sends the key in the
api-secret-key: {key}header. Used as an automatic fallback when the REST API Key method fails. Use this only if the REST API Key is not applicable.
Required Permissions
To connect the Axonius adapter to Trend Micro Deep Security, you need Read-Only (Auditor) access.
The recommended method is to create a dedicated API Key assigned to the built-in Auditor role. This ensures the adapter can fetch device and user data without having the ability to modify your security policies.
APIs
Axonius uses the Trend Micro Deep Security API (v1). The following endpoints are called:
POST /api/computers/search— Fetch managed devices with security module detailsGET /api/policies— Fetch security policies (required when Fetch policy details is enabled)GET /api/administrators— Fetch administrator user accountsGET /api/roles— Fetch administrator rolesGET /api/intrusionpreventionrules— Fetch intrusion prevention rules (required when Fetch Prevention Intrusion Rules is enabled)GET /api/rulesets— Fetch Application Control Rulesets (required when Fetch Application Control Rulesets is enabled)GET /api/agentversioncontrolprofiles/{id}/agentversioncontrols— Fetch agent version control data (required when Agent Version Control Profile ID is configured)
Setting Up Trend Micro Deep Security to Work with Axonius
To generate a REST API Key in Trend Micro Deep Security:
- In Deep Security Manager, navigate to Administration > User Management > API Keys.
- Click New to create a new API key.
- Assign the key to the built-in Auditor role (read-only access).
- Copy the generated API key — it is displayed only once.
For Trend Micro Cloud One – Workload Security, API keys are managed under Administration > API Keys in the Cloud One console.
For more information, see the Trend Micro Deep Security API documentation.
Connecting the Adapter in Axonius
- Navigate to the Adapter Catalog, search for Trend Micro Deep Security, and select the adapter.
- Click Add Connection.
- Provide the following parameters.
Required Parameters
-
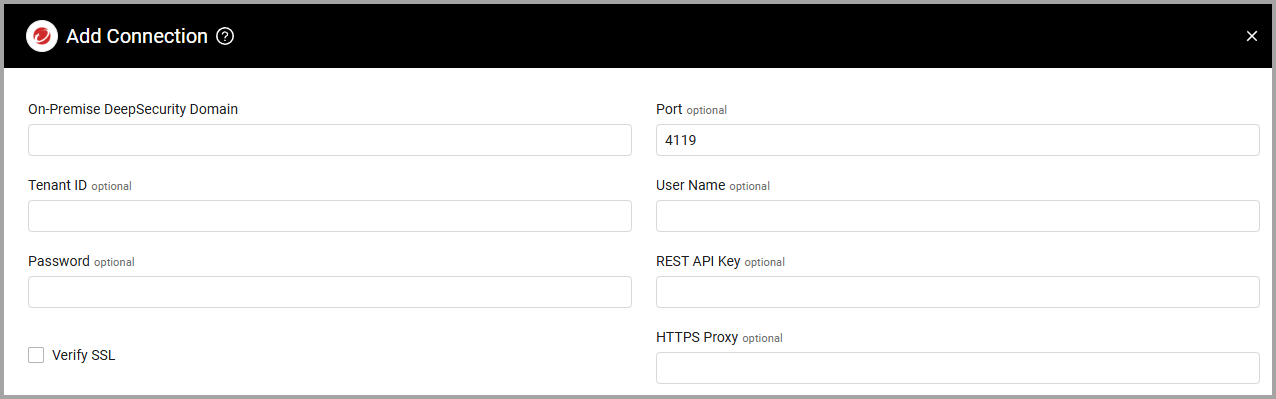
On-Premise DeepSecurity Domain - If you are using an on-premises deployment, enter the DeepSecurity domain. This value is also required when using a REST API Key. Alternatively, when working with Micro Trend Deep Security SaaS / Cloud One, enter the URL of the cloud platform:
https://cloudone.trendmicro.com. -
Port - If the port number is other than 4119 (default), specify the port number.
Important
An authentication method selection is also required, even though these parameters are marked as optional. You must choose one of the following authentication methods:
- REST API - Including domain + REST API Key.
- Legacy API - Including Username + Password + Tenant ID or domain.
For more information, see Optional Parameters.
Optional Parameters
-
Verify SSL - Select whether to verify the SSL certificate of the server against the CA database inside of Axonius. For more details, see SSL Trust & CA Settings.
-
Tenant ID - If using a REST API Key, specify either the tenant (for cloud deployments) or domain (for on-premises).
-
User Name and Password (Legacy API - Not Recommended) - The user name and password for an account that has read access to the API. Fetch will not include all the data as the Rest API Key and should be used only if API Key is not applicable.
-
REST API Key (New API - Recommended) - API key for the REST API assigned for Axonius to consume Trend Micro Control Manager Automation APIs.
-
HTTPS Proxy - Enter an HTTPS proxy address to connect the adapter to a proxy instead of directly connecting it to the domain.
To learn about additional optional/common adapter connection parameters, see Adding a New Adapter Connection.
Advanced Settings
Note:
- Advanced settings can apply to either all connections of this adapter, or to a specific connection. For more detailed information, see Advanced Configuration for Adapters.
- For more general information about advanced settings, see Adapter Advanced Settings.
- Avoid Hostname duplications - Select this option to avoid returning duplicate hostname fetches.
- Do not fetch devices with an inactive status - Select this option to not fetch devices when the Status field is set to "inactive".
- Fetch Users - Select this option to fetch users.
- Fetch policy details - Enable this option to fetch policy details. When enabled, the following sub-option is also available:
- Fetch Application Control Rulesets - Enable this option to fetch Application Control Ruleset details from Trend Micro Deep Security and associate them with devices using the Application Control Ruleset ID. Fetched ruleset details include the ruleset name, type, version, created date, and last modified date.
- Agent Version Control Profile ID (optional) - Enter the agent version control profile ID.
- Fetch Network Assets - Select this option to fetch network assets.
- Fetch Prevention Intrusion Rules - Select this option to fetch Prevention Intrusion Rules. This will enrich the fetched devices with vulnerability information.
- Modify Device Serial Field (optional) - Enter the specific attribute name from the Trend Micro source data that you want to map to the Axonius Serial Number field. By default, the adapter uses the
biosUUIDattribute name. You optionally entervmwareUUID,azureVMID, or other names.
Updated about 2 months ago