GitHub
GitHub provides hosting for software development version control using Git, including distributed version control and source code management (SCM) functionality.
Asset Types Fetched
Asset Type | Requirements and Authentication |
|---|---|
Devices, Users, Vulnerabilities, Software, Roles, Groups, Secrets, Tickets, Groups |
|
Alerts/Incidents, Permissions, SaaS Applications, All Application Extensions, All Application Extension Instances, Admin Managed Extensions, Application Addons, User Initiated Extensions, Admin Managed Extension Instances, Application Addon Instances, Application Keys, User Initiated Extension Instances |
|
Application Resources |
|
Application Settings | Authenticate with User Name and Password |
Licenses |
|
Before You Begin
Authentication Methods
You can connect the adapter using either of the following authentication methods:
- Authenticating with an Authorization Token
- Authenticating with the GitHub app
- (Only for fetching Application Settings and Licenses) Prove the following parameters: Custom Login URL, User Name, Password, Multi-factor Authentication
APIs
Axonius uses the GitHub API.
Permissions
Refer to GitHub Permissions for full details.
Authenticating with an Authorization Token
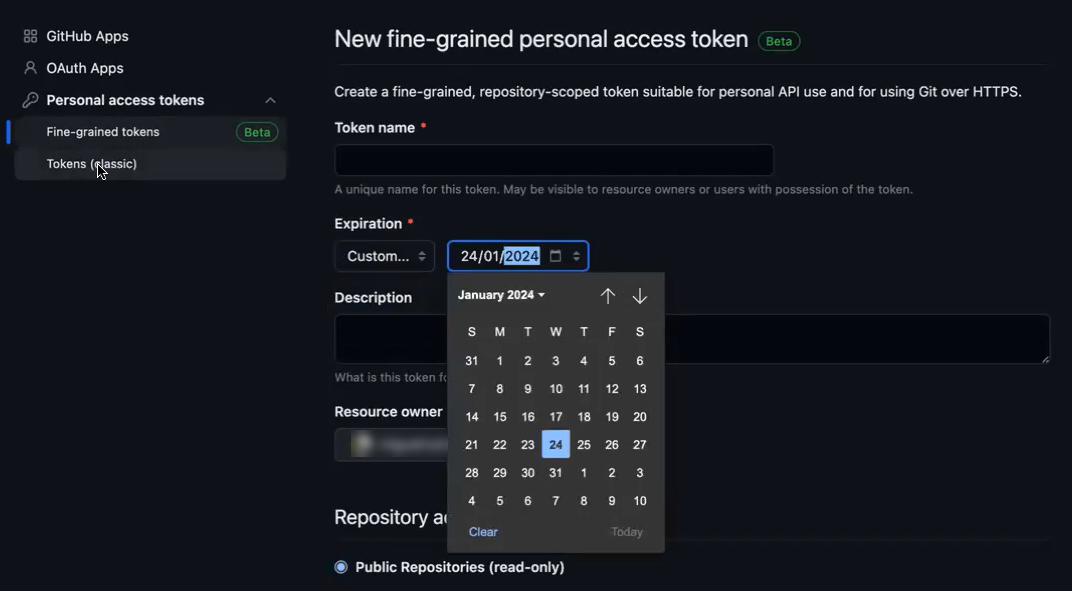
- From within a GitHub app, navigate to Personal access tokens
>Fine-grained token. - Enter a token name.
- Set the expiration date for one year after the current date.
Note
You must regenerate the token and replace it in the adapter connection before the expiration date (at most, one year from creation).

-
In the Repository Access section, select All repositories.
-
Set Repository and Account permissions according to the list in Permissions for Authenticating with an Authorization Token. Note that some asset types require specific permissions.
-
Set the Resource owner to Organization.
-
Click Generate Token.
-
Click
 to copy the token.

-
Back in Axonius, paste the copied token into the Authorization Token connection parameter.
-
To use a personal access token with an organization that uses SAML single sign-on (SSO), you must first authorize the token to access the organization's SSO. For details,see GitHub Docs - Authorizing a personal access token for use with SAML single sign-on.
Authenticating with a GitHub App
Follow these steps:
Creating and Configuring the App
- In your GitHub account, navigate to Settings
>Developer settings. - Select GitHub Apps and click New GitHub App.
- Enter a name for your app.
- Set the Homepage URL (this can be a GitHub repository or documentation URL).
- (Optional) Set the Callback URL if the app will authenticate with OAuth.
- Set permissions for the app based on what actions it needs to perform. For API usage, you might need to set specific permissions for repositories, organizations, etc.
- Subscribe to events that your app needs to be notified about.
- Click Generate a private key. This downloads a .pem file.
- Store the .pem file for later use for authenticating your app.
- Locate the App ID on the app's page, copy and paste it into the GitHub App ID connection parameter.
Assigning Permissions to the App
- Set Repository, Account and Organization permissions according to the list in Permissions for Authenticating with a GitHub App. Note that some asset types require specific permissions.
- Under Account Permissions, select the following options:
- Access: Read-only for Email addresses and Followers
- Access: Read and write for Gists and Profile
Installing the App on Your Organizations
- On your app's settings page, under the General section, locate the Installation URL. This URL is used to install the app on any organization where you have sufficient permissions.
- Log into GitHub as an organization admin.
- Navigate to the installation URL.
- Select the organizations from the drop-down menu and follow the prompts to install the app.
- If your permissions are set to request access on a per-repository basis, specify which repositories the app can access.
Using the App as an API
To use the GitHub App as an API, youll need to authenticate using the App ID and the private key (.pem file) you downloaded. Youll typically generate a JWT (JSON Web Token) and use it to authenticate API requests.
The GitHub documentation provides extensive guides on authenticating with GitHub Apps, including code examples for generating JWTs and making authenticated API requests.
Connecting the Adapter in Axonius
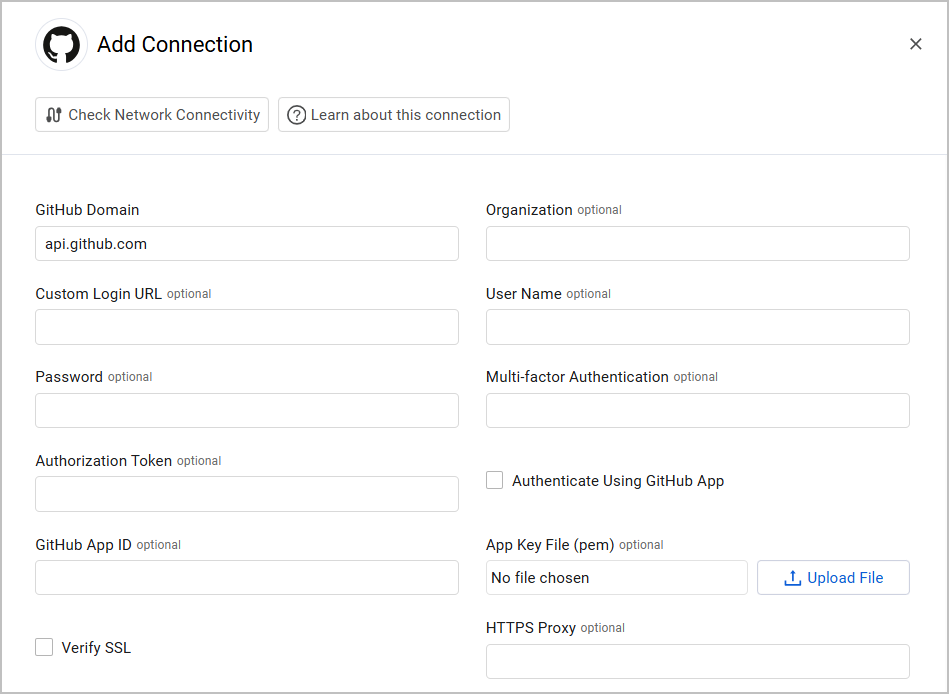
To connect the adapter in Axonius, provide the following parameters:
General - All Assets
Required Parameters
- GitHub Domain - The hostname or IP address of the GitHub server.
Note
The GitHub Domain parameter is always required, for all authentication methods and asset types.
Optional Parameters
- Organization - The organization of the GitHub account. To connect this adapter, you must either configure this parameter, or enable the Fetch all organizations for logged user Advanced Setting. You can also fetch data without specifying the Organization.
- Verify SSL - Select whether to verify the SSL certificate of the server against the CA database inside of Axonius. For more details, see SSL Trust & CA Settings.
- HTTPS Proxy - Connect the adapter to a proxy instead of directly connecting it to the GitHub domain.
Authenticating with an Authorization Token (All Assets except for Application Settings)
- Authorization Token - Specify the personal access token that has read access. If you authenticate using GitHub App leave this field blank.
Authenticating with the GitHub App (All Assets except for Application Settings)
- Authenticate using GitHub App- Check to enable authenticating using the GitHub App. Make sure you add the 'org' scope in GitHub.
- GitHub App ID - The GitHub app ID can be found under the GitHub app's page.
- App Key File (pem) - Click Upload File to upload the GitHub app's .pem key file. You can download this file from the GitHub app's page. When an App Key is set up, Axonius also fetches external collaborator data for GitHub apps.
Fetching Application Settings and Licenses
Note
If you have the required permissions to fetch Licenses, the adapter will also automatically fetch Copilot license and metrics Info.
- Custom Login URL - If you have GitHub Enterprise, enter your Custom Login URL here.
- User Name and Password - Credentials used for the account that fetches Application Settings.
- Multi-factor Authentication - The secret generated in the adapter for setting up 2-factor authentication for the adapter user created to fetch Application Settings data. This is only needed if the you enable it in the account assigned to the adapter.

To learn more about common adapter connection parameters and buttons, see Adding a New Adapter Connection.
Fetching data without Specifying the Organization
It is possible to fetch data without specifying the organization. This configuration is meant for GitHub accounts that have multiple organizations.
If an account has multiple organizations and wants to fetch data from many of them, you need to create the GithHub app, get the App ID and PEM file, install it on all the organizations you want to fetch from, and use the app as an API.
Before beginning this procedure, ensure that you have the necessary permissions in each organization to install apps. Also, note that the installation process needs to be done for each organization individually unless you are automating it through an API, which requires an initial installation to get started.
This section provides a general approach to creating, configuring, and using a GitHub App across multiple organizations. For detailed instructions and advanced configurations, refer to the GitHub Developer documentation.
Advanced Settings
Note
Advanced settings can either apply to all connections for this adapter, or to a specific connection. Refer to Advanced Configuration for Adapters.
-
Fetch public organizations for users - Select whether to fetch the public organizations where each user is a member.
- If disabled, this adapter will not fetch the public organizations each user is a member of.
-
Fetch public gists for users - Select whether to fetch data about public gists for users.
-
For each user, show in the user all the repositories they have access in the organization - For each user, show all the repositories in the organization to which they have access.
-
Fetch Teams to insert on the Users - Select this option to fetch data for teams that the users belong to.
-
Fetch repository software bill of materials (SBOM) - Select this option to enrich Repositories with Software Bill of Materials (SBOM).
-
Fetch repository runners - Select to enrich repositories with runners data.
-
Enable fetching of default branches - Select this option to fetch default branches from repositories.
-
Fetch branch rules - Select this option to enrich default branches with protection rules.
-
Number of organizations to fetch concurrently - Enter the number of organizations to concurrently fetch by the adapter.
-
Fetch issues - Select this to fetch GitHub Repository Issues.
-
Fetch Projects V2 - Select this to fetch Projects V2 as Application Resources.
-
Fetch public organizations for users - Select this option to fetch the names of organizations that the users belong to.
-
Fetch all organizations for logged user - Select whether to fetch all organizations for the logged user. To connect this adapter, you must either enable this setting or provide the Organization parameter for each connection's basic configuration.
-
Fetch user role and organization data - Select to fetch each user role in the organization and additional information about the organization.
-
Fetch Repositories as devices (if Application Resources are not available) - Select this option to fetch repositories as devices when application resources are not available.
-
Fetch code and secret scanning alerts - Select this option to fetch code scanning and secret scanning alerts from GitHub as Alerts and Incidents assets.
-
Fetch repository vulnerabilities - Select this option to fetch dependency vulnerabilities via GitHub Dependabot alerts, which provide information about vulnerabilities in the repository's dependencies. These vulnerabilities appear as a GitHub Repositories resource type under the Application Resources assets.
-
Fetch repository commits - Select this option to fetch for each repository its commit history, if available.
Note
To access the REST API endpoints for code/secret scanning alerts and repository vulnerabilities, the authenticated user must be an owner or security manager for the organization. OAuth app tokens and personal access tokens (classic) must have the
security_eventsorreposscope to use this endpoint with private or public repositories, or thepublic_reposcope to use this endpoint with only public repositories.
Note
To learn more about Adapter Configuration tab advanced settings, see Adapter Advanced Settings.
Related Enforcement Actions
Updated about 2 months ago
