
HPE Aruba Networking Central
HPE Aruba Networking Central is a unified cloud-based network operations, assurance and security platform that simplifies the deployment, management, and optimization of wireless, wired and WAN environments.
Note
Due to changes that were made to the vendor's API, it's paramount that you change the value in Advanced Settings → Adapter Configuration→ 'Wait for a connection to the sources for up to X seconds' to 3000.
Use Cases the Adapter Solves
- Unified Network Infrastructure Inventory: Automatically discover and inventory all HPE Aruba Networking Central-managed devices — access points, switches, and gateways — alongside other assets in Axonius, eliminating manual spreadsheets and providing a single, continuously updated source of truth for network infrastructure.
- NAC/802.1x Compliance Verification: Use the Fetch Switch Port NAC/802.1x Status setting to retrieve per-port dot1x enablement data, then query across all switches to identify ports that are not enforcing 802.1x authentication, enabling security teams to close gaps in network access control policies.
- Network Client Visibility and Access Auditing: Enumerate all wired and wireless clients connected to the managed network — including the associated switch or AP, VLAN, interface port, and username — to support access audits, detect unauthorized devices, and cross-reference connected endpoints against authoritative user and device records.
Types of Assets Fetched
This adapter fetches the following types of assets:
- Devices, Network Devices
Data Retrieved through the Adapter
Devices - fields such as: Name, Serial Number, IP Address, MAC Address
Before You Begin
Required Ports
- TCP port 443 (HTTPS)
Authentication Methods
HPE Aruba Networking Central uses OAuth 2.0.
APIs
Axonius uses the HPE Aruba Networking Central API. The following endpoints are called:
Authentication
POST oauth2/authorize/central/api/login- Initiates a session login using username and passwordPOST oauth2/authorize/central/api- Exchanges session cookies for an authorization code scoped to the Customer IDPOST oauth2/token- Exchanges an authorization code for access and refresh tokens, or refreshes an existing token
Device Inventory
GET monitoring/v2/aps- Fetches access points with paginationGET monitoring/v1/switches- Fetches switches with paginationGET monitoring/v1/clients/wireless- Fetches wireless clients with paginationGET monitoring/v1/clients/wired- Fetches wired clients with paginationGET monitoring/v1/gateways- Fetches gateways with paginationGET monitoring/v1/gateways/{serial}- Fetches extended details for a single gateway by serial number (called when Fetch extended details for gateways is enabled)GET configuration/v1/devices/{device_serial}/configuration- Fetches switch CLI configuration to extract NAC/802.1x port configuration (called when Fetch Switch Port NAC/802.1x Status is enabled)
Required Permissions
The user account supplied in User Name and Password must have read access to monitoring data across all device types. To use the Fetch Switch Port NAC/802.1x Status setting, the account must also have read access to device configuration. The account must have access to the target customer tenant (identified by Customer ID).
Setting Up HPE Aruba Networking Central to Work with Axonius
Complete the following steps in HPE Aruba Networking Central before configuring the adapter in Axonius.
Step 1 — Confirm you have a local (non-SSO) user account
The adapter authenticates using OAuth 2.0, which requires a local HPE Aruba Networking Central account. SAML/SSO accounts cannot generate API tokens.
- Log in to Aruba Central and navigate to Account Home.
- Under Global Settings, click Users and Roles.
- Click Add User and create a local account with an email username.
- Assign the Administrator role and save. Note the username and password — these are the User Name and Password values in Axonius.
Step 2 — Find your Customer ID
- Log in to Aruba Central using the local user account.
- Click the profile icon in the top-right corner of the page.
- Copy the Customer ID shown in the account details dropdown.
Step 3 — Create an application to get Client ID and Client Secret
- From Account Home, under Global Settings, click API Gateway.
- Click the My Apps & Tokens tab, then click + Add Apps & Tokens.
- Enter an Application Name, then click Generate.
- Copy and store the Client ID and Client Secret — these are required in Axonius. Store the Client Secret securely, as you may not be able to retrieve it again.
For more details, see Creating Application & Token.
Step 4 — Find your Region
- From Account Home, under Global Settings, click API Gateway.
- Select the REST API tab and note the Base URL.
- Match the Base URL to the corresponding region in the Region parameter table.
Alternatively, click the profile icon and use the zone value shown in the account details dropdown.
Connecting the Adapter in Axonius
- Navigate to the Adapter Catalog, search for HPE Aruba Networking Central, and select the adapter.
- Click Add Connection.
- Provide the following parameters.
Required Parameters
- Region (required) - Select the region corresponding to the domain name. The value must match the My Zone value, which can be viewed under the User Settings in HPE Aruba Networking Central. The selected regions map to the following domain URLs:
| Region | Domain Name |
|---|---|
| US-1 | https://app1-apigw.central.arubanetworks.com |
| US-2 | https://apigw-prod2.central.arubanetworks.com |
| US-WEST-4 | https://apigw-uswest4.central.arubanetworks.com |
| EU-1 | https://eu-apigw.central.arubanetworks.com |
| EU-3 | https://apigw-eucentral3.central.arubanetworks.com |
| Canada-1 | [https://apigw-ca.central.arubanetworks.com |
| China-1 | https://apigw.central.arubanetworks.com.cn |
| APAC-1 | https://api-ap.central.arubanetworks.com |
| APAC-EAST1 | https://apigw-apaceast.central.arubanetworks.com |
| APAC-SOUTH1 | https://apigw-apacsouth.central.arubanetworks.com |
- User Name and Password (required) - The credentials for a user account that has the permissions to fetch assets.
Note
If you are working with a version of HPE Aruba Networking Central that is greater than 2.5.5, the credentials used in the adapter must be a local account or outside of the SAML domain, since SAML users cannot generate tokens via the API. Refer to HPE Networking Support Portal for further information.
- Customer ID (required) - The Customer ID value is obtained from the User Settings in HPE Aruba Networking Central.
- Client ID and Client Secret (required) - The Client ID and Client Secret is obtained from the application created. For more details, see Creating Application & Token.
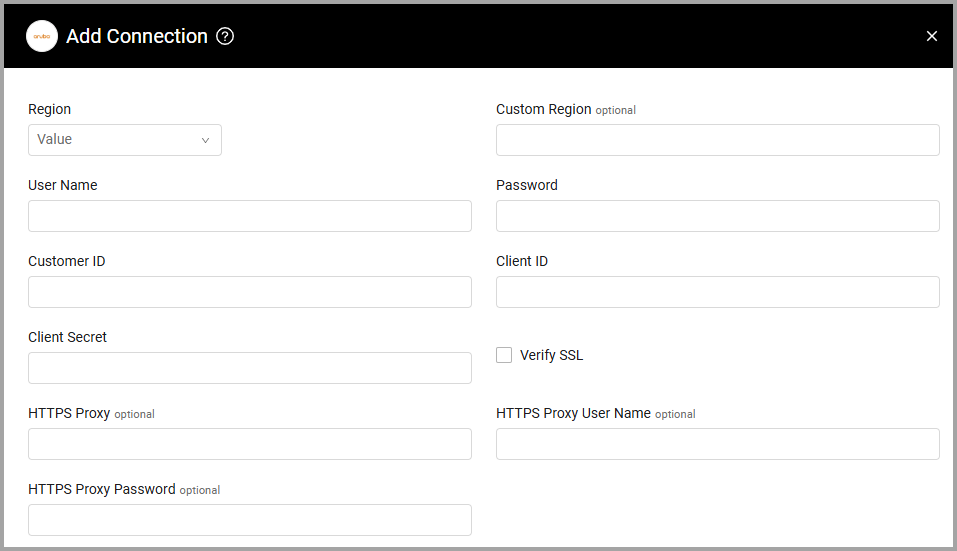
Optional Parameters
- Custom Region (optional) - If you want to select a region not listed in the Region dropdown list:
- From the Region dropdown list, select CUSTOM.
- From the Custom Region parameter, specify the domain name.
- Verify SSL - Select whether to verify the SSL certificate of the server against the CA database inside of Axonius. For more details, see SSL Trust & CA Settings.
- HTTPS Proxy (optional) - Connect the adapter to a proxy instead of directly connecting it to the domain.
- HTTPS Proxy User Name (optional) - The user name to use when connecting to the value supplied in Host Name or IP Address via the value supplied in HTTPS Proxy.
- HTTPS Proxy Password (optional) - The password to use when connecting to the server using the HTTPS Proxy.
To learn more about common adapter connection parameters and buttons, see Adding a New Adapter Connection.
Advanced Settings
Note
Advanced settings can either apply to all connections for this adapter, or to a specific connection. Refer to Advanced Configuration for Adapters.
- Devices type to fetch (required, default: Access Point, Switch) - Select one or more types of devices to fetch, including wired and wireless clients, and gateway devices.
- Fetch clients (Wired/Wireless) as network devices - Select this option to fetch clients as network devices.
- Fetch Switch Port NAC/802.1x Status - Select this option to fetch switch port 802.1x/NAC configuration for each Switch device. The adapter adds the Switch Ports information to Switch device records. This triggers one additional API call per Switch device and may increase fetch duration and API rate limit usage on large switch fleets.
- Fetch extended details for gateways - Enable this option to retrieve extended gateway details.
- Number of concurrent gateway detail requests (Default: 7) - Enter the number of gateway detail requests to send concurrently. Accepted values: 1 through 25.
- API rate limit (calls per second) (Default: 7) - Enter the maximum number of API calls per second for the adapter. Enter 0 to disable client-side rate limiting. Accepted values: integers greater than or equal to 0.
Note
To learn more about Adapter Configuration tab advanced settings, see Adapter Advanced Settings.
Updated 4 days ago