
Managing Service Accounts
Use the Service Accounts page to manage the service accounts in the system. Use service accounts to execute commands using the REST API. See Axonius REST API for more about using the Axonius REST API.
Service accounts support two authentication types:
- API Key and Secret – The default method. You generate an API key and secret pair that are included in each API request.
- OAuth 2.1 – Generates a Client ID and Client Secret that are exchanged for a short-lived access token. The access token is then used to authenticate API requests.
Detailed instructions for authentication can be found in the API documentation.
You can assign roles and configure access settings for each service account.
To access the Service Accounts page:
- From the top right corner of any page, click
 . The System Settings page opens.
 - In the Categories/Subcategories pane of the System Settings page, expand User and Role Management, and select Service Accounts.
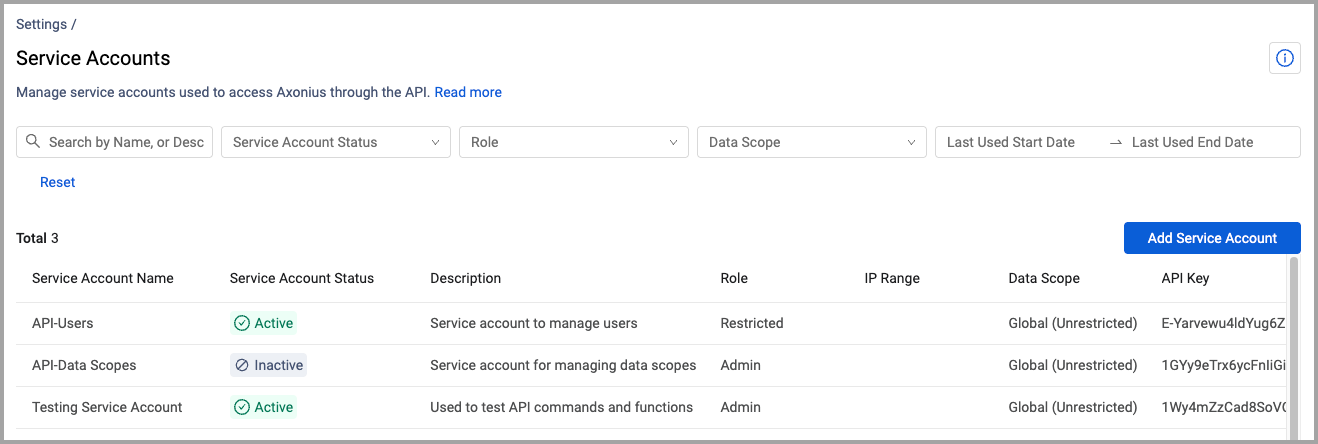
You can find the following information on the Service Accounts table:
- Service Account Name - The name of the service account.
- Service Account Status - The status of the service account. Every service account in the system has a status, and you can filter the table by service account status. See Managing Service Account Status
- Description (optional) – Description of what the user can do.
- Role – The role that defines what this API user can do. Only roles with API Access permission may be associated with a service account.
- IP Range - The IP address ranges (in CIDR notation) that the account is authorized to use when accessing the API.
- Data Scope - The Data Scope assigned to the service account.
- Authentication Type – The authentication method used by the service account: API Key and Secret or OAuth 2.1.
- Key – The API key generated by the system for this service account (displayed for API Key and Secret accounts only).
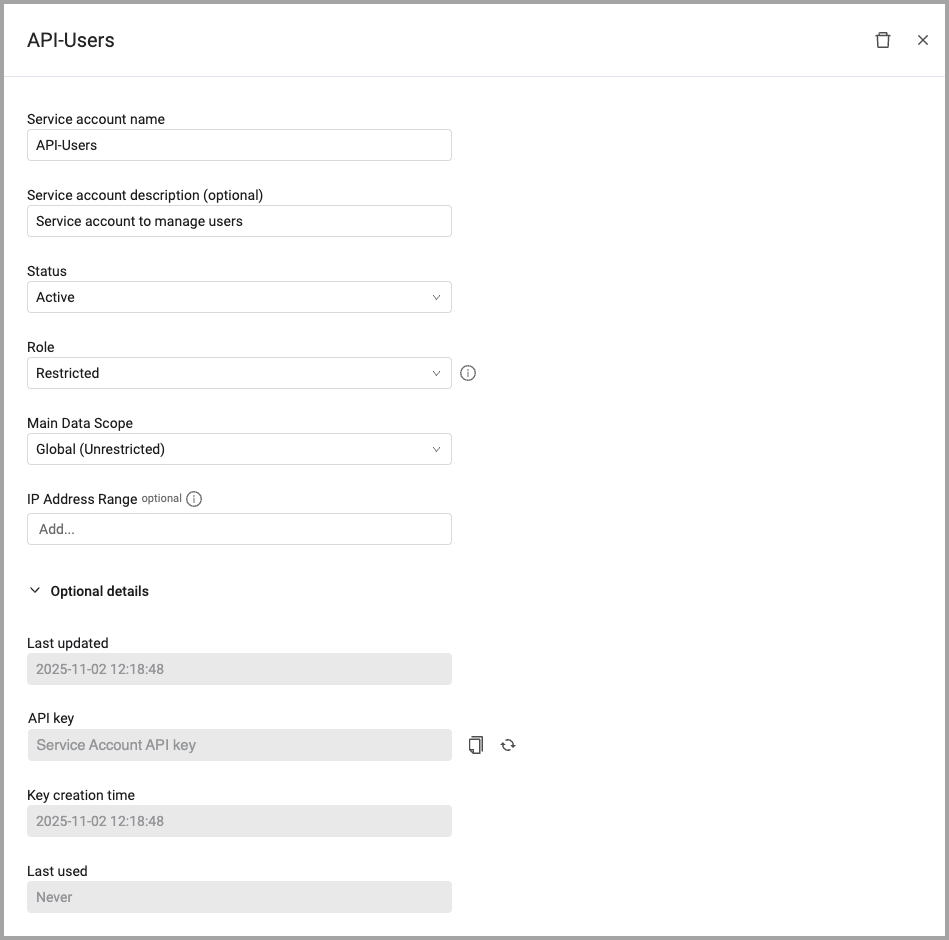
- Key Creation Time – The time that the key was created. This parameter is useful to renew the key according to your organization’s policy.
- Last Used – The date and time that the account was last used. The timestamp is updated for every action that the service account does in the system and if the user never logged in, it is 'Never'.
- Last Updated - The date and time that the account was last updated.
Creating a Service Account
To create a Service Account
-
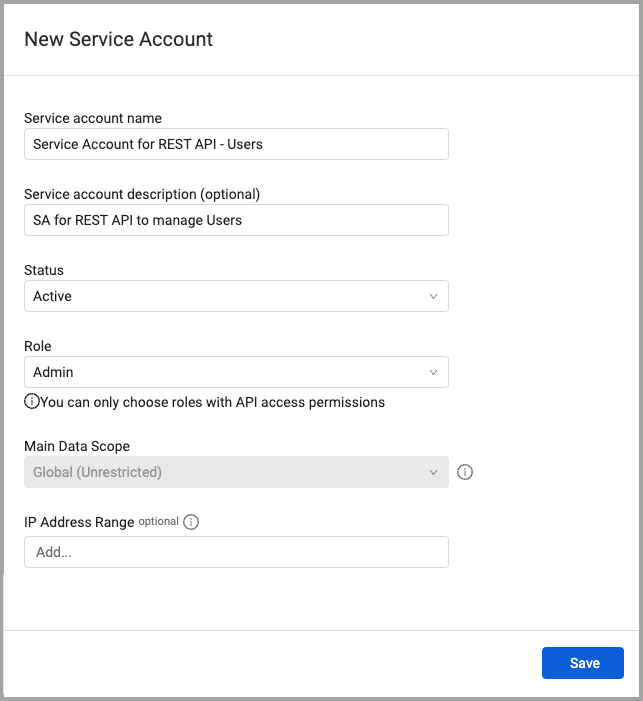
Click Add Service Account. The New Service Account drawer opens.
-
Type a Service account name (required) - The name for the service account should not be changed once you set it.
-
Status (required) - Select a status for the account: Active or Inactive. See Managing Service Account Status
-
Type a Service account description (optional) that describes what the service account does in the system.
-
Select a Role that defines what this service account can do. Only roles with API access permissions are available. This role must also have the necessary permissions to perform the actions it will execute using the API. For example, if the service account will be used to manage data scopes, this role will need permissions related to data scopes.
-
Select a Main Data Scope to which this service account will have access. Data scopes determine what data, dashboards, queries, and other objects the Service Account can see. API requests sent using the service account can only apply to the assets and information within this data scope. This helps to control what a specific account can access with the API. See Data Scope Management for more information on data scopes. The Data Scope name appears in the Data Scope column on the Service Accounts page. Admin users are automatically assigned the Global Data Scope.
-
Enter one or more IP Address Ranges (optional) that the account is authorized to use when accessing the system via API. The address range must be in CIDR notation: a.b.c.d/y where a.b.c.d is the first IP address and /y is the identifier for the range. For example: 192.168.20.0/24,192.168.10.3/24. This provides extra validation that service accounts are accessed via REST API calls only for known IP addresses.
.png)
-
Select an Authentication type:
- API Key and Secret (default) – The system generates an API key and secret pair when you save the account.
- OAuth 2.1 – The system generates a Client ID and Client Secret when you save the account. These credentials are exchanged for an access token to authenticate API requests. See Using OAuth 2.1 Authentication.
-
Click Save.
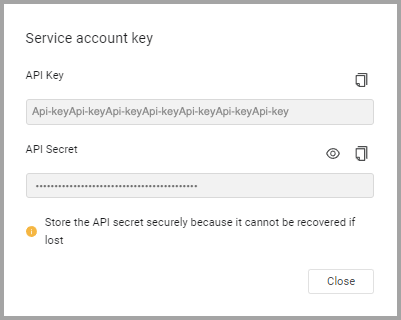
- If API Key and Secret is selected, the API Key and API Secret that allow the service account to access the API are generated and displayed.
- If OAuth 2.1 is selected, the Client ID and Client Secret are generated and displayed.
Important
The secret (API Secret or Client Secret) is only displayed once in this message and not anywhere else in Axonius. You have to copy it as it cannot be recovered. If the API secret is lost, you can reset the API key to generate a new secret. Click
to copy the API secret and save it in a safe place, or manage it using a key management system.
-
Click Close. The new Service Account is created and is now displayed on the Service Accounts page. Details about the service account can be found under Optional details in the account's details drawer.
Managing Service Account Status
When creating service accounts, you can set their status to "Active" or "Inactive".
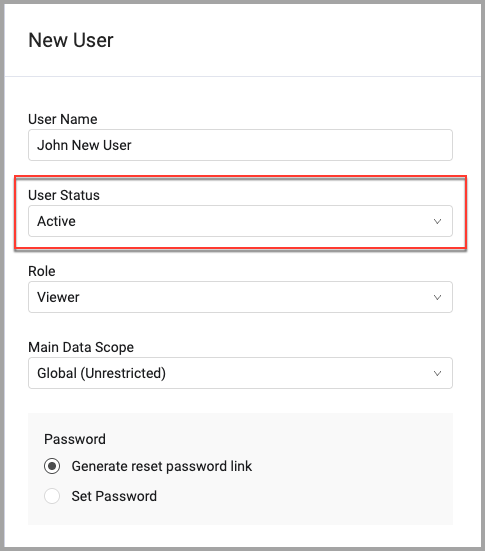
The "Service Account Status" field on the Service Accounts page indicates the current status of all service accounts, and the table can be filtered by account status.
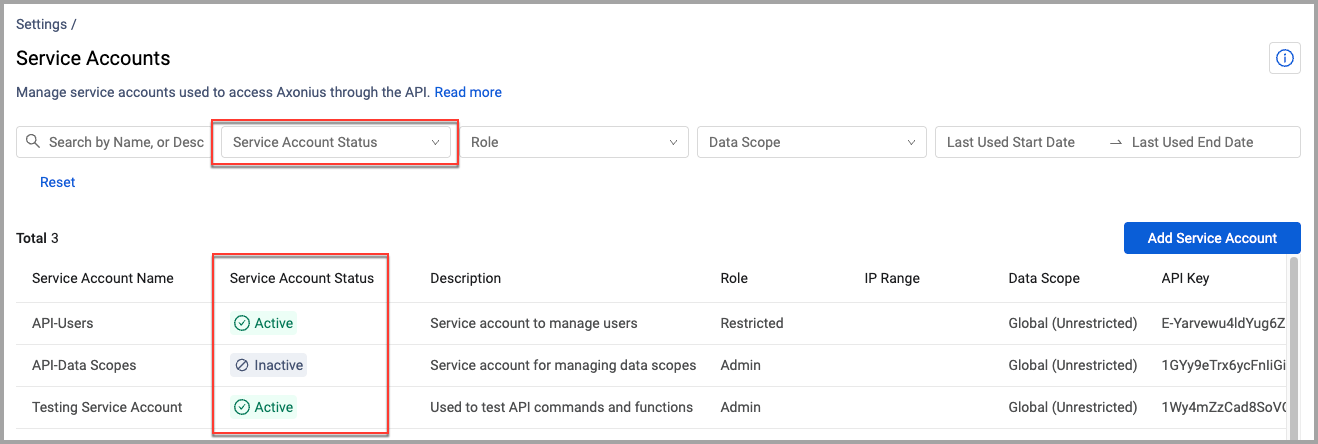
A service account can have one of the following statuses:
- Active - The account can be used to access the REST API to perform tasks for which they have permission.
- Inactive - The account exists but cannot access the REST API. An account with an "Inactive" status can be changed to "Active".
To change the status of a service account:
- From the Service Account page, select the account you want.
- In the Status field, select the status you want.
- Click Save.
Searching and Filtering the Service Accounts Table

In the Search box, enter the text to search for in the service accounts you want to see. Description text is also searched.
You can also filter the service accounts by the following fields:
- Service Account Status - The status of the service account. See Managing Service Account Status.
- Role - Filters by role.
- Data Scope - Filters by Data Scope.
- Date Range - Filters by the selected date range.
Within a filter list, click Select All to select all options. Click Clear All to deselect all options.
Click Reset to clear all filter selections.
Editing a Service Account
You can edit a service account.
To edit a Service Account
- In the Service Accounts table, select a service account. The service account details drawer opens.
- Edit the details. You cannot change the API key.
- To change the Authentication Type, select the new type from the dropdown. When you save the account, new credentials are generated and displayed. Copy and save these credentials immediately, as the secret is only shown once.
- Click Save.
Note
It is not possible to reset only one credential. When you reset credentials, both are regenerated (API Key and API Secret, or Client ID and Client Secret). Resetting credentials also invalidates any existing access tokens for that service account.
Using OAuth 2.1 Authentication
Service accounts configured with OAuth 2.1 authentication use a Client ID and Client Secret to obtain a short-lived access token. This token is then used to authenticate API requests.
Getting an Access Token
Use the /api/oauth2/token endpoint to exchange your Client ID and Client Secret for an access token.
Request details:
- Method: POST
- Endpoint:
/api/oauth2/token
Headers:
Set the Authorization header using HTTP Basic authentication. Combine the Client ID and Client Secret as <client_id>:<client_secret>, encode the result in base64, and set the header value to Basic <base64_value>.
For example, if the Client ID is aaa and the Client Secret is bbb, encode aaa:bbb in base64 to get YWFhOmJiYg==. The header value is Basic YWFhOmJiYg==.
Body:
The request body must be of type x-www-form-urlencoded with the following field:
| Key | Value |
|---|---|
grant_type | client_credentials |
Response:
The response body contains an access_token. This token expires after one hour. When it expires, make a new request to this endpoint to obtain a fresh token.
Using the Access Token
To authenticate API requests, add the Authorization header to each request with the value Bearer <access_token>.
Resetting OAuth 2.1 Credentials
If your Client ID or Client Secret is lost or compromised, you can reset the credentials. Resetting generates a new Client ID and Client Secret, and invalidates all existing access tokens for that service account.
From the UI
To reset OAuth 2.1 credentials:
- From the Service Accounts page, select the service account. The service account details drawer opens.
- Expand Optional details. The Client ID field is displayed.
- Click Reset OAuth credentials. A popup appears displaying the new Client ID and Client Secret.
- Copy and save the new credentials immediately. The Client Secret is only displayed once.
From the API
Use the following endpoint to reset credentials programmatically:
- Method: POST
- Endpoint:
/api/settings/service_accounts/<service_account_id>/reset_credentials
The response returns the new client_id and client_secret. Copy and save the Client Secret immediately, as it cannot be retrieved after the response is closed.
Rotating the API Key of a Service Account
The API key of a service account can be rotated at any time.
To rotate the API key of a service account:
- From the Service Accounts page, select the account whose API key you want to rotate.
- In the details drawer, scroll down and expand Optional details and click
 .
.
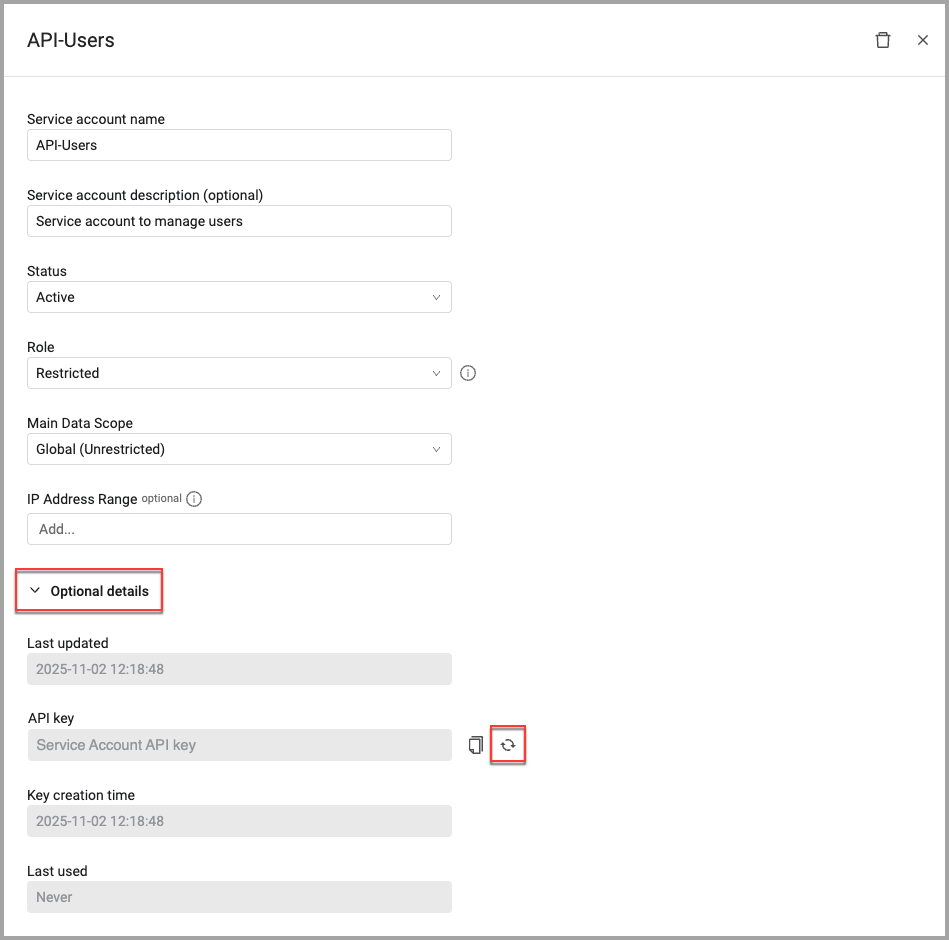
- Click to copy the API key.
Deleting a Service Account
Service accounts can be deleted. When a service account is deleted, it is not retained in the system.
Note
Delete a service account with caution, as once it is deleted, no one can use it or its associated key. Any API commands that use the deleted service account will no longer work.
To delete a service account:
- In the Service Accounts table, select a service account. The service account details drawer opens.
- Click the
 in the drawer header. After clicking Delete to confirm the action, the service account is deleted.
Updated about 1 month ago