Check Point Infinity
Check Point Infinity protects against cyber threats across networks, endpoint, cloud and mobile devices. This adapter supports the entire Infinity platform, including Check Point firewalls.
Note
To enable Axonius to fetch data:
- In Checkpoint Infinity Management API > Access Settings, the Accept API calls setting must be set to All IP addresses that can be used for GUI clients, or to All IP Addresses,.
- When working with a Tunnel, in the Checkpoint Management Server WEB UI configuration, the IP address of the Tunnel Server must be added to Host Access.
Asset Types Fetched
Devices |
Users |
Network/Firewall Rules |
Network Routes
Before You Begin
Permissions
A user account with permission to access the System Data domain in Check Point Infinity is required. This can be achieved through either of the following:
- A Superuser account
- A custom read-only permission profile that includes System Data access.
Creating a read-only user for Check Point Infinity
Creating a read-only permission profile varies between different versions of Check Point Infinity and instructions for doing so can be found in the Check Point user manual. As a general reference,the following guide can be used to create read-only users.
Finding the Management API Key and the Management Server URL in the Check Point Infinity Portal
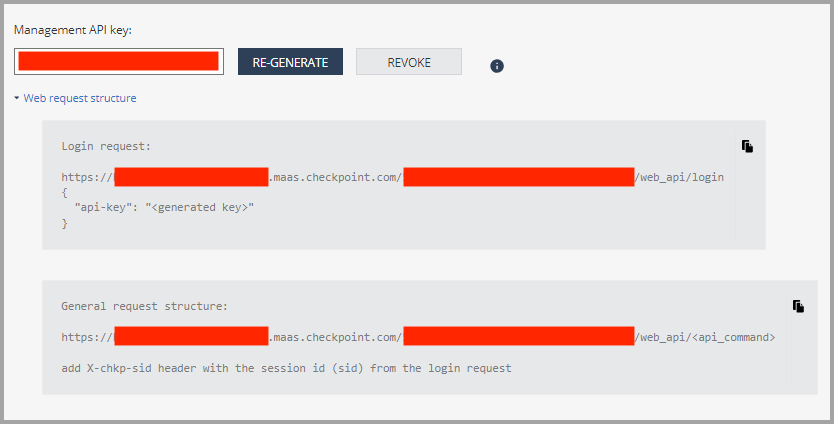
If you are using the Check Point Infinity Portal to manage the Check Point firewall management server, the required URL and API Key can be found under the menu “Settings” > “API & Smart Console”. See the screenshot below for reference.

Connecting the Adapter in Axonius
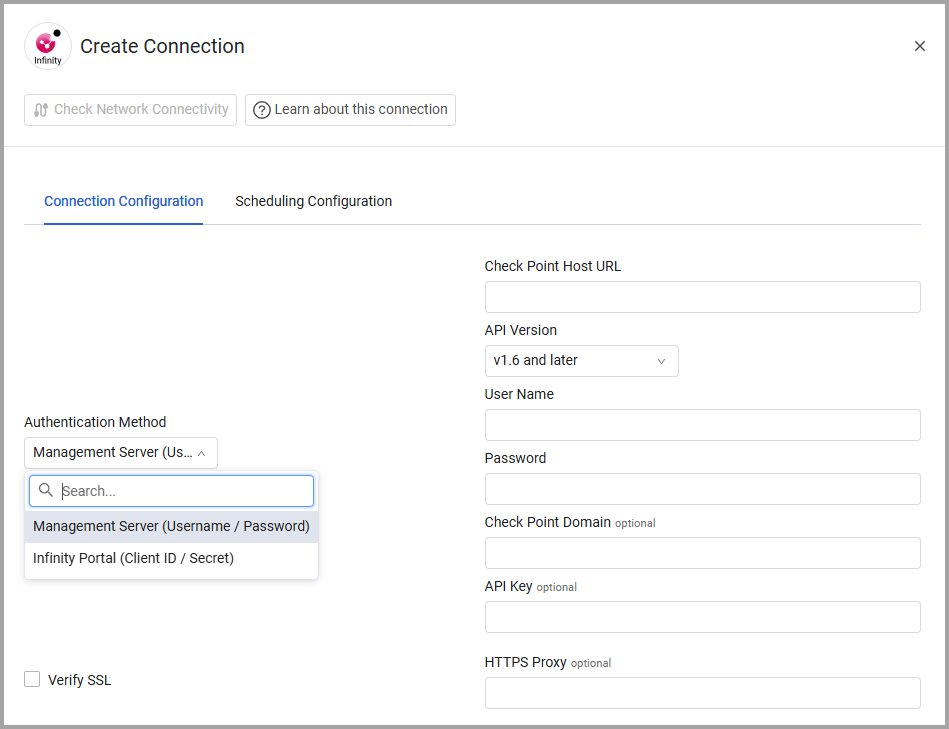
To connect the adapter in Axonius, provide the following parameters:
Required Parameters
- Check Point Host URL - The hostname of the Check Point Infinity server.
Note
When the Check Point Host URL is a managed server, you need to set the full login URL and use API Key instead of User Name and Password. For more information, see Finding the Management API Key and the Management Server URL in the Check Point Infinity Portal.
- User Name and Password - The credentials for a user account that has Read-only permissions to fetch assets.
- API Version (default: v1.6 and later) - Select the API Version to use, either v1.5 or earlier or v1.6 and later. Refer to Check Point Management API Reference.

Optional Parameters
- API Key - An API Key associated with a user account that has permissions to fetch assets.
- Check Point Domain - An optional domain to connect within the Check Point Infinity server. Use a Multi-Domain Server (MDS) in order to also fetch administrator users. “System Data” is the default MDS domain name.
- Verify SSL - Select whether to verify the SSL certificate of the server against the CA database inside of Axonius. For more details, see SSL Trust & CA Settings.
- HTTPS Proxy - Connect the adapter to a proxy instead of directly connecting it to the domain.
To learn more about common adapter connection parameters and buttons, see Adding a New Adapter Connection.
Advanced Settings
Note
Advanced settings can either apply to all connections for this adapter, or to a specific connection. Refer to Advanced Configuration for Adapters.
- Calculate Last Seen from creation/modification date (optional) - Select whether to calculate Last Seen based on the Last Modified Date or Creation Date.
- Compare devices to "Unused Objects" database (optional) - When selected, assets that match a record in the Unused Objects database by their UID receive a new Detected as Unused Object field set to Yes in the Query Wizard; assets that don't match any such records are set to No in the Query Wizard.
- Exclude devices that match "Unused Objects" (optional) - When selected, regardless of the Compare devices to "Unused Objects" database parameter, assets that match a record in the Unused Objects database are excluded from the fetch, and aren't added to Axonius.
- Use System Data Domain for Users fetch. - Select this option to switch the authentication/login context so the fetch is done on global/MDS-level users, instead of domain-level ones.
- Create Devices from Smart Mgmt logs (optional) - Select to create devices from Smart Management API logs.
- Extended NAT Handling for device enrichment - Select this option to match host objects against the NAT rulebase to anticipate additional IP addresses for those objects.
- Add IPs from NAT policy as device interfaces - Select this option to add IP addresses from the NAT policy as devices interfaces.
- Extend NAT Rules as connected devices - Select this option to parse the NAT rules as connected devices for the Checkpoint Device Asset.
- Policy Packages for Extended NAT handling (All when empty) - Enter policy packages to use for extended NAT handling.
- Match NAT rules on original columns (default: Original Source or Destination) - Select how to match the NAT rules on original columns.
- Match NAT rule method - Select this option to match the NAT rule method.
- Internal CIDR blocks (optional, default: 10.0.0.0/8, 172.16.0.0/12, 192.168.0.0/16) - Enter the internal CIDR blocks that you want to fetch from.
- Log search timeframe (optional, default: last-hour) - Filter search results of logs by the specified timeframe. The Smart Management log API can return a maximum of 1 million records.
- Log search criteria (optional, default: blade:"Firewall") - Filter search results of logs by specific types of devices and products.
- Fetch Threat Protection data - Enable this to fetch all threat prevention policies and threat protection signatures, and enrich gateway devices with CVEs that are protected by their assigned threat prevention profiles.
Note
To learn more about Adapter Configuration tab advanced settings, see Adapter Advanced Settings.
Related Enforcement Actions
Checkpoint Infinity - Tag Devices that are Publicly Exposed by a FW/NAT Rule
Updated 5 days ago
