
Setting Page Columns Display
Your system includes predefined columns for each Assets table, as well as the Adapter Connections and Adapter Fetch History pages. You can change those default displays and customize which columns appear on each page in which order. When you export tables to CSV files, the column order in the exported file matches the table display order.
Each Assets page maintains its own column configuration, displaying only columns relevant to that specific asset type.
You can save columns in sets of Views that you can load as required. See Saved Views for more information.
Setting Page Columns Display
Note
Applies to Assets tables, Adapter Connections page and Adapters Fetch History page.
You can set the columns displayed on the page, change their order, or pin specific columns so that they are not scrolled.
To change the displayed columns:
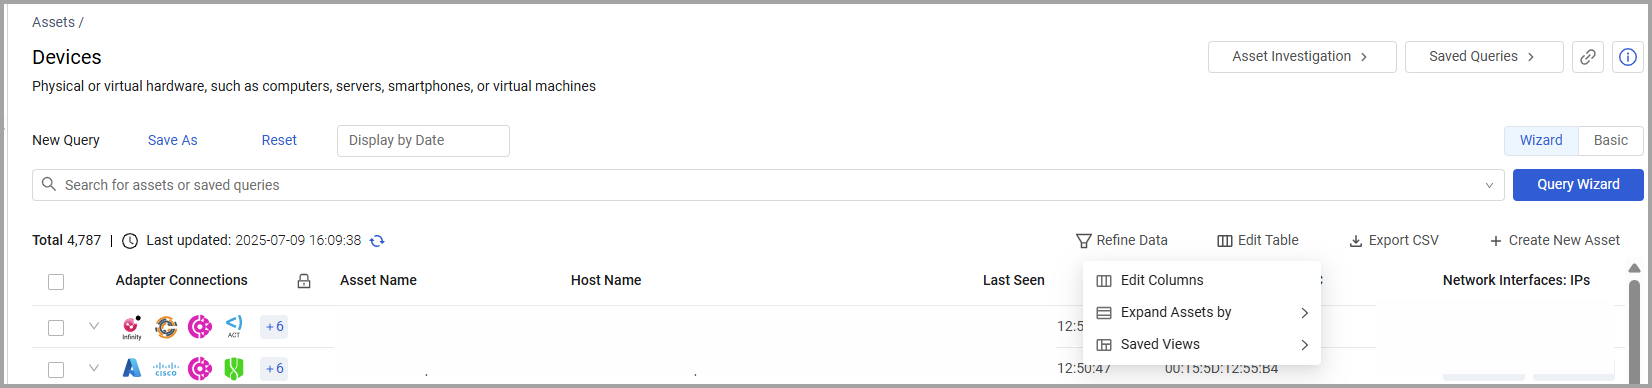
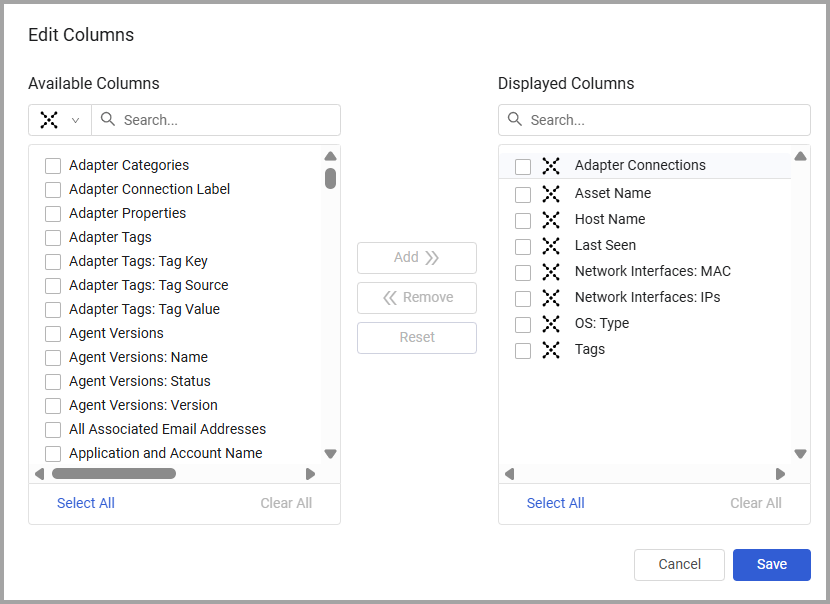
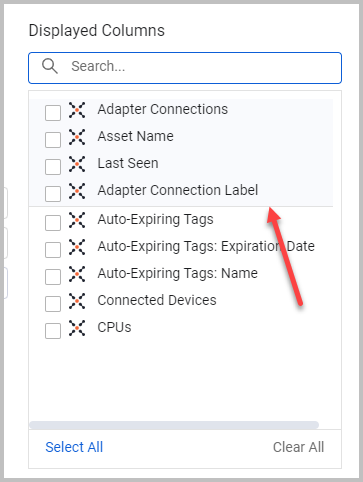
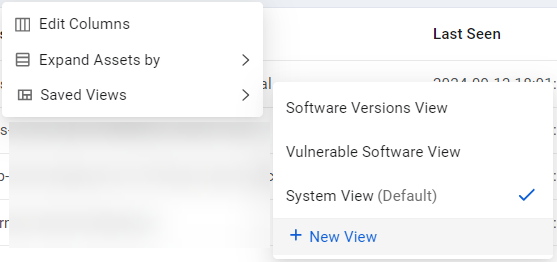
- Click Edit Table, then select Edit Columns from the dropdown menu.
-
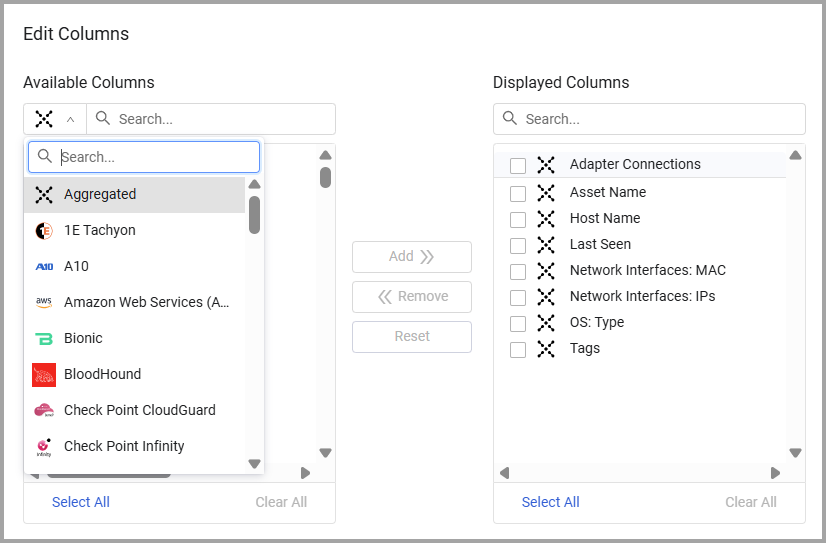
In the Available Columns pane, select an adapter from the dropdown menu to view its available columns. (This step applies to Assets pages only.)
-
To add columns to the page, select the required columns in the Available Columns list and then click Add. Columns available depend on the adapter you select. Note that Custom Data is also an option in the adapter list.
Note
It is not recommended to add more than 50 columns to a table, as this may affect optimal table behavior.
- To remove columns from the page, select the required columns in the Displayed Columns list and click Remove.
- To change the order in which the columns appear, move them up or down in the Displayed Columns pane.
- To cancel any changes that you made to the column display and return to the default view, click Reset.
- Click Save when you finish your configuration. To save a view as your default view, see Saved Views.
To return to your default column view and clear all filters, click Reset above the search bar.
Note
On Assets pages, you can save queries with the columns in the Displayed Columns pane even when no query expression has been defined. Then, you can load these saved queries and use them as a template for building new saved queries that include the predefined columns and column filters.
Changing the Order Columns are Displayed
You can change the order of columns in tables in the system directly from the table. Drag and drop columns on the table to arrange them in the order you want. Use Edit Columns to save your changes.
Pinning the Columns Displayed
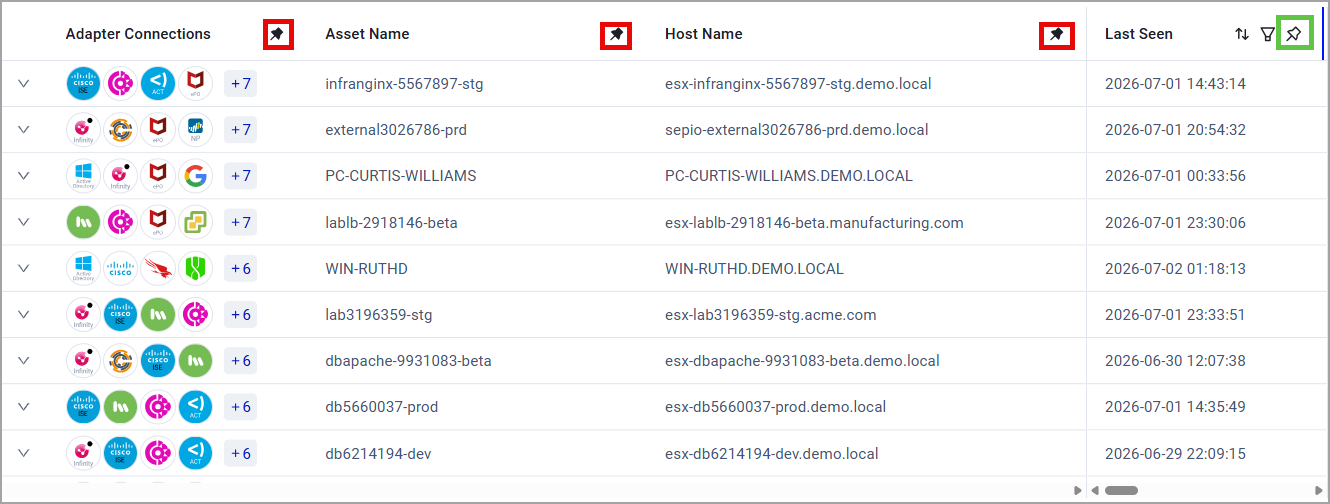
Pin columns so you can scroll horizontally while the pinned columns are always visible. A pinned column has a black pin icon in its header; an unpinned column has a white pin icon. By default, on Assets pages, the Adapter Connections column is always displayed (pinned) when you scroll horizontally.
To pin columns from an Assets/Adapter Connections/Fetch History page, hover over a column heading and click on the pin icon.
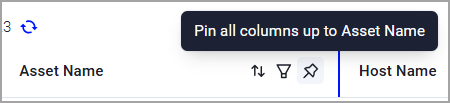
All the columns up to and including the selected column are pinned (black pin icon). In the following example, we pinned all columns up to Host Name - see the difference between the pinned headers (circled in red) and the unpinned headers (circled in green):
You can also pin the column display using the Edit Columns dialog. Any pinned columns are displayed at the top of the Displayed Columns pane, in a shaded area.
-
Click Edit Table, then select Edit Columns from the dropdown menu.
-
Drag the field you want to set to pin near to the top of the Displayed Column pane.
-
Hover over the column name to see the pin icon next to it.
-
Click the icon to set the column name to be pinned. This column and all columns above it are then pinned.
-
Click Apply.
On Assets pages, the system informs you if you choose too many columns to properly display the Assets table, the system informs. In that case, either change your screen resolution or select fewer columns.
To unpin a column, drag the column header out of the pinned (shaded) area, or click the pin icon again to unpin this column and all columns below it.
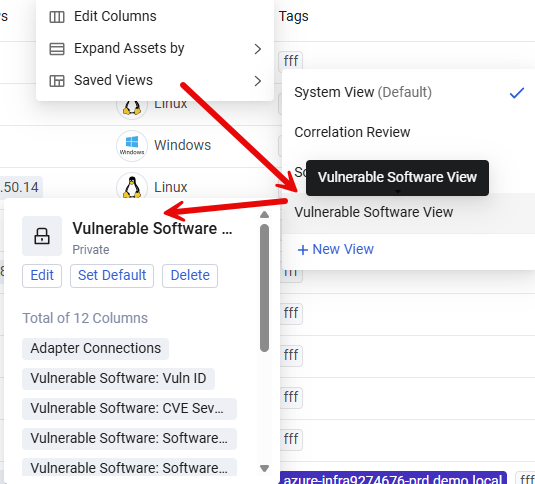
Saved Views
Note
Applies to Assets tables, Adapter Connections page and Adapters Fetch History page.
Views are column arrangements displayed in tables. Use Saved Views to create views tailored to specific use cases or your workflow preferences.
Use Views to define and save column arrangements. You can:
- Create a collection of Saved Views for Assets table and Adapter table columns and switch between them according to your needs.
- Display fields most relevant to your current task.
- Define different view sets for each asset type or Adapter Connection/Fetch History page.
Each user can create their own set of Views, however, users cannot share a view.
Creating a View
To create a view:
-
Select Edit Table.
-
From Saved Views, select + New View.
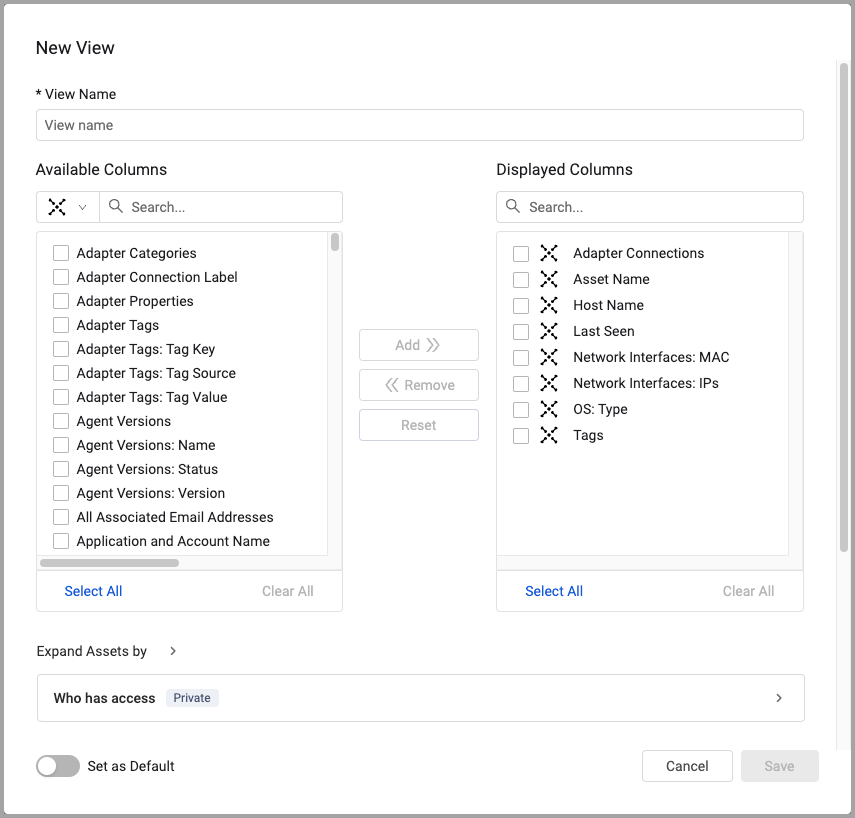
-
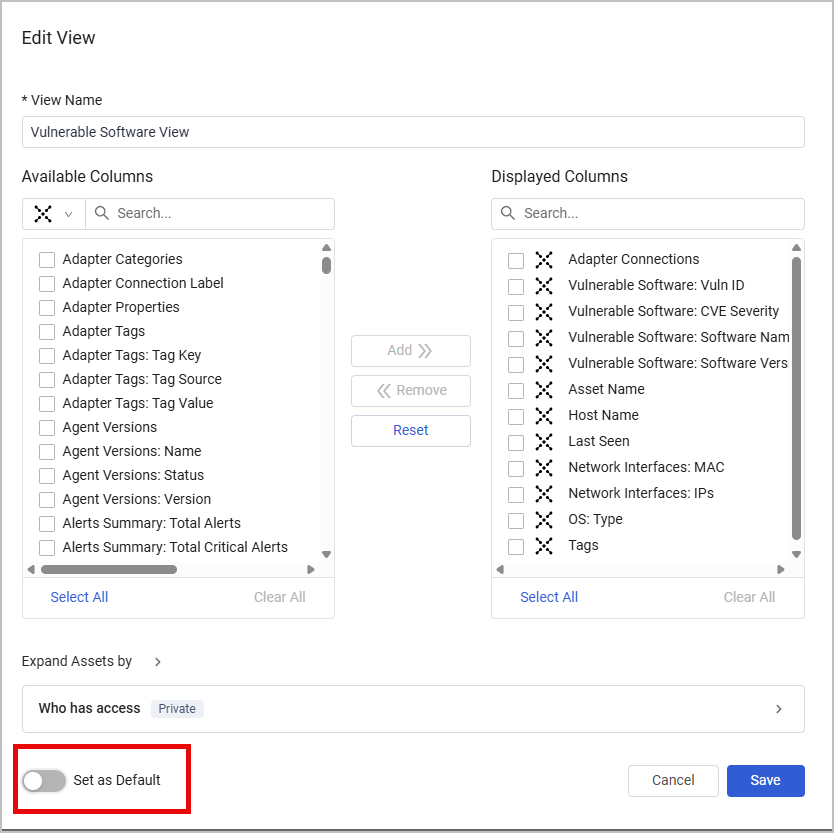
The New View dialog opens. Enter a name for your view. You can only save the view after naming it.
-
Select columns from the Available Columns pane, then click Add to move them to the Displayed Columns pane.
Note
While there is no technical limitation on the number of columns you can add to a table, It is not recommended to add more than 50 columns, as this may affect optimal table display and behavior.
- To remove columns from the Displayed Columns pane, select them and click Remove. Note that the columns available change according to the adapter you select. For more information, see Setting Page Column Display.
- To change the column display order, drag the columns up and down to change. To make this the default view, enable Set as Default.
- Under Expand Assets by, select whether to expand rows in the view by a complex field. See Expanding Assets by a Complex Field for more information.
- Under Access, define which user roles can access this view. See Sharing a Saved View for more information.
- Save the View.
After you save the view, the system notifies you and loads the new view. On each Assets page, you can select a view and set it as default.
Note
The view is only saved to the Asset Type/Adapter table it was created from.
Loading a View
-
From Edit Table, hover over Saved Views. All available views for this asset/adapter table are listed.
-
Select the view you want to load.
The System View contains the default columns that Axonius provides for each asset type. You can set any view as your personal default. Once set, your default view loads automatically each time you open that specific table.
Editing a View
-
From Edit Table, hover over Saved Views.
-
Hover over the relevant view. A popup displaying the view's details appears. Click Edit.
-
Edit the view as required, then click Save to load the edited view.
Editing the System View (Admins Only)
Admins can also edit the default System View (but not rename it). This creates a new System View for all users.
Sharing a Saved View
You can share a saved view by managing access to selected roles. See Managing Roles for more information about assigning permissions to roles at the system level.
Notes
Only users with the Manage saved views permission can share views. This section is not available to users without this permission.
Users with the Manage saved views permission who are not admins can share views but cannot modify role permissions. Only admins can edit role permissions.
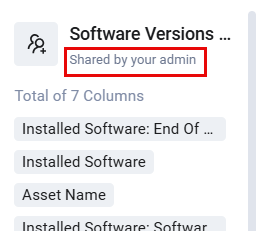
When you hover over a view, you can see an indication whether it is shared by your admin or shared by you with others. Unshared views are listed as Private.
To share a saved view:
- Hover over the relevant view and click Edit.
- Scroll to the bottom of the Edit View dialog and expand Who has access.
- Under Who has access, configure the access privileges for the saved view.
- Save your changes.
Deleting a View
Note
You can only delete private views. You can't delete views shared by your admin.
Hover over the relevant view and click Delete. The system asks you to confirm before deleting the view.
- If you delete your default view, the System View becomes the new default for that Assets page. The System View cannot be deleted.
- After deleting a view, the current column view continues to be displayed, but this arrangement is no longer saved as a view.
Making a View the Default View
The system includes a default System View for each table. You can set any view as your personal default. That default view displays automatically when you open an asset/adapter table, and you can set different defaults for each table type.
To set a view as default, hover over the relevant view and click Set Default. You can also do this from the Edit View dialog.
Additional Predefined Views
Axonius supplies various column arrangements for search for specific parameters for Assets pages. These include:
- System search (Host Name) (Default)
- System search (Last Used Users) (Default)
- System search (IP Address) (Default)
- System search (Installed Software Name) (Default)
See System Search Default to set the columns to be displayed in system searches. For more information, see Free Text Search in Table.
Refining the Data Displayed in Table Columns and Rows
Note
For Assets tables only.
Use complex expressions to refine the display in Assets table so you can zoom in on the information that interests you the most. The following types of data refinement are available:
- Refine display by field value
- Refine field values by adapter connection
- Refine asset entities by field value
- Refine asset entities by adapter connection
Data refinement does not impact the 'count' of the results, only the results that are displayed.
To open the Refine Data Display dialog, click the .png) icon on the right of each column header.
icon on the right of each column header.
Configuring data refinement does the following:
-
Sets the columns and rows displayed in the queries that you create.
-
Sets the display of CSV exports, including reports or Enforcement Actions that export data as CSV files.
Refining Display by Field Value
Use complex expressions to create sophisticated filters to:
- Refine the display.
- Search for specific values to be displayed in each table column on the page, including multi-field columns.
Open the Refine display by field value pane, which acts as a sophisticated column filter.

Each row in the Field values - refine by condition pane is a filter expression that consists of the following elements:
-
AND / OR switch
-
NOT Flag
-
Field dropdown
-
Operator dropdown
-
Value field
-
Parentheses controls
See Creating Queries with the Query Wizard for more information on each element and how to define it.
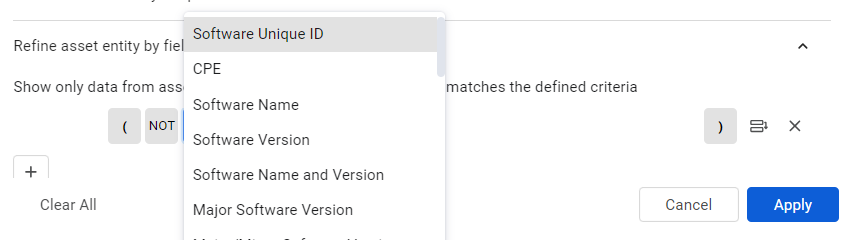
The Field Name drop-down shows the column on which you are filtering. The options available depend on the field type: if this is a complex field, all values that are part of the complex field are displayed and you can select the field to filter by.
For example, If you filter on the Installed Software complex field, the field dropdown contains the following range of possible values to filter by:

Axonius displays only values that match the complete filter.
Refining Field Values by Adapter Connection
Configure the system to hide or show values from specific adapter connections in a selected column. Only values from the included adapters will be displayed in that column.
- Open the Refine field values by adapter connection pane.
- From the dropdown menu, select whether to include or exclude values.
- In the adapters list, start typing to search for a specific adapter or connection name, then select the adapter or connection that you want to exclude or include values from.
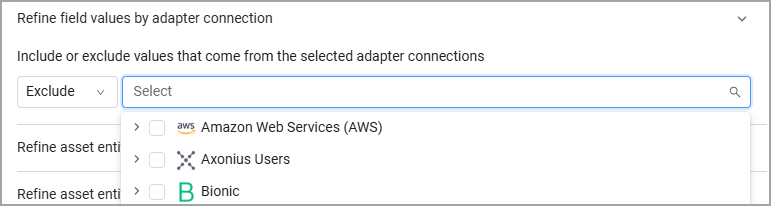
- Mark the adapter to select all its connections or specific connections, or click Select All to select all adapters and connections.
- To undo your selections, click Clear All.
Refining Asset Entities by Field Value
Use Refine asset entities by field value to refine the contents of the asset entity that are displayed according to the rows.
For example, you can hide a row, an asset entity, which contains a Software Version with a specific value.
- Open the Refine asset entities by field value pane.
- Create a filter as explained in Refining Display by Field Value.
Refining Asset Entities by Adapter Connection
Use Refine asset entities by adapter connection to hide or show asset entities from specific adapter connections. You can hide or show a row (an asset entity) if it comes from a specific adapter or adapter connection. An asset without any asset entities might be completely hidden or shown.
- Open the Refine asset entities by adapter connection pane.
- Create a filter as explained in Refining Field Values by Adapter Connection.

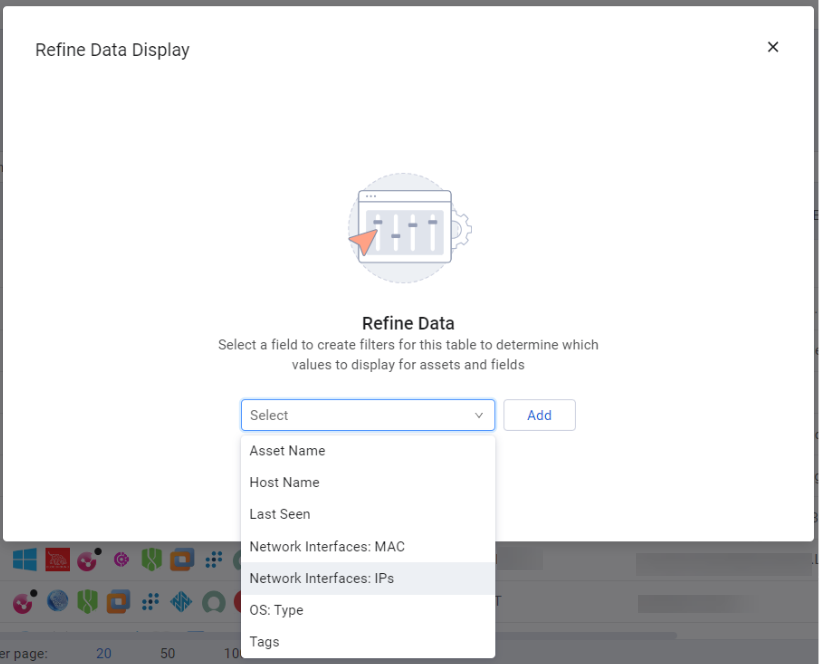
Refining Data for the Entire Table
Instead of refining data for each field separately, you can manage data refinement for all table columns in a single dialog. Note that you cannot refine data for only parts of the table - you can select either one row or all rows.
- Click Refine Data (next to Edit Table button).

- If no fields to be refined were selected yet, select a field. You can only select fields that are currently included in the table. Next, click Add.
- Select a data refinement method and set the required filters, as explained in previous sections.
- To refine data for another field, click
+and select a field. It appears as a new tab in the Refine Data Display dialog.
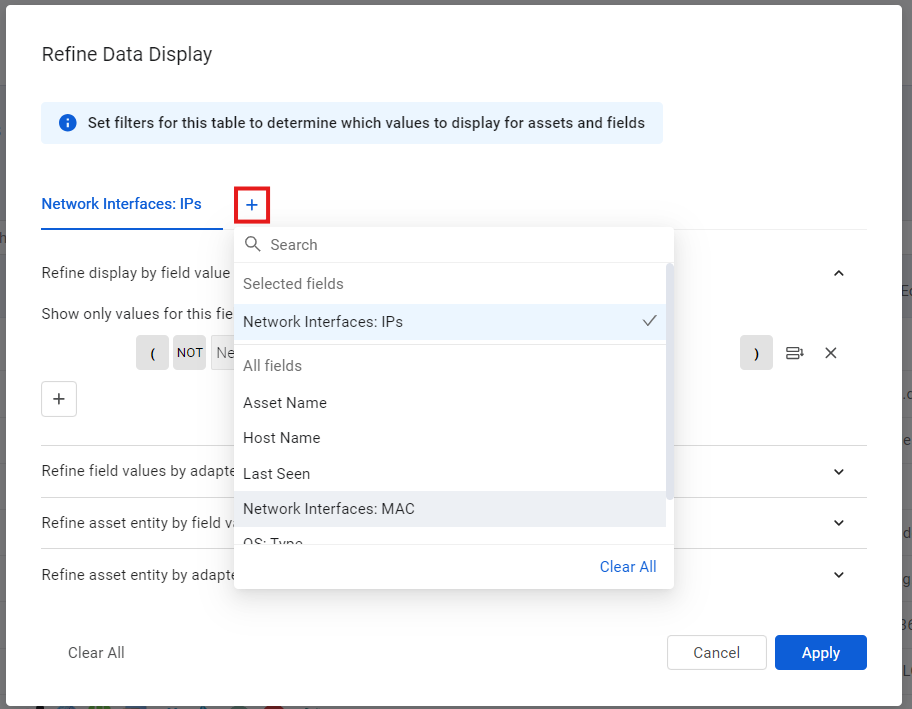
- Select Apply to save your changes.
- Click X next to the field's tab to remove it.

You can open the general Refine Data dialog at any time to see all the refinements defined for this table.