
Axonius - Add Custom Data to Assets
Axonius - Add Custom Data to Assets does either of the following for assets returned by the selected query or assets selected on the relevant asset page:
- Add a custom field (name and value) to the assets.
- Add or replace a value of a custom field or Axonius field that already exists on the assets.
Once added, you can use the custom field in future queries.
Learn more about Custom Data.
See Creating Enforcement Sets to learn more about adding Enforcement Actions to Enforcement Sets.
Note
- Not all asset types are supported for all Enforcement Actions.
- See Actions supported for Activity Logs, Adapters Fetch History, and Asset Investigation modules.
- See Actions supported for Aggregated Security Findings.
- See Actions supported for Software.
Required Fields
These fields are required to run the Enforcement Set.
- Action name - The name of this Enforcement Action. The system sets a default name. You can change the name.
- Configure Dynamic Values (optional) - Toggle on to enter a Dynamic Value statement. See Creating Enforcement Action Dynamic Value Statements to learn more about Dynamic Value statement syntax.
Note
When this action pulls an Axonius Integer field and performs calculations on it, it sends the result to the new Custom String Field as a Float value and does not convert it back to an Integer value. For example, when a user creates a custom enrichment job to add 3 to an Axonius Integer field (435), the action sends 438.0 to a Custom String Field instead of converting it to 438 (an Integer). To bypass this conversion, it is recommended to create a Dynamic Value Statement where you apply the to_int function on the Integer field. This ensures that a number in Integer format is sent to the Custom String Field.
- Add custom data to - Select whether to add custom data to an Asset Field or a Complex Object Field.
- When you select Asset Field, the following field is required:
- Field name - Here you can either create a new custom field, or select a predefined custom field or Axonius field. If the predefined field already exists on the asset, you can replace its value or add to its values.
- When you select Complex Object Field, the following fields are required:
- Complex object field name - Select the complex object field to which the custom field will be added. The options are either Security Findings Instances or Installed Software. Complex object fields are fields that can be presented in a table view, where the columns in the table are asset fields ("nested" fields). For example, the Open Ports complex object field is a table that contains columns (asset fields) such as Port Number and Protocol. The custom field you define will be added to the table as an asset field. For more information, see Asset Profile Page - Complex Fields.
- Field name - See explanation above.
- When you select Asset Field, the following field is required:
The following sections describe how to fill in the Field Name field. This applies to both Asset Fields and Complex Object Fields. For additional information on custom Complex Object Fields and possible use cases, see Adding Custom Complex Object Fields.
Adding a New Custom Field
To create a custom field to add to the asset
- Type a new field name and then click + New Field Name.
Note
Custom field names support special characters (i.e., not alphabetic or numeric characters). However, the system does not support giving a custom field a name identical to that of an already existing custom field apart from special characters. For example: If CustomField*1 is a defined custom field, you cannot name a new custom field CustomField$1 or CustomField#1.
- From the Field type dropdown, select one of the following:
- Single Value - Creates a single-value field.
- Multiple Values - Creates a list field.
- From the Value type dropdown, select a value type according to the field type that you selected in the previous step. The value types are:
- String - Contains letters, numbers, special symbols (such as % or #), or any other printable character.
- Date - Learn about Adding Dates
- Float - Any number with a decimal point.
- Integer -Any number without a decimal point.
- Boolean - Contains a value that is either True or False. Available only for Single Value fields.
- Type a value into the Field value box.
- When the Field type is Single Value, type a value.
- For a String, Float, or Integer value type, in the Field value box, type a free-text value for the custom field.
- For a Boolean value type, from the Field value (True/False) dropdown, select either Yes or No.
- For a Date value type, select the current date or a specific date. Learn more about Adding Dates.
- When the Field type is Multiple Values, in the Field Value box, type a list of field values.
- For a String, Float, or Integer value type, in the Field value (list [field type]) box, type a value, and then press Enter, comma, or semicolon to add it to the list. You can also paste a comma separated list into the field. To learn more, see Adding a List String below.
- For a Date value type, in the Field Value (list date) box, select the current date or specific dates. Learn more about Adding Dates.
- The Append values if field exists (list [field type]) checkbox becomes available. When enabled, if the Multiple Value field already exists on the asset, the field values entered in this Enforcement Action are added to the existing values on the asset field. Otherwise, the entered field values overwrite the existing field values.
- When the Field type is Single Value, type a value.
Adding a Predefined Field
To select a predefined custom field or Axonius field
- From the Field name dropdown,filter the list of fields, to select a custom field or an Axonius field that is already defined in the system. Either add this field to each asset, or, if it already exists on the asset, add values to it or replace its values.
- The Field type and Value type are automatically filled in according to the custom field configuration.
- To add or replace values from this field, follow step 4 as explained in Creating a New Custom Field.
Adding Dates
You can add a Date custom field to assets. This can be useful to identify the first time an asset was noncompliant.
- For a Single Value date field you can add a single date - the Enforcement Action run time or a different date.
- For a Multiple Values date field you can add the Enforcement Action run time (a single date) or a list of other dates.
Adding a Single Value Date Field
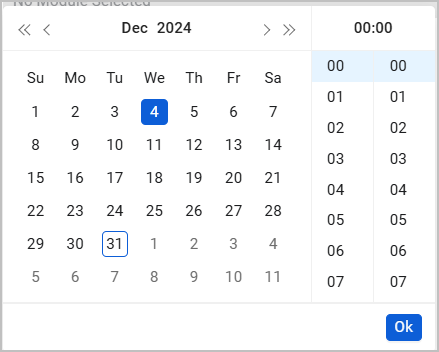
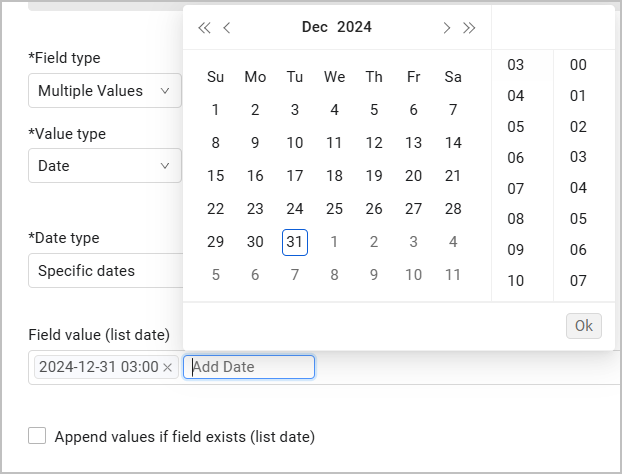
- From the Date type dropdown, select Now (Execution time) or set a Specific date. The times displayed are in UTC.
- Now (Execution time) sets the date to the Enforcement Action run time.
- Specific date can be either in the past or future. This option also contains an exact hour to select. In the Set date box, select a date from the calendar and an hour from the time picker (the default is 00:00), and then click Ok.
- The Do not overwrite If field exists (True/False) checkbox becomes available. When enabled, if the Date field already exists on the asset, the date value entered in this Enforcement Action does not replace the existing date on this field. This can be useful, for instance, if the action added a custom date to show the first time something was found on the system, and you do not want to overwrite this value. Otherwise, if you do not enable this option, the entered date replaces the existing date.
Adding a Multiple Values Date Field
- From the Date type dropdown, select Now (Execution time) or set Specific dates. The times displayed are in UTC.
- Now (Execution time) sets the date to the Enforcement Action run time.
- Specific dates can be either in the past or future. This option also contains exact hours to select. In the Field value (list date) box, click Add Date to select a date and an hour for each list item and then click Ok. Repeat for each date that you want to add.
- The Append values if field exists (list date) checkbox becomes available. See explanation at the end of the Creating a New Custom Field section.
Note
When you create a Dynamic Value Statement for adding a custom date field, ensure to use form.field_date.specific with Date type set to Specific date, as a dynamic date can be written only to this type of Date field. Do not use form.field_date.now or a field with Date type set to Now, as this type of field cannot accept dynamic input and regardless of the statement, its value is always the action runtime.
Adding a List String
To add items to a list string
- Do one of the following
-
Type the name of the field value and press Enter.
-
Type the name of the field value and press Comma (,).
-
Type the name of the field value and press Semicolon (;).
-
For example:
- Type 'Paris' and press Enter. A tile named 'Paris' is added to the list.
- Type 'London' and type a comma ','. A tile named 'London' is added to the list.
- Type 'Montreal' and type a semicolon ';'. A tile named 'Montreal' is added to the list.
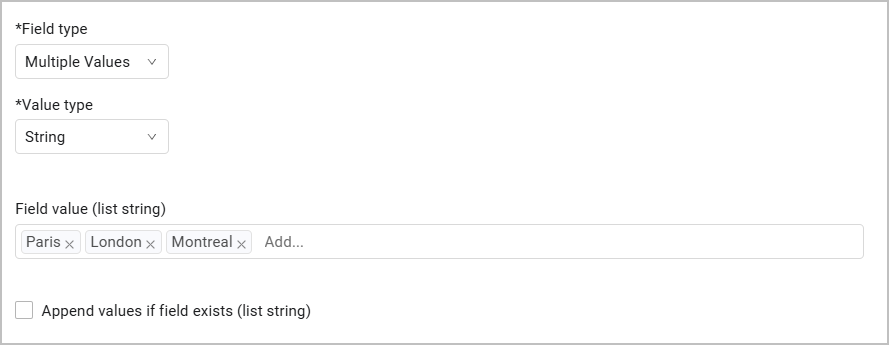
To remove items from the list, click the x in the tile you want to remove.
Adding Custom Complex Object Fields
Complex object fields are fields that can be presented in a table view, containing several asset fields. For example, the Installed Software table lists each software installed on the device, including its version and vendor. Some users might want to add custom data to this table, for example, "Approved VPN Version" (for managing software compliance).
Note
The custom complex object fields supported for this Enforcement Action are Security Findings Instances and Installed Software. Each of these complex fields is only available for specific assets, so their availability depends on the asset type selected in the query.
To add a custom asset field ("nested field") to a complex object field:
-
On the relevant Assets page, create a view containing the table you want to add custom data to.
For example - On the Devices page, apply the Software Versions view, expanded by the Installed Software complex field: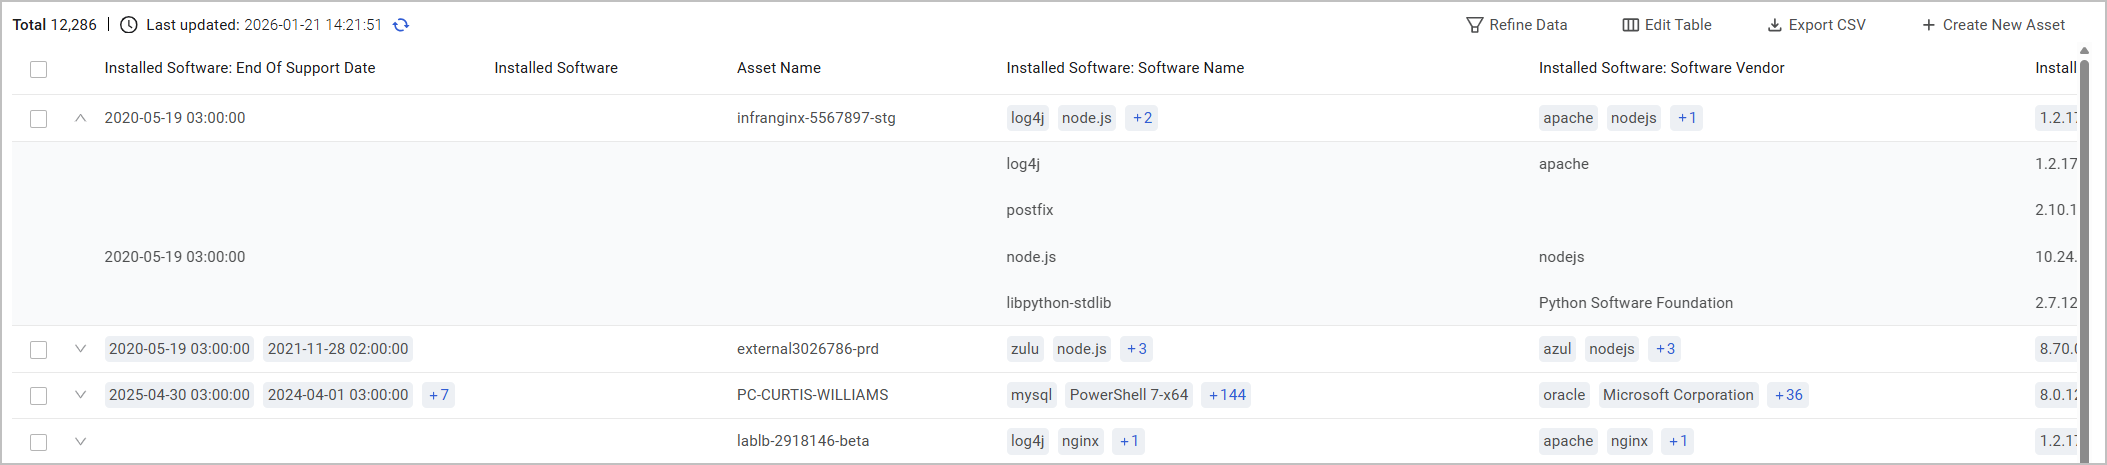
-
From the top of the table, select Save As to create a new saved query.
-
Create a new Add Custom Data to Assets Enforcement Set and select the saved query.
-
Under Required Fields, select to add custom data to a Complex Object Field.
-
Populate the following fields:
- Complex object field name - Select Installed Software or Security Findings.
- Field name - Type a new field name and then click + New Field Name.
- Define the field type, value type and field value, as explained earlier in this page.
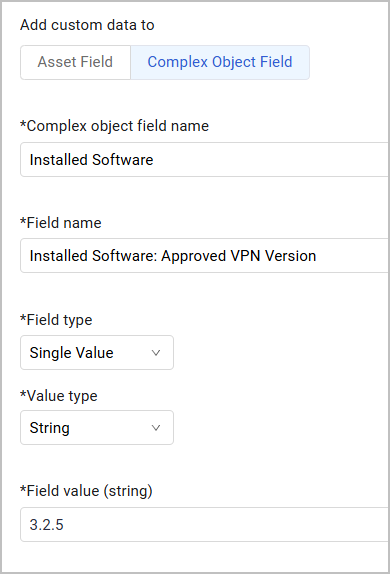
Example:
-
Save and run the Enforcement Set.
-
After the run is complete, from the Run History page, select this Enforcement Set, and click the Affected Assets to view the devices with the updated data.

-
The Devices page opens in a new tab. Select a device to go to its Asset Profile Page. From this page, under Tables, select Installed Software.
-
The new custom field is displayed in the table view.
Note
Custom fields added to complex objects fields are not supported in a view expanded by a complex field, that is, custom data doesn't appear in this view.
Additional Fields
These fields are optional.
-
Remove this custom data field from entities not found in the query results (True/False) - Toggle on this option to remove the custom field from all entities that are not part of the list of assets on which the Enforcement Action ran. Be aware that selecting this option can cause the removal of custom fields added by other users or Enforcement sets.
-
To see a list of the assets, which are not in the query results, view the run history detail and click Additional in the drawer header.

-
When this option is toggled on, the following sub-options appear:
- Remove entire field - Select this option to remove the entire field from entities not in the query results.
- Remove values field - Relevant for Multiple Values fields. Select this option to remove from entities not in the query results, only the field values added to the Multiple Values field (for assets in the query) using this Enforcement Action (these are the field values in Field value (list string) under Required Fields).
-
For more details about other enforcement actions available, see Action Library.
Updated 4 months ago