Cisco Identity Services Engine (ISE)
- 14 Apr 2024
- 5 Minutes to read
- Print
- DarkLight
- PDF
Cisco Identity Services Engine (ISE)
- Updated on 14 Apr 2024
- 5 Minutes to read
- Print
- DarkLight
- PDF
Article Summary
Share feedback
Thanks for sharing your feedback!
The Cisco Identity Services Engine (ISE) adapter connects to the Cisco ISE management interface in order to enable the creation and enforcement of security and access policies for endpoint devices connected to managed routers and switches.
Types of Assets Fetched
This adapter fetches the following types of assets:
- Devices
Parameters
- Cisco ISE Domain (required) - The hostname or IP address of the Cisco ISE server that Axonius can communicate with via the Required Ports.
- Cisco pxGrid Domain (optional) - Set this parameter to connect to a pxgrid domain instead of the regular domain used for ERS. When this parameter is not set, the same ISE domain is used for both pxgrid and ERS APIs.
- User Name and Password (required) - The credentials for a user account that has the Required Permissions to fetch assets.
- Use pxGrid to Fetch Live Sessions -
- If enabled, Axonius will enrich the data collected from Cisco ISE by enabling pxGrid. Using pxGrid requires a plus licence and requires an additional authentication step from pxGrid Services on your Cisco ISE domain. For more details, see Authorize Axonius in pxGrid Services.
- If disabled, Axonius will not enable pxGrid.
- pxGrid Client Certificate / pxGrid Client Private Key / pxGrid Client Private Key Password / pxGrid Client Root CA chain (optional) - Those settings are required for xmpp client with pxgrid 1.0. For details, contact Axonius Support.
Note:
The xmpp client has been deprecated by Cisco. Axonius will continue supporting it, but it is advised to transition to the REST client to fetch pxGrid data.
- Use v1.1 Object Model for ERS API - Select when using either Cisco ISE versions 2.4 or 2.7, or if you receive a “Connection Fails” HTTP 400 error.
Note:
This parameter is only used with the ERS API. It has no effect when using the pxGrid API.
Verify SSL - Select whether to verify the SSL certificate of the server against the CA database inside of Axonius. For more details, see SSL Trust & CA Settings.
HTTPS Proxy (optional) - Connect the adapter to a proxy instead of directly connecting it to the domain.
To learn more about common adapter connection parameters and buttons, see Adding a New Adapter Connection.

Advanced Settings
Note:
Advanced settings can either apply for all connections for this adapter, or you can set different advanced settings and/or different scheduling for a specific connection, refer to Advanced Configuration for Adapters.
- Fetch endpoints -
- If enabled, all connections for this adapter will fetch data from the ISE endpoint.
- If disabled, all connections for this adapter will not fetch data from the ISE endpoint.
- Fail client on pxGrid connection error (required, default: True)- Select to propagate errors originating from the PxGrid connection when Use pxGrid to fetch live sessions is enabled for a client. When this is not set, errors are propagated only when there are errors from both pxGrid and ERS connectivity to a client.
Note:
When configuring the Cisco ISE and you do not want to use the pxGrid fetch to retrieve the data you need to enable Fetch endpoints.
- Skip devices without IP address (required, default false)- Select this option to not fetch devices that do not have an IP address.
- Only include devices that have a name OR an IP address (required, default false) - Select this option to only fetch devices that have either an asset name or an IP address.
- Only include devices that have a name AND an IP address (required, default false) - Select this option to only fetch devices that have both an asset name and an IP address.
Note:
if a Cisco ISE connection has “Fetch endpoints” enabled but ALSO has 'Skip devices without IP address' or 'Only include devices that have a name AND an IP address' enabled then the endpoints data will not be ingested, because endpoints don’t have IP address data.
Note:
To learn more about Adapter Configuration tab advanced settings, see Adapter Advanced Settings.
Required Ports
Axonius must be able to communicate with the value supplied in Cisco ISE Domain via the following ports:
External RESTful Services (ERS) REST API: Older versions of ISE may use TCP/9060, Newer version of ISE use 443, set this in adapter configuration using ise.domain.com:443.
Set the port to that used in your version of ISE.pxGrid Subscribers may need to utilize port 8910.
For more details, see Cisco ISE Ports Reference.
Required Permissions
The value supplied in User Name must have read access to devices.
To create a service account for Axonius with the sufficient permissions for calling the Cisco ISE API, do as follows:
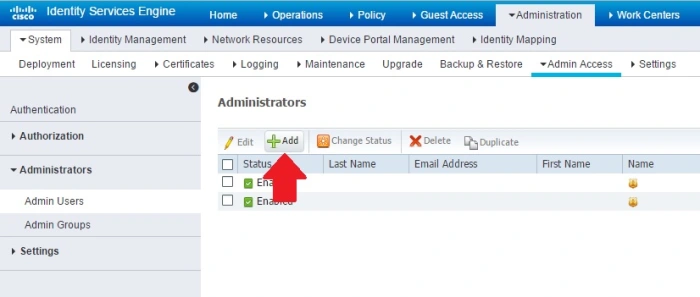
Navigate to Administration > Admin Access > Administrators > Admin Users and click Add.
Assign an access type. Select ReadOnly. You can choose between Read/Write or ReadOnly.
Add the user to one of the following Admin Groups: ERS Admin or ERS Operator.
Enable ERS (External RESTful Services) to allow REST calls. To do this, navigate to Administration > System > Settings > ERS Settings then select Enable ERS for Read/Write under the Primary Administration Node:
 Note:The ERS setting must be enabled after each upgrade as it is reset to "disabled" during each upgrade. If you plan on utilizing this adapter, we recommend adding a note to your Cisco ISE upgrade process documentation that the REST API should be enabled at the end of each upgrade.


Authorize Axonius in pxGrid Services on your Cisco ISE domain
In order to authorize Axonius with the sufficient permissions for using the pxGrid services do as follows:
Enable the Use pxGrid to Fetch Live Sessions checkbox in the Add Connection dialog.
Clicking Save and Fetch will generate an Axonius ID that will follow in an error to authorize the generated ID in the pxGrid System: (Next steps)

Log into the ISE Admin GUI, navigate to Administration > pxGrid Services

If the user you define does not appear in the Cisco UI, you might have to navigate to the “Settings” tab in the Cisco ISE pxGrid Administration settings page and ticki the checkbox labeled “Allow password based account creation“.

Select the Axonius client and click Approve as shown in the image.

Click Save and Fetch to complete the configuration and to establish the connection.


Note:
pxGrid Services should be enabled on your Cisco ISE domain.
Enabling pxGrid Services in Cisco ISE Administration
To enable pxGrid Services in Cisco ISE Administration:
- Log into the ISE Admin GUI, navigate to Administration > Deployment
- Select the ISE node to be used for the pxGrid persona.

- Select pxGrid and click Save.

Note:
For Cisco ISE pxGrid to be enabled you must have a plus license on ISE deployment. For more details, see Configure ISE 2.4 and FMC 6.2.3 pxGrid Integration.
Was this article helpful?